Cloud Inference Application#
Inference Application Development Workflow |
Sample Cloud Inference Application |
|---|---|
|
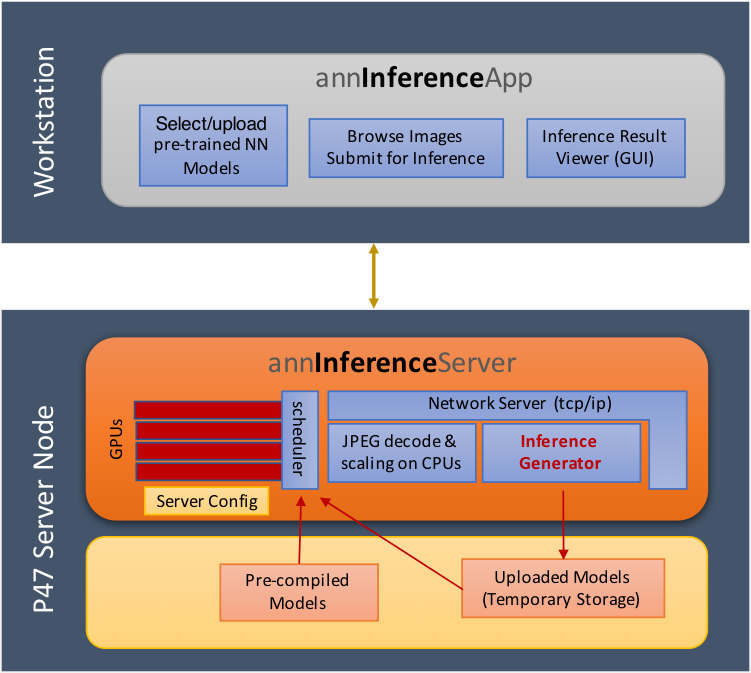
Cloud Inference Engine#
The cloud inference app is designed as a server and a client inference modules, where a single or multiple clients can send the server continuous stream of images for inference. The server module processes the requests of the clients and returns the results of the inference to the client to be displayed. The server and client modules can be launched on the same machine and connected through localhost or launched on different machines and connected over the network.
Inference Server Application - inference_server_app#
The server application is built along with MIVisionX and placed in /opt/rocm/bin when MIVisionX is installed. The server application has a command-line interface.
usage:
 inference_server_app [-p <port> default:26262]
                      [-b <batch size> default:64]
                      [-n <model compiler path> default:/opt/rocm/libexec/mivisionx/model_compiler/python]
                      [-w <server working directory> default:~/]
                      [-t <num cpu decoder threads [2-64]> default:1]
                      [-q <max pending batches>]
                      [-s <local shadow folder full path>]
                      [-gpu <comma separated list of GPUs>]
                      [-fp16 <ON:1 or OFF:0> default:0]
Client Application - client_app#
The client application needs to be built by the user using QT Creator. The client application has a GUI interface to connect with the server.
Running the Cloud Inference#
Step 1 - Launch Inference Server Application - this app is built and installed with the MIVisionX. You can launch the server using the following commands
export PATH=$PATH:/opt/rocm/bin
export LD_LIBRARY_PATH=$LD_LIBRARY_PATH:/opt/rocm/lib
inference_server_app
Expected output
INFO: using OpenCL platform#0 with 1 GPU devices ...
INFO: listening on port 28282 for annInferenceApp connections ...
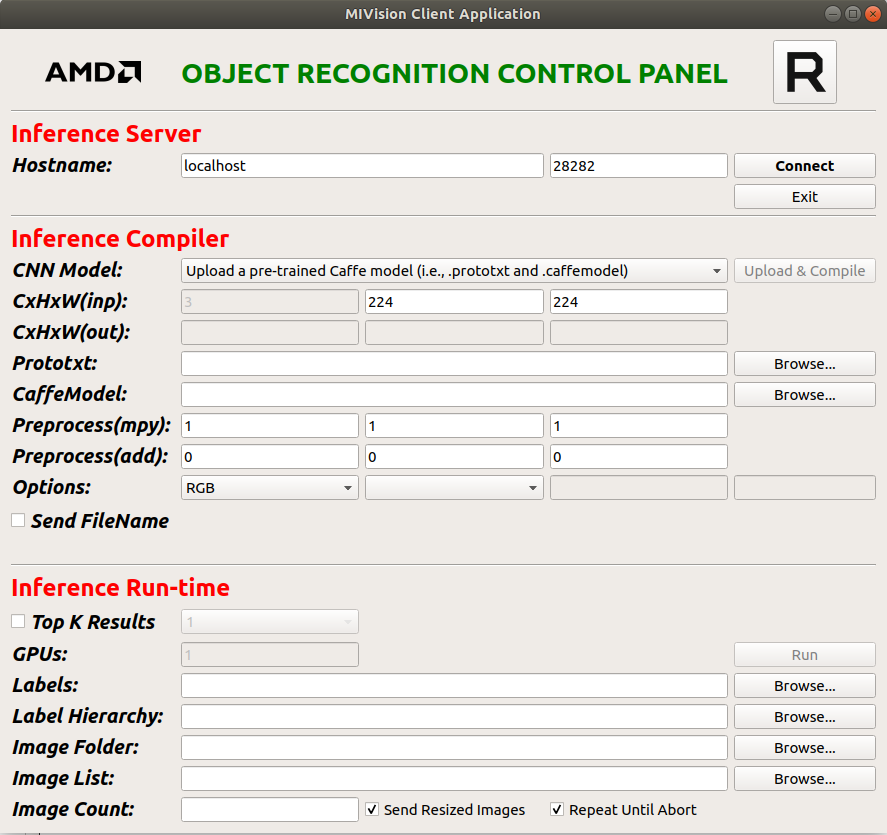
Step 2 - Launch Inference Client Application - The client application needs to be built and launched using QT Creator.
The Client Application is available at MIVisionX/apps/cloud_inference/client_app folder.
Open annInferenceApp.pro with the QTCreator and build the client application. Once the client is built, launch the application. Below is the image of the client application
Step 3 - Connect Server and Client - After launching the server and client applications on the system, you can connect them using the default port. The server and client could also be launched on two different machines.

Step 4 - Upload PreTrained Caffe Model - Once the connection is established, load the caffe model and prototxt to the server using the client application.
The client application section Inference Compiler needs to be completed as shown in the below example.
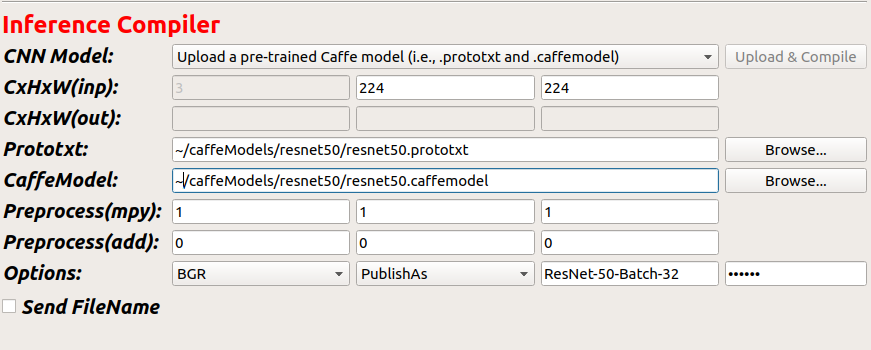
CNN Model: upload or select a published model from the drop-down menu. (User needs to save models on the server using Publishas feature)
CxHxW(input): channels x height x width of model input
Prototxt: give the location of the model .prototxt
CaffeModel: give the location of the pretrained caffe model .caffemodel
Options: BGR/RGB - model trained with RGB or BGR images
Publishas: name_tag for published compiled model
password: Radeon ( To load the models to the server)
Step 5 - Load Image DataBase - Now you can run a simple test inference using the AMD-tinyDataSet provided in this project within the MIVisionX/toolkit/analysis_and_visualization/classification/sample folder.
The client application section Inference Run-time needs the labels.txt, the AMD-tinyDataSet folder location, & AMD-tinyDataSet-val.txt provided in the sampleDataSet folder.
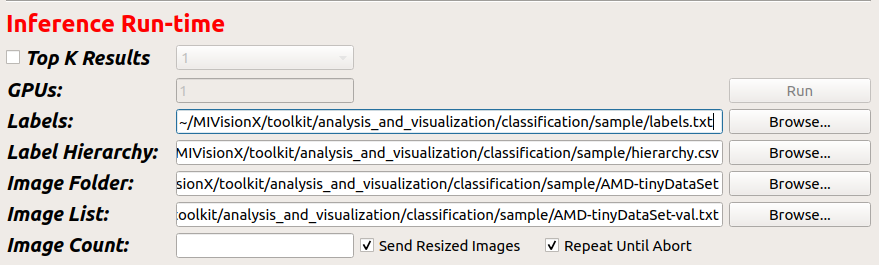
Labels: location to MIVisionX/toolkit/analysis_and_visualization/classification/sample/labels.txt
Image Folder: location to MIVisionX/toolkit/analysis_and_visualization/classification/sample/AMD-tinyDataSet folder
Image List: location to MIVisionX/toolkit/analysis_and_visualization/classification/sample/AMD-tinyDataSet-val.txt (image validation text)
Step 6 - Run Inference - Once all the required fields are completed on the client app the run button will turn green. You can now run the inference.