DeepSeek-R1 with SGLang and example applications#
Author: Mahdi Ghodsi
Knowledge level: Beginner
Throughout this tutorial, you’ll leverage AMD GPUs to deploy the powerful language model DeepSeek-R1-Distill-Qwen-32B. The tutorial covers setting up an AI development environment and explores two main practical applications:
Advanced chatbot: Using Open WebUI to create a sophisticated chatbot with web search and file interaction capabilities.
Code development assistant: Installing and utilizing the AI Toolkit Code extension to perform code analysis and pair programming tasks.
Let’s dive in!
Note: The same steps can be applied to serve DeepSeek-R1(671B) on a single AMD MI300X node. For more information about running this model, see this blog post.
Prerequisites#
This tutorial was developed and tested using the following setup.
Operating system#
Ubuntu 22.04: Ensure your system is running Ubuntu version 22.04.
Hardware#
AMD Instinct™ GPUs: This tutorial was tested on an AMD Instinct MI300X GPU. Ensure you are using an AMD Instinct GPU or compatible hardware with ROCm support and that your system meets the official requirements.
Software#
ROCm 6.2 or 6.3: Install and verify ROCm by following the ROCm install guide. After installation, confirm your setup using:
amd-smi
This command lists your AMD GPUs with relevant details.
Note: For ROCm 6.4 and earlier, use the
rocm-smicommand instead.Docker: Ensure Docker is installed and configured correctly. Follow the Docker installation guide for your operating system.
Note: Ensure the Docker permissions are correctly configured. To configure permissions to allow non-root access, run the following commands:
sudo usermod -aG docker $USER
newgrp docker
Verify Docker is working correctly with:
docker run hello-world
Visual Studio Code: Ensure Visual Studio Code (VS Code) is downloaded. You can download VS Code from the official download page.
Launch Jupyter notebooks#
Install Jupyter using the following command:
pip install jupyter
Start the Jupyter server:
jupyter-lab --ip=0.0.0.0 --port=8888 --no-browser --allow-root
Note: Ensure port 8888 is not already in use on your system before running the above command. If it is, you can specify a different port by replacing --port=8888 with another port number, for example, --port=8890.
Note: The following steps should be executed within your Jupyter notebook after successfully launching the Jupyter server.
Launching the SGLang server on AMD GPUs#
The following command pulls the specified SGLang Docker image, starts the container, and then runs the sglang.launch_server command to initiate the server.
Important: The latest version of the SGLang Docker image tag must be retrieved from their official Docker Hub page.
%%bash
export INFERENCE_PORT=30000
export INFERENCE_MODEL=deepseek-ai/DeepSeek-R1-Distill-Qwen-32B
export CUDA_VISIBLE_DEVICES=0
export DEBUG_HIP_BLOCK_SYNC=1024
export API_KEY="abc-123"
export GPU_FORCE_BLIT_COPY_SIZE=6
export SGLANG_DIMG="lmsysorg/sglang:v0.4.5.post3-rocm630"

docker run -d --rm \
    --ipc=host \
    --privileged \
    --shm-size 16g \
    --device=/dev/kfd \
    --device=/dev/dri \
    --group-add video \
    --cap-add=SYS_PTRACE \
    --cap-add=CAP_SYS_ADMIN \
    --security-opt seccomp=unconfined \
    --security-opt apparmor=unconfined \
    --env "HIP_VISIBLE_DEVICES=$CUDA_VISIBLE_DEVICES" \
    -p 3000:3000 \
    -v ~/.cache/huggingface:/root/.cache/huggingface \
    --name sglang_server "lmsysorg/sglang:v0.4.5.post3-rocm630" \
    python3 -m sglang.launch_server \
    --model deepseek-ai/DeepSeek-R1-Distill-Qwen-32B \
    --port 3000 \
    --trust-remote-code \
    --disable-radix-cache \
    --host 0.0.0.0 \
    --api-key "abc-123"
Note: Select an appropriate port number that is open to the public. Ensure the network and firewall settings allow connections to your server via the selected port number.
Verify that the model is loaded and the server is launched successfully. The following script is designed to continuously check until either the server is ready or the command times out.
Note: Downloading and loading the model can take several minutes.
import os, time, requests, sys, subprocess

# ---------- tweakables ------------------------------------------------------
PORT          = int(os.getenv("INFERENCE_PORT", 30000))
URL           = f"http://localhost:{PORT}/health_generate"
HEADERS       = {"Authorization": f"Bearer {os.getenv('API_KEY', 'abc-123')}"}

SLEEP         = 30          # seconds between polls
TIMEOUT       = 20 * 60     # give up after 20 min  (0 ⇢ wait forever)
CONTAINER_NAME = "sglang_server"   # <-- the one you used in docker run
# ---------------------------------------------------------------------------

def dump_logs(container, lines=100):
    """Print the last *lines* of docker logs for *container*."""
    try:
        result = subprocess.run(
            ["docker", "logs", "--tail", str(lines), container],
            stdout=subprocess.PIPE,
            stderr=subprocess.STDOUT,
            text=True,
            check=False,
        )
        print("\n--- docker logs (tail) -----------------------------")
        print(result.stdout or "(no output)")
        print("--- end docker logs --------------------------------\n")
    except FileNotFoundError:
        print("\n Docker CLI not found—cannot show logs\n")

start = time.time()
print(f"Polling {URL} every {SLEEP}s (timeout: {TIMEOUT or '∞'} s)…")

while True:
    elapsed = time.time() - start

    # --- timeout handling ----------------------------------------------------
    if TIMEOUT and elapsed >= TIMEOUT:
        print(f"\n Timeout: model didn’t load within {TIMEOUT/60:.1f} min")
        dump_logs(CONTAINER_NAME)
        sys.exit(1)

    try:
        if requests.get(URL, headers=HEADERS, timeout=10).ok:
            print(f"\n✅  Model is ready! Total load time: {elapsed:.1f}s")
            break
        else:
            status = "server up, model still loading"
    except requests.exceptions.RequestException:
        status = "server not responding yet"

    print(f"[{elapsed:5.0f}s] {status}. Retrying in {SLEEP}s …")
    time.sleep(SLEEP)
Upon a successful launch, your server should be accepting incoming traffic through an OpenAI-compatible API. Retrieve the public IP address of your server:
!curl ifconfig.me
Now you can resume the rest of this tutorial on your own local device. Verify the endpoint is reachable by executing the following from your local device using the IP address from the previous cell. The value of PORT_NUMBER was set to INFERENCE_PORT when you executed the SGLang server cell.
!curl http://YOUR_SERVER_PUBLIC_IP:PORT_NUMBER/v1/models -H "Authorization: Bearer abc-123"
Advanced chatbot with OpenWebUI#
Note: The rest of this tutorial is designed to be executed on your own local device.
Follow the installation instructions from the Open WebUI GitHub repository.
After installation, configure your endpoint URL in the Open WebUI client as follows:
Navigate to
Settingsas shown in the image below: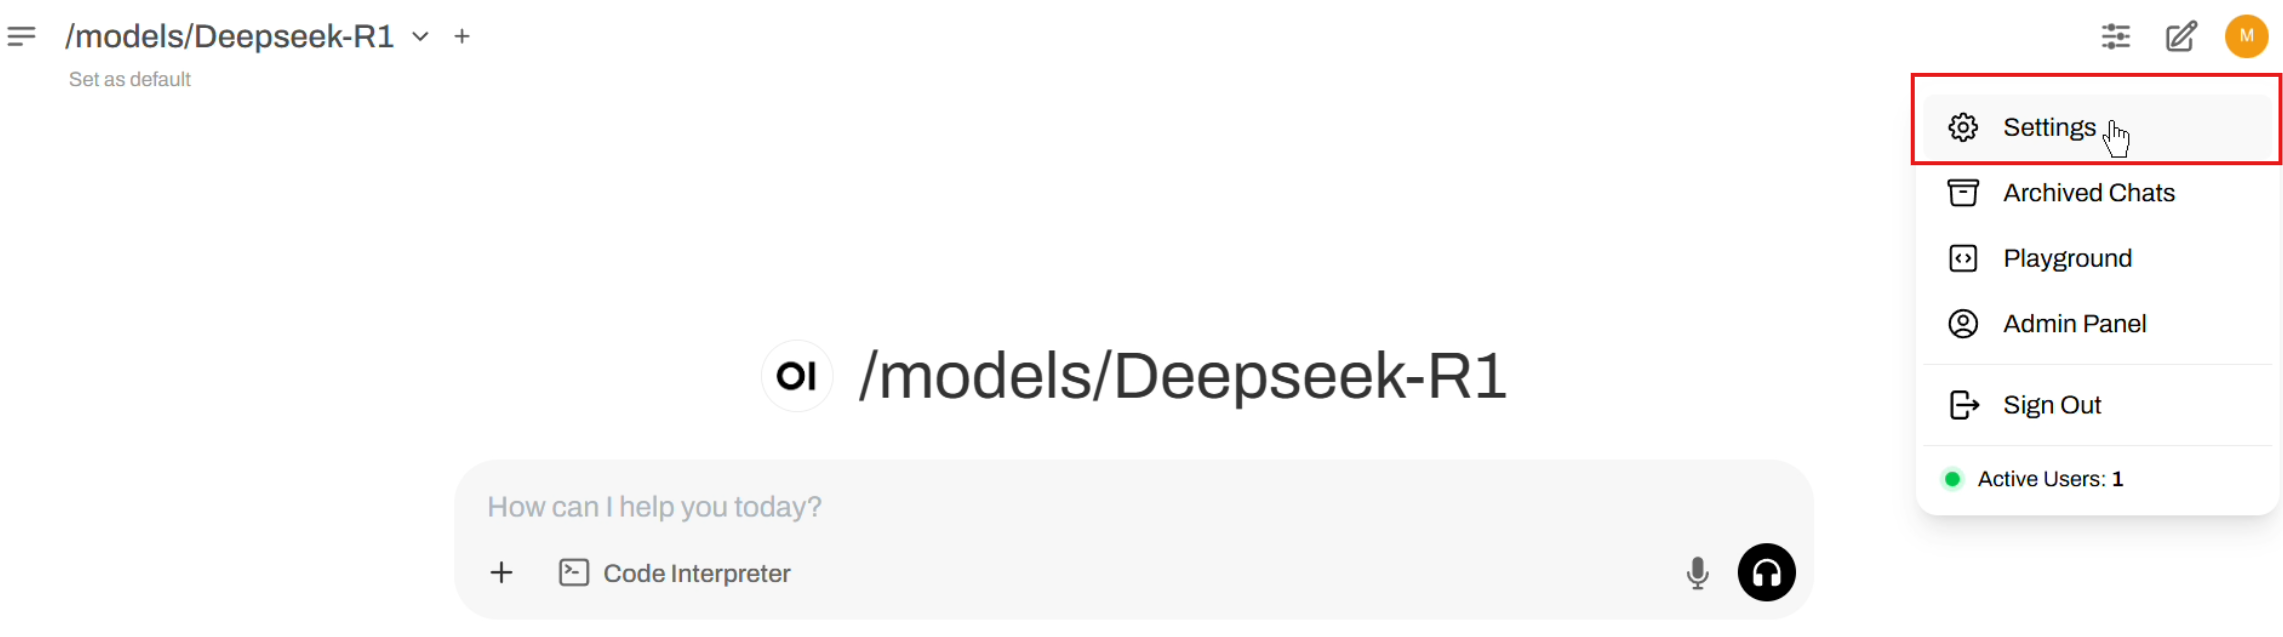
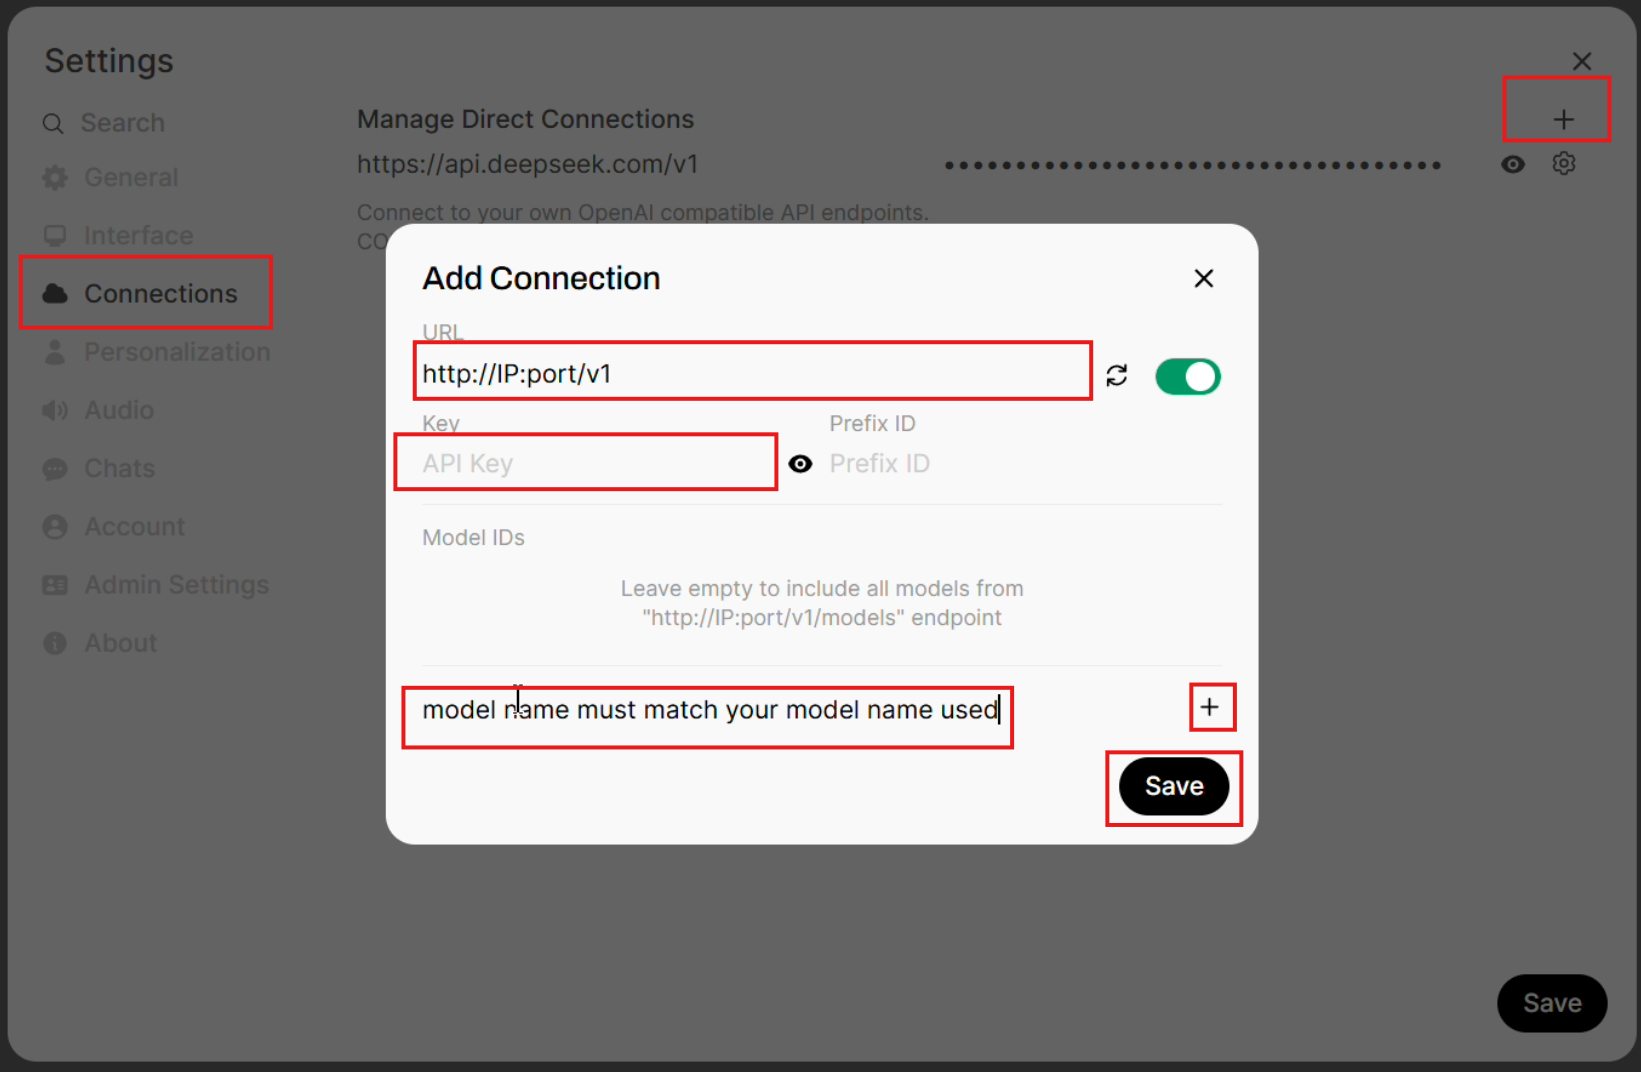
Select
Connectionsfrom the left tab.Enter the
URLso that it matches this format:http://YOUR_SERVER_PUBLIC_IP:PORT_NUMBER/v1.Enter the
Keyto match the API key you passed tosglang.launch_server.Enter the model name (under
Model IDs) that exactly matches the argument you passed tosglang.launch_server. For example,deepseek-ai/DeepSeek-R1-Distill-Qwen-32B.Click on the
+button.Click on the
Savebutton.
Chatbot testing with DeepSeek-R1#
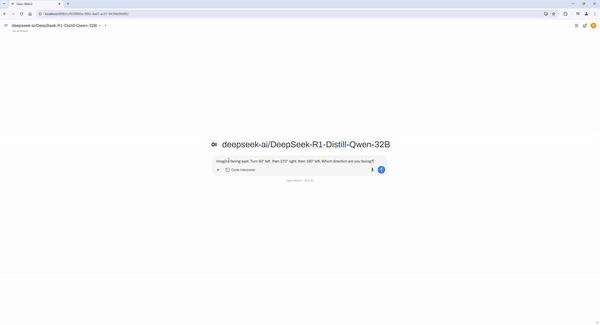
Use Open WebUI to interact with your chatbot. Here is an example prompt:
Imagine facing east. Turn 90° left, then 270° right, then 180° left. Which direction are you facing?
Follow up with a request for code visualization:
Can you give me a simple Python code without importing external libraries to visualize this step-by-step with Unicode arrows?
Code development assistant using the VS Code AI Toolkit#
Follow these steps to install the AI Toolkit for VS Code extension in VS Code:
Open VS Code.
Navigate to Extensions (
Ctrl+Shift+X).Search for and install VS Code AI Toolkit.
Click on
remote inferenceas shown in the image below: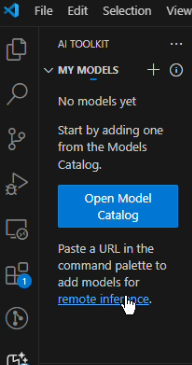
Select
Add a custom model.
Enter the Open AI-compatible URL matching this format:
http://YOUR_SERVER_PUBLIC_IP:PORT_NUMBER/v1/chat/completions.
Enter the model name so that it exactly matches the argument passed to
sglang.launch_server, for example,deepseek-ai/DeepSeek-R1-Distill-Qwen-32B.
Press Enter to display the model name.
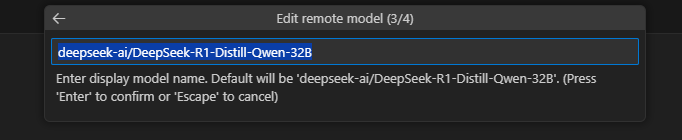
Enter the HTTP header for authorization matching this format
Authorization: Bearer API KEYexactly as specified, whereAPI KEYmust match the key you passed tosglang.launch_server. If you used the exact same command provided in this tutorial, enterAuthorization: Bearer abc-123.
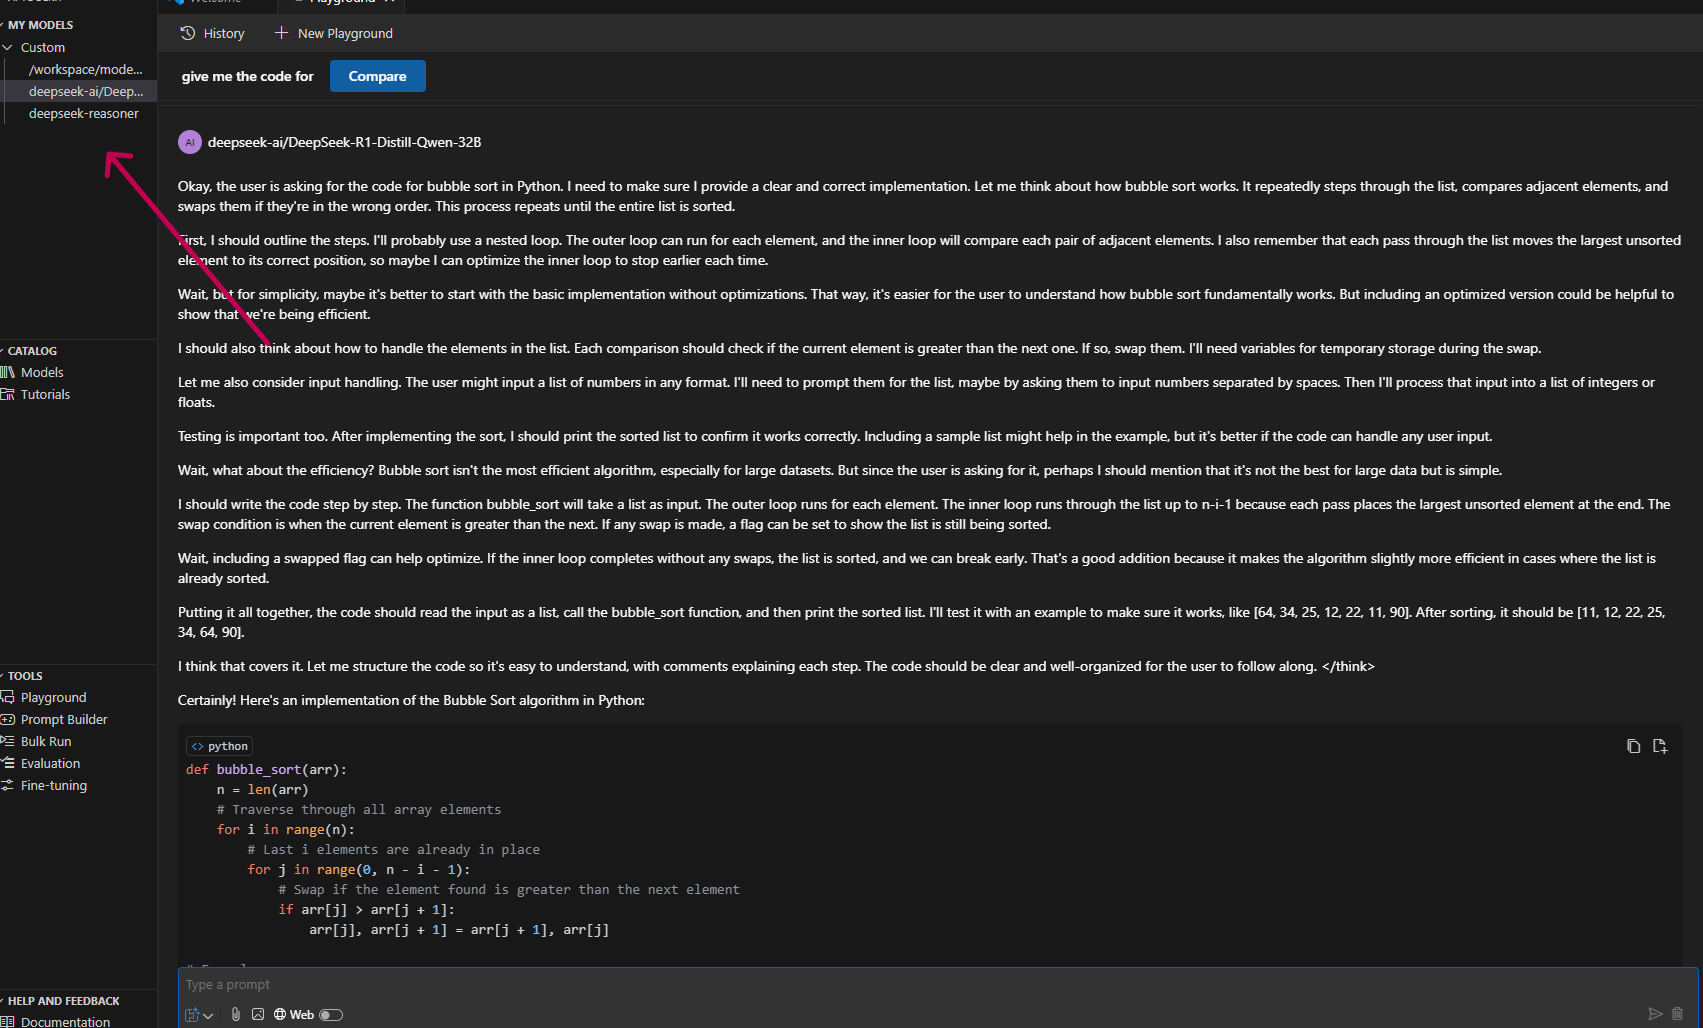
After you’ve completed the steps above, your model should be listed under MY MODELS on the left. Click your model to start the corresponding playground.
Build a snake game#
In VS Code, make this request:
"Can you build a classic snake game? Include 'Powered by DeepSeek-R1 on AMD MI300X' in the corner. Use Python."
Optional advanced challenge: Pac-Man#
Try building a Pac-Man game with a maximum of three prompts.
Happy coding! If you encounter issues or have questions, don’t hesitate to ask or raise an issue on our Github page!