FP8 quantization with AMD Quark for vLLM#
Author: Charles Yang
Knowledge level: Intermediate
Quantization can effectively reduce memory and bandwidth usage, accelerate computation, and improve throughput with minimal accuracy loss.
vLLM is an open-source library designed to deliver high throughput and low latency for large language model (LLM) inference. It optimizes text generation workloads by efficiently batching requests and making full use of GPU resources, empowering developers to manage complex tasks like code generation and large-scale conversational AI.
vLLM can leverage Quark, a flexible and powerful quantization toolkit, to produce performant quantized models to run on AMD GPUs. Quark has specialized support for quantizing large language models with weight, activation, and KV cache quantization and cutting-edge quantization algorithms like AWQ, GPTQ, Rotation, and SmoothQuant.
This tutorial guides you through setting up Quark and quantizing LLM models to FP8, then running the FP8 model on AMD Instinct™ GPUs using the ROCm software stack. Learn how to configure Quark parameters, achieve different model precisions, and compare performance with different quantization algorithms.
Supported models#
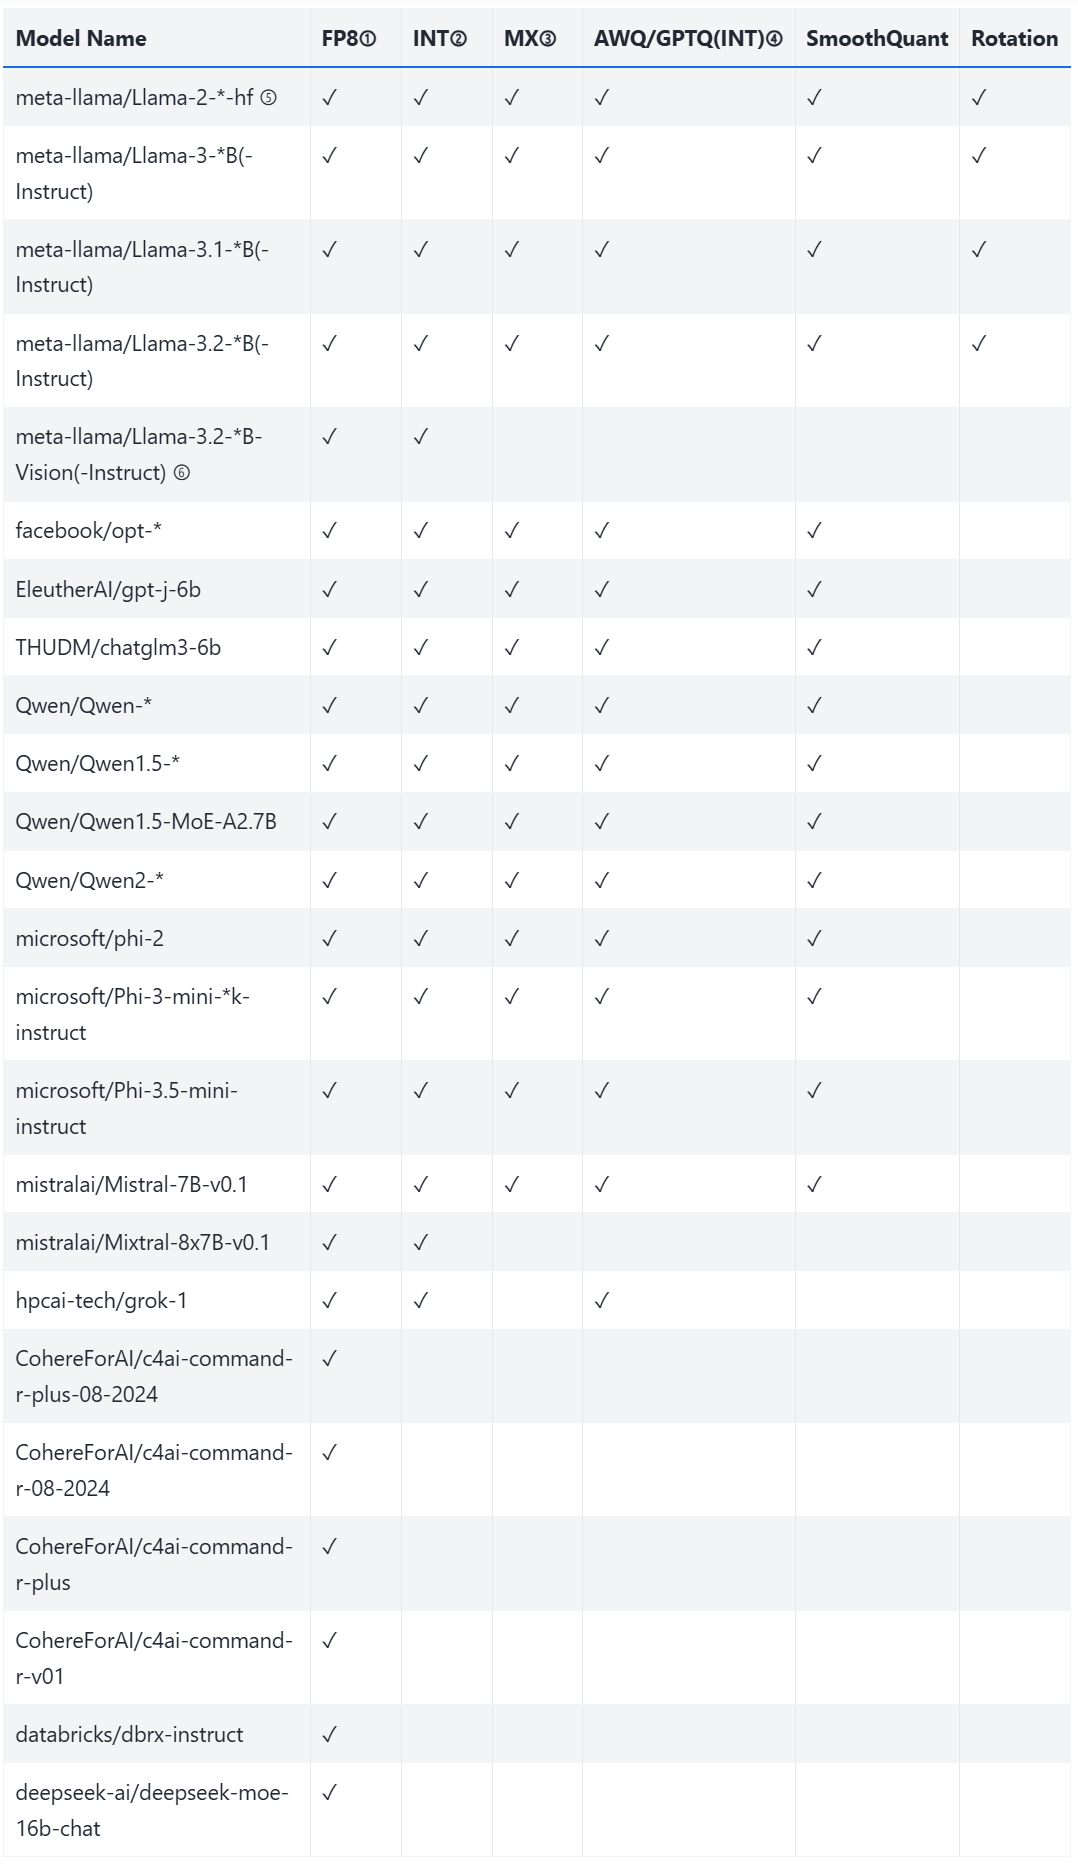
Figure 1: Supported models in the AMD Quark tool.
Notes#
(1) FP8: Refers to OCP
fp8_e4m3data type quantization.(2) INT: Includes
INT8,UINT8,INT4, andUINT4quantization types.(3) MX: Includes custom OCP data types such as:
MXINT8MXFP8E4M3MXFP8E5M2MXFP4MXFP6E3M2MXFP6E2M3
(4) GPTQ:
QuantSchemeonly supports thePerGroupandPerChannelvalues.(5):
*indicates different model sizes (for example,7Bor13B).(6): For
meta-llama/Llama-3.2-*B-Visionmodels, only the language components are quantized. The vision modules are excluded.
Prerequisites#
This tutorial was developed and tested using the following setup.
Operating system#
Ubuntu 22.04: Ensure your system is running Ubuntu version 22.04.
Software#
ROCm 6.2 or 6.3: Install and verify ROCm by following the ROCm install guide. After installation, confirm your setup using:
amd-smi
This command lists your AMD GPUs with relevant details.
Note: For ROCm 6.4 and earlier, use the
rocm-smicommand instead.Docker: Ensure Docker is installed and configured correctly. Follow the Docker installation guide for your operating system.
Note: Ensure the Docker permissions are correctly configured. To configure permissions to allow non-root access, run the following commands:
sudo usermod -aG docker $USER
newgrp docker
Verify Docker is working correctly with:
docker run hello-world
Hugging Face API access#
Obtain an API token from Hugging Face for downloading models.
Ensure the Hugging Face API token has the necessary permissions and approval to access the Meta Llama checkpoints.
Environment setup with Docker and ROCm#
Follow these steps to configure your tutorial environment:
1. Pull the Docker image#
Ensure your system meets the system requirements.
Pull the Docker image required for this tutorial:
docker pull rocm/vllm:latest
2. Launch the Docker container#
Launch the Docker container and map the necessary directories. From your host machine, run this command:
docker run -it --rm \
  --network=host \
  --device=/dev/kfd \
  --device=/dev/dri \
  --group-add=video \
  --ipc=host \
  --cap-add=SYS_PTRACE \
  --security-opt seccomp=unconfined \
  --shm-size 8G \
  -v $(pwd):/workspace \
  -w /workspace/notebooks \
  rocm/vllm:latest
Note: This command mounts the current directory to the /workspace directory in the container. Ensure the notebook file is either copied to this directory before running the Docker command or uploaded into the Jupyter Notebook environment after it starts. Save the token or URL provided in the terminal output to access the notebook from your web browser. You can download this notebook from the AI Developer Hub GitHub repository.
3. Launch Jupyter Notebooks in the container#
Inside the Docker container, install Jupyter using the following command:
pip install jupyter
Start the Jupyter server:
jupyter-lab --ip=0.0.0.0 --port=8888 --no-browser --allow-root
Note: Ensure port 8888 is not already in use on your system before running the above command. If it is, you can specify a different port by replacing --port=8888 with another port number, for example, --port=8890.
4. Installing dependencies#
Next, install CMake and Quark. Select the CPU wheel of PyTorch so that Quark can run on laptops without GPUs. This is slower but is fine for trying Quark out. Install Quark from PyPI, which pulls in the required dependencies.
Run the following commands inside the Jupyter notebook running within the Docker container:
!pip install cmake amd-quark==0.8.1
!pip install ipython ipywidgets
!pip install huggingface_hub
!pip install evaluate>=0.4.0
!pip install accelerate datasets pillow pillow transformers zstandard lm-eval
5. Provide your Hugging Face token#
You’ll require a Hugging Face API token to access Llama-3.1-8B. Generate your token at Hugging Face Tokens and request access for Llama-3.1-8B-Instruct. Tokens typically start with “hf_”.
Run the following interactive block in your Jupyter notebook to set up the token:
from huggingface_hub import notebook_login, HfApi

# Prompt the user to log in
notebook_login()
Verify that your token was accepted correctly:
# Validate the token
try:
    api = HfApi()
    user_info = api.whoami()
    print(f"Token validated successfully! Logged in as: {user_info['name']}")
except Exception as e:
    print(f"Token validation failed. Error: {e}")
Quantization process#
After installing Quark, follow these steps to learn how to use it. The Quark quantization process includes the following steps:
Load the model
Prepare the calibration dataloader
Set the quantization configuration
Quantize the model
Export the model
Evaluation in vLLM
1. Load the model#
Quark uses transformers to fetch the model and tokenizer.
from transformers import AutoTokenizer, AutoModelForCausalLM

MODEL_ID = "meta-llama/Llama-3.1-8B-Instruct"
MAX_SEQ_LEN = 512

model = AutoModelForCausalLM.from_pretrained(
    MODEL_ID, device_map="auto", torch_dtype="auto",
)
model.eval()

tokenizer = AutoTokenizer.from_pretrained(MODEL_ID, model_max_length=MAX_SEQ_LEN)
tokenizer.pad_token = tokenizer.eos_token
2. Prepare the calibration dataloader#
Quark uses the PyTorch dataloader to load calibration data. For more details about how to use calibration datasets efficiently, see Adding Calibration Datasets.
from datasets import load_dataset
from torch.utils.data import DataLoader

BATCH_SIZE = 1
NUM_CALIBRATION_DATA = 512

# Load the dataset and get the calibration data.
dataset = load_dataset("mit-han-lab/pile-val-backup", split="validation")
text_data = dataset["text"][:NUM_CALIBRATION_DATA]

tokenized_outputs = tokenizer(text_data, return_tensors="pt",
    padding=True, truncation=True, max_length=MAX_SEQ_LEN)
calib_dataloader = DataLoader(tokenized_outputs['input_ids'],
    batch_size=BATCH_SIZE, drop_last=True)
3. Set the quantization configuration#
Start by downloading and unzipping the example configuration files and necessary packages.
%%bash
#Install unzip and wget
apt-get update
apt-get install -y unzip wget

# Download and unzip AMD Quark examples
wget -O amd_quark-0.8.1.zip https://download.amd.com/opendownload/Quark/amd_quark-0.8.1.zip
unzip -o amd_quark-0.8.1.zip
Set the quantization configuration. This tutorial uses FP8 per-tensor quantization on weight, activation, and the KV cache, while the quantization algorithm is AutoSmoothQuant. See the Quark configuration guide for further details.
from quark.torch.quantization import (Config, QuantizationConfig,
                                     FP8E4M3PerTensorSpec,
                                     load_quant_algo_config_from_file)

# Define fp8/per-tensor/static spec.
FP8_PER_TENSOR_SPEC = FP8E4M3PerTensorSpec(observer_method="min_max",
    is_dynamic=False).to_quantization_spec()

# Define global quantization config, input tensors and weight apply FP8_PER_TENSOR_SPEC.
global_quant_config = QuantizationConfig(input_tensors=FP8_PER_TENSOR_SPEC,
    weight=FP8_PER_TENSOR_SPEC)

# Define quantization config for kv-cache layers, output tensors apply FP8_PER_TENSOR_SPEC.
KV_CACHE_SPEC = FP8_PER_TENSOR_SPEC
kv_cache_layer_names_for_llama = ["*k_proj", "*v_proj"]
kv_cache_quant_config = {name :
    QuantizationConfig(input_tensors=global_quant_config.input_tensors,
                       weight=global_quant_config.weight,
                       output_tensors=KV_CACHE_SPEC)
    for name in kv_cache_layer_names_for_llama}
layer_quant_config = kv_cache_quant_config.copy()

# Define algorithm config by config file.
LLAMA_AUTOSMOOTHQUANT_CONFIG_FILE = 'amd_quark-0.8.1/examples/torch/language_modeling/llm_ptq/models/llama/autosmoothquant_config.json'
algo_config = load_quant_algo_config_from_file(LLAMA_AUTOSMOOTHQUANT_CONFIG_FILE)

EXCLUDE_LAYERS = ["lm_head"]
quant_config = Config(
    global_quant_config=global_quant_config,
    layer_quant_config=layer_quant_config,
    kv_cache_quant_config=kv_cache_quant_config,
    exclude=EXCLUDE_LAYERS,
    algo_config=algo_config)
4. Quantize the model#
Apply the quantization. After quantizing, freeze the quantized model first before exporting.
import torch
from quark.torch import ModelQuantizer
from quark.torch.export import JsonExporterConfig

# Apply quantization.
quantizer = ModelQuantizer(quant_config)
quant_model = quantizer.quantize_model(model, calib_dataloader)

# Freeze quantized model to export.
freezed_model = quantizer.freeze(model)
5. Export the model#
Export the model using the HuggingFace safetensors format. For more details, see HuggingFace safetensors.
from quark.torch.quantization.config.config import Config
from quark.torch.export.config.config import ExporterConfig
from quark.shares.utils.log import ScreenLogger
from quark.torch import ModelExporter
from transformers import AutoTokenizer
from torch import nn
from pathlib import Path
from typing import List, Optional, Dict, Any
import torch
import json
import sys
import os


logger = ScreenLogger(__name__)
# Define export config.
LLAMA_KV_CACHE_GROUP = ["*k_proj", "*v_proj"]
export_config = ExporterConfig(json_export_config=JsonExporterConfig())
export_config.json_export_config.kv_cache_group = LLAMA_KV_CACHE_GROUP
export_path= "Llama-3.1-8B-Instruct-FP8"


EXPORT_DIR = MODEL_ID.split("/")[1] + "-FP8"
exporter = ModelExporter(config=export_config, export_dir=EXPORT_DIR)

model = exporter.get_export_model(freezed_model, quant_config=quant_config, custom_mode="quark", add_export_info_for_hf=True)
model.save_pretrained(export_path)
try:
    model_type = 'llama'
    use_fast = True if model_type in ["grok", "cohere", "olmo"] else False
    tokenizer = AutoTokenizer.from_pretrained(MODEL_ID, trust_remote_code=True, use_fast=use_fast)
    tokenizer.save_pretrained(export_path)
except Exception as e:
    logger.error(f"An error occurred when saving tokenizer: {e}.  You can try to save the tokenizer manually")
exporter.reset_model(model=model)
logger.info(f"hf_format quantized model exported to {export_path} successfully.")
6. Evaluation in vLLM#
Now you can load and run the Quark quantized model directly through the LLM entrypoint:
from vllm import LLM, SamplingParams

# Sample prompts.
prompts = [
    "Hello, my name is",
    "The president of the United States is",
    "The capital of France is",
    "The future of AI is",
]
# Create a sampling params object.
sampling_params = SamplingParams(temperature=0.8, top_p=0.95)

# Create an LLM.
llm = LLM(model="Llama-3.1-8B-Instruct-FP8",
          kv_cache_dtype='fp8',quantization='quark')
# Generate texts from the prompts. The output is a list of RequestOutput objects
# that contain the prompt, generated text, and other information.
outputs = llm.generate(prompts, sampling_params)
# Print the outputs.
print("\nGenerated Outputs:\n" + "-" * 60)
for output in outputs:
    prompt = output.prompt
    generated_text = output.outputs[0].text
    print(f"Prompt:    {prompt!r}")
    print(f"Output:    {generated_text!r}")
    print("-" * 60)

# clean up and release GPU
del llm

# Step 2: Call garbage collector
import gc
gc.collect()

# Step 3: If using PyTorch backend, clear CUDA (optional but helpful)
import torch
if torch.cuda.is_available():
    torch.cuda.empty_cache()
    torch.cuda.ipc_collect()
You can also use lm_eval to evaluate accuracy:
!lm_eval --model vllm \
  --model_args pretrained=Llama-3.1-8B-Instruct-FP8,kv_cache_dtype='fp8',quantization='quark' \
  --tasks gsm8k
Quark quantization script#
In addition to the Python API example above, Quark also offers a quantization script to quantize large language models more conveniently. It supports quantizing models using a variety of different quantization schemes and optimization algorithms. It can export the quantized model and run evaluation tasks as it goes.
Note: You can change the output directory for the script using the --output_dir option.
import os
os.chdir("./amd_quark-0.8.1/examples/torch/language_modeling/llm_ptq/")
!python3 quantize_quark.py --model_dir meta-llama/Llama-3.1-8B-Instruct \
                          --output_dir ./Llama-3.1-8B-Instruct-FP8 \
                          --quant_scheme w_fp8_a_fp8 \
                          --kv_cache_dtype fp8 \
                          --quant_algo autosmoothquant \
                          --num_calib_data 512 \
                          --model_export hf_format \
                          --tasks gsm8k
Best practices for Post-Training Quantization (PTQ)#
This section outlines the best practices for PTQ with AMD Quark PyTorch. It provides guidance on fine-tuning your quantization strategy to address accuracy degradation issues. The example below uses the meta-llama/Llama-3.1-8B-Instruct model and code files from quark/examples/torch/language_modeling/llm_ptq to demonstrate the methodology.
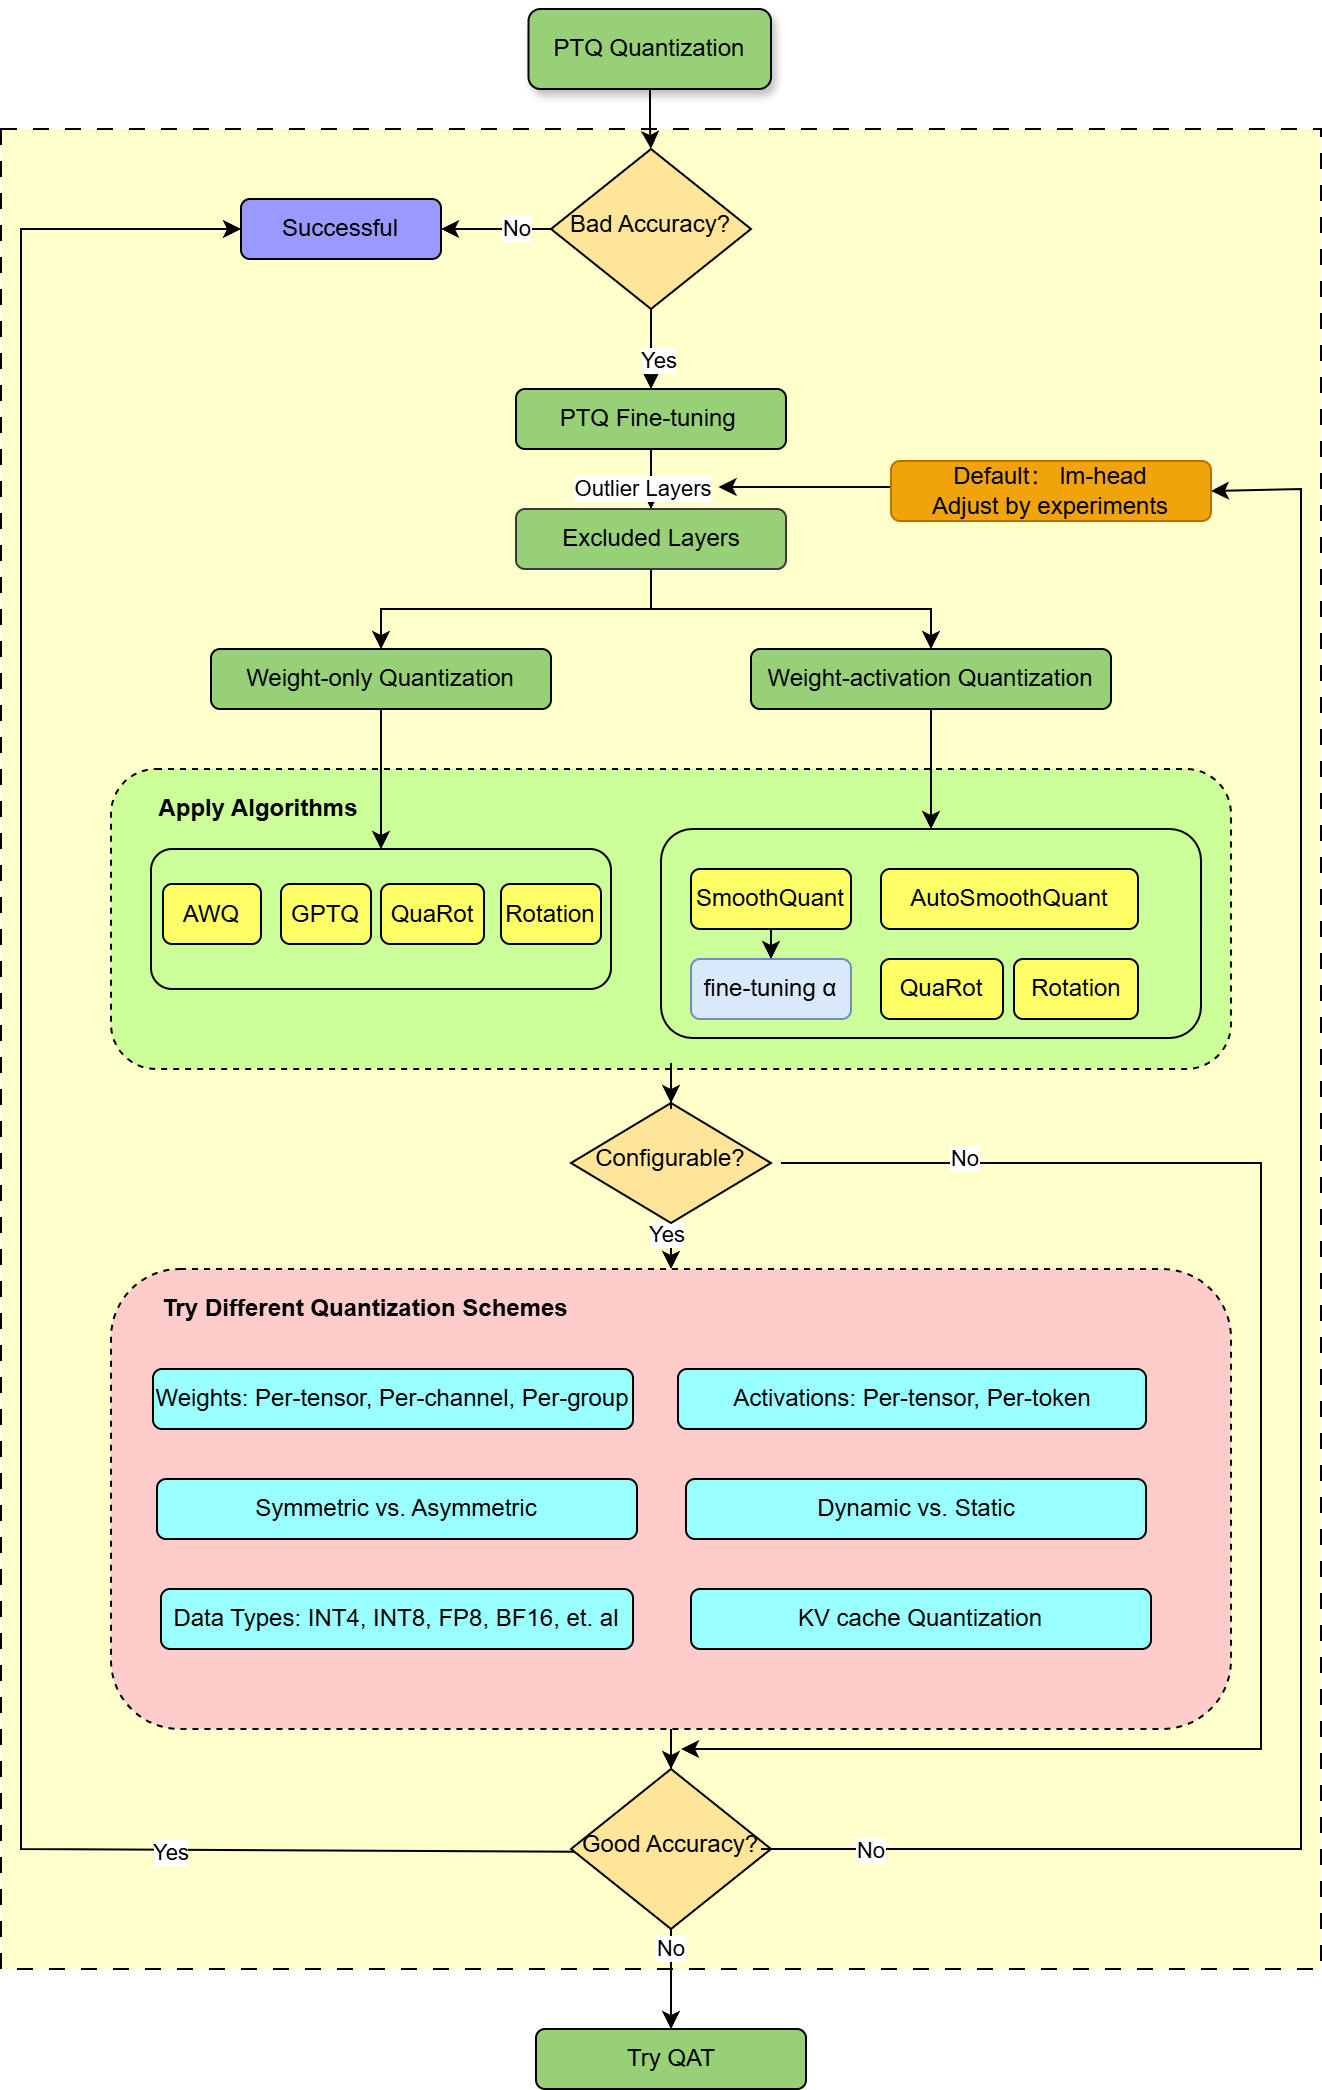
Figure 2: Best practices for AMD Quark PyTorch quantization
Confirm your current working directory is ./amd_quark-0.8.1/examples/torch/language_modeling/llm_ptq/, then run the code below.
exclude_layers="*lm_head *layers.0.mlp.down_proj"
!python3 quantize_quark.py --model_dir meta-llama/Llama-3.1-8B-Instruct \
                          --quant_scheme w_fp8_a_fp8 \
                          --exclude_layers $exclude_layers
Applying various quantization algorithms#
AMD Quark supports various quantization algorithms specifically designed for LLMs. You can experiment with the following algorithms to enhance accuracy.
Note: The model precision is not limited to FP8 in this section.
AWQ (Activation-aware Weight Quantization)#
AWQ determines the optimal scaling factors for a smooth-through grid search and is widely used in low-bit weight only quantization (for example, W4 quantization with a group size of 128). The algorithm can be applied using the following command.
!python3 quantize_quark.py --model_dir meta-llama/Llama-3.1-8B-Instruct \
                          --quant_scheme w_uint4_per_group_asym \
                          --group_size 128 \
                          --dataset pileval_for_awq_benchmark \
                          --quant_algo awq
AutoSmoothQuant#
AutoSmoothQuant enhances SmoothQuant by automatically selecting the optimal values for each layer, guided by the mean squared error (MSE) loss across blocks.
!python3 quantize_quark.py --model_dir meta-llama/Llama-3.1-8B-Instruct \
                          --quant_scheme w_int8_a_int8_per_tensor_sym \
                          --dataset pileval_for_awq_benchmark \
                          --quant_algo autosmoothquant
QuaRot#
QuaRot eliminates activation outliers using a rotation technique named the Hadamard transform. AMD Quark supports the QuaRot algorithm, which can be used as follows.
!python3 quantize_quark.py --model_dir meta-llama/Llama-3.1-8B-Instruct \
                          --quant_scheme w_int8_a_int8_per_tensor_sym \
                          --pre_quantization_optimization quarot
Rotation#
QuaRot employs an online Hadamard transform in its algorithm, which requires kernel support for hardware deployment. Inspired by QuaRot and QServer, AMD Quark introduces the Rotation method, which enhances accuracy without requiring kernel modifications.
!python3 quantize_quark.py --model_dir meta-llama/Llama-3.1-8B-Instruct \
--quant_scheme w_int8_a_int8_per_tensor_sym \
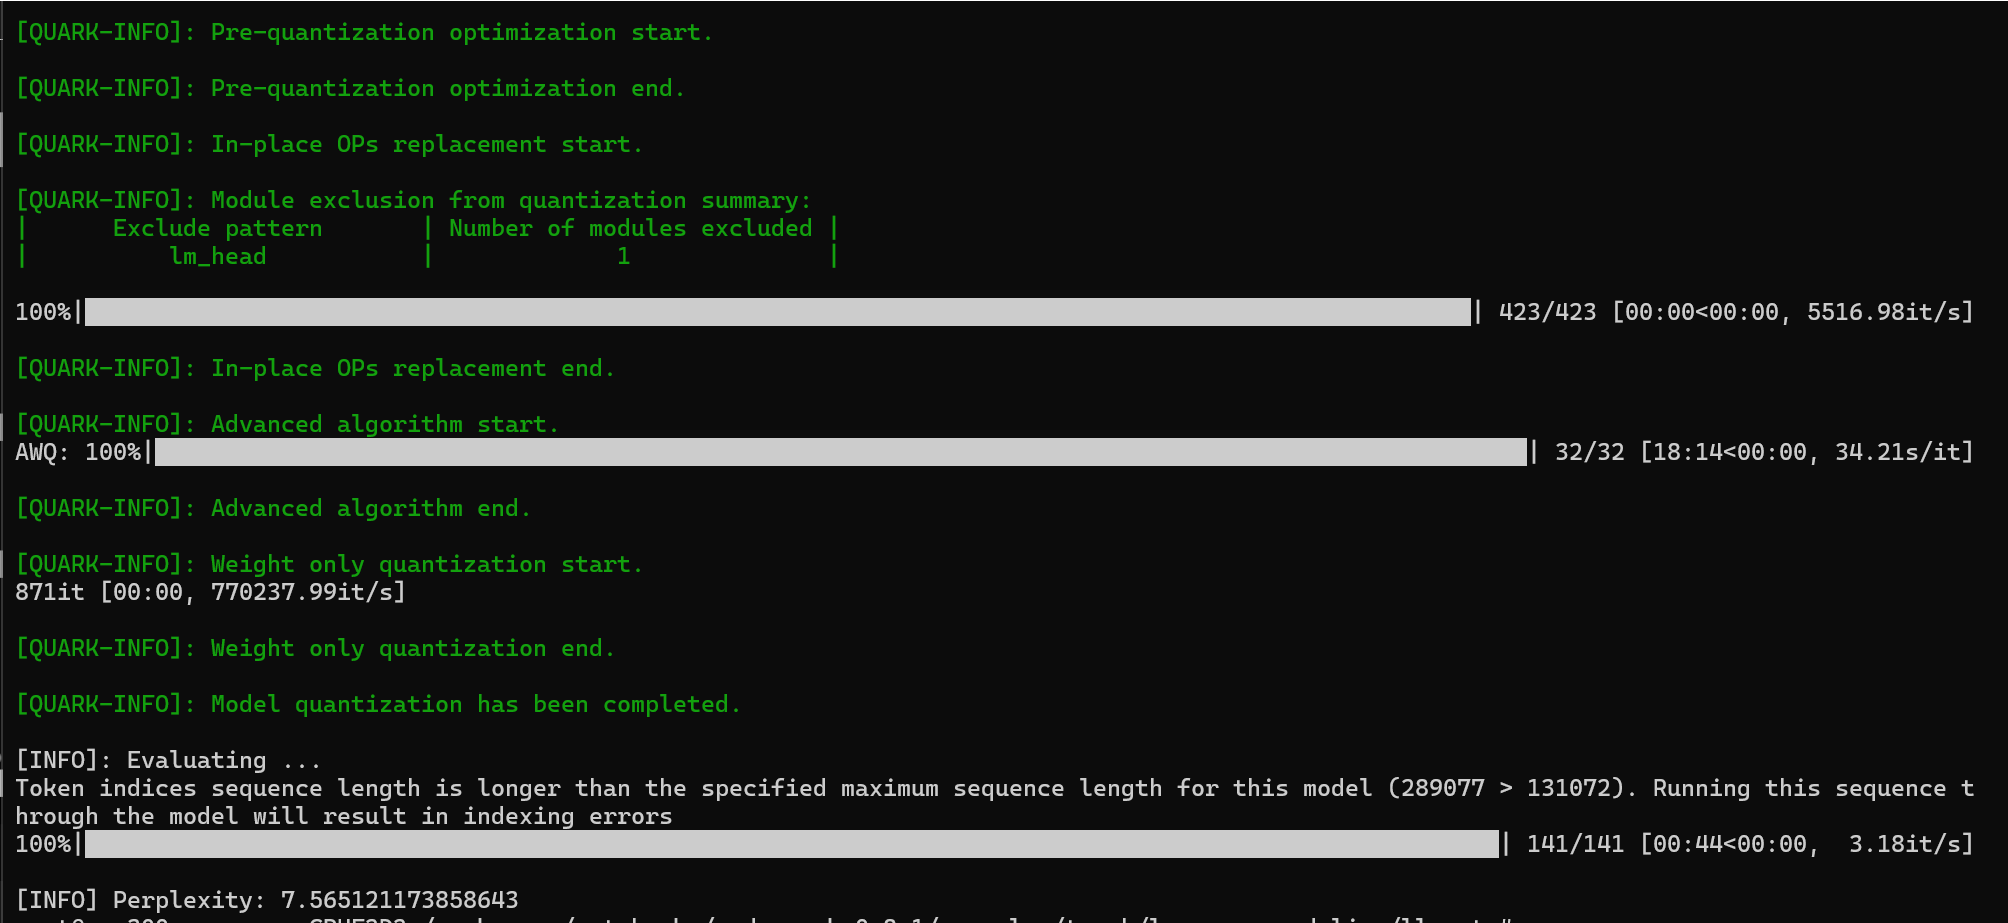
--pre_quantization_optimization rotation
A successful evaluation result is shown below:
Trying different quantization schemes#
Experimenting with various quantization schemes can help improve accuracy. However, keep in mind that selecting a appropriate scheme depends on your specific requirement and hardware constraints.
Key quantization schemes#
Weight-only vs. weight-activation quantization: Activation quantization might lead to a significant accuracy drop while weight-only quantization with an extremely low bit-width can yield better results.
Quantization granularity
Weight quantization: Options include per-tensor, per-channel, or per-group quantization.
Activation quantization: Options include per-tensor or per-token quantization.
Dynamic versus static quantization: For activation quantization, dynamic quantization often results in better accuracy than static quantization.
Symmetric versus asymmetric: Try experimenting with symmetric or asymmetric quantization based on how sensitive the model is to signed or unsigned values.
Data types (Dtypes): AMD Quark supports several data types, including
INT4,INT8,FP8,MX-FPX,FP16, andBFloat16. Choose the data type that best balances accuracy and efficiency for your model.KV cache quantization: Skipping KV cache quantization typically results in better performance. Applying this approach to the entire KV cache or specific parts of it might lead to better accuracy.
If accuracy issues persist after applying the above methods, consider trying the AMD Quark debug tool to identify outlier layers and exclude them from quantization.