Deploy DeepSeek-R1 with the vLLM V1 engine and build an AI-powered office assistant#
Imagine starting up DeepSeek-R1, a 60-billion-plus parameter reasoning machine, on an AMD Instinct™ MI300X GPU and watching it produce over 200 tokens per second. Now imagine doing this with a single command line and no driver issues.
Starting with vLLM v0.9.2, the V1 engine gives you low latency and out-of-the-box throughput.
In this hands-on deep dive, you will:
Compare V1 vs V0 performance with live benchmarks.
Deploy DeepSeek-R1 in production-ready mode with quantized safetensors.
Build a native Microsoft Word and Microsoft Excel AI sidekick using OpenAI-compatible endpoints.
V1 versus V0 challenge
You’ll run a multi-round conversation system to conduct side-by-side live benchmarks and record real-time latency and throughputs. The results will confirm the V1 Engine’s scheduler and paged-attention kernels deliver higher queries-per-second (QPS) and a lower Time-to-First-Token (TTFT).
Deploy DeepSeek-R1 in production
From quantized safetensors to OpenAI-compatible /v1/chat/completions endpoints, DeepSeek-R1 features auto-scaling, batching, and KV-cache offloading tuned for an MI300X with 128 GB HBM3.
Build an AI-powered office assistant
Use the deployed DeepSeek-R1 backend to enable a native Microsoft Word and Excel copilot that sits inside your desktop apps, instantly condensing multi-page documents and turning hours of paperwork into minutes of conversation.
It’s time to launch the Instinct MI300X. Now that you know what’s coming up, launch the notebook and get started!
Prerequisites#
This tutorial was developed and tested using the following setup.
Operating system#
Ubuntu 22.04/24.04: Ensure your system is running Ubuntu 22.04 or 24.04.
Hardware#
AMD Instinct™ GPUs: This tutorial was tested on a single node with eight AMD Instinct MI300X GPUs. Ensure you are using an AMD Instinct GPU or compatible hardware with ROCm support and that your system meets the official requirements.
Software#
ROCm 6.3 or 6.4: Install and verify ROCm by following the ROCm install guide. After installation, confirm your setup using:
rocm-smi
This command lists your AMD GPUs with relevant details, similar to the image below.

Docker: Ensure Docker is installed and configured correctly. Follow the Docker installation guide for your operating system.
Note: Ensure the Docker permissions are correctly configured. To configure permissions to allow non-root access, run the following commands:
sudo usermod -aG docker $USER
newgrp docker
Verify Docker is working correctly:
docker run hello-world
Environment setup#
Follow these steps to set up the development environment.
Step 1: Pull the ROCm vLLM image#
Open a new terminal window on your server and run the following command:
docker pull rocm/vllm-dev:nightly_0624_rc2_0624_rc2_20250620
Step 2: Launch the Docker container#
Use this command to run the Docker container.
docker run -it --rm \
  --cap-add=SYS_PTRACE \
  -e SHELL=/bin/bash \
  --network=host \
  --security-opt seccomp=unconfined \
  --device=/dev/kfd \
  --device=/dev/dri \
  -v $(pwd):/workspace \
  --group-add video \
  --ipc=host \
  --name vllm_V1_demo_01 \
  -w /workspace \
  rocm/vllm-dev:nightly_0624_rc2_0624_rc2_20250620
Step 3: Install and launch Jupyter Notebooks#
The previous step launched an interactive Docker shell. Inside the Docker container, install JupyterLab using the following command:
pip install jupyter
Start the Jupyter server:
jupyter-lab --ip=0.0.0.0 --port=8888 --no-browser --allow-root
Note: Ensure port 8888 is not already in use on your system before running the command above. If it is, you can specify a different port by replacing --port=8888 with another port number, for example, --port=8890.
The remainder of this tutorial is intended to be run inside a Jupyter notebook. Upload this file to the JupyterLab instance you just launched and follow the steps below.
Demo 1: Multi-turn question-answering with the DeepSeek-R1 V1 and V0 engines#
DeepSeek-R1 provides a powerful toolkit for assessing model performance. It focuses on multi-turn question answering, simulating realistic multi-user conversation scenarios, where new users continuously join while existing users exit. The multi-round-qa.py script launches numerous parallel user sessions, each engaging in multiple rounds of dialogue with the model. This setup provides a clear view of serving latency and overall throughput.
Understanding the vLLM performance testing toolkit#
The high-level flow of the script is illustrated below:
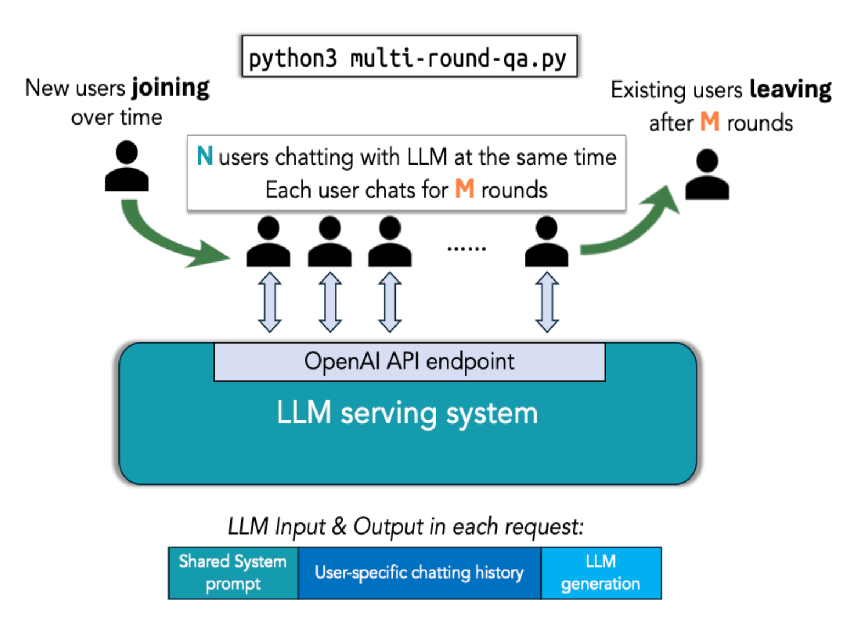
The script replays a realistic multi-turn QA pattern:
Each user holds a stateful chat session (with the conversation history carried forward).
Every turn, the user asks a follow-up question with a length that grows with the accumulated context.
The script stresses the engine on latency (TTFT, ITL) and throughput (effective QPS), while the KV cache is being reused, evicted, or off-loaded.
Start testing it now by working through the following steps!
Step 1: Clean the cache space#
Start by cleaning the pip installation cache space to avoid potential compilation issues.
!pip cache purge
Step 2: Download the repository#
Run these commands to download the repository and install the requirements.
%%bash
cd /app
git clone https://github.com/vllm-project/production-stack.git
cd /app/production-stack/benchmarks/multi-round-qa
pip install -r requirements.txt
Step 3: Prepare the Hugging Face models#
Follow these steps to install the Hugging Face CLI and download the models.
First install the Hugging Face CLI.
!pip install -U "huggingface_hub[cli]"
Then download the DeepSeek-R1 model by running the following cell:
Note: This is a very large model, so the download process could take a few minutes. If the connection is interrupted, rerun this cell.
%%bash
MODEL_DIR=/workspace/models/DeepSeek-R1   # single, consistent path
mkdir -p "$MODEL_DIR"

huggingface-cli download \
    deepseek-ai/DeepSeek-R1 \
    --local-dir "$MODEL_DIR"
Step 4: Run the DeepSeek-V1 engine#
Start a new terminal to run the DeepSeek-V1 engine. To start a new terminal, click on the + symbol next to the active notebook tab. The following animation demonstrates how to open a new terminal in the Jupyter environment and customize your view.
Copy and paste the following command to the terminal window:
SAFETENSORS_FAST_GPU=1 \
VLLM_ROCM_USE_AITER=1 \
VLLM_USE_V1=1 \
vllm serve /workspace/models/DeepSeek-R1 \
  -tp 8 \
  --max-model-len 32768 \
  --block-size 1 \
  --max_seq_len_to_capture 32768 \
  --no-enable-prefix-caching \
  --max-num-batched-tokens 32768 \
  --gpu-memory-utilization 0.95 \
  --trust-remote-code \
  --port 8000
After successfully running the command above in your terminal, the output should look like the example below. After you confirm the server is ready, return to the Jupyter notebook and continue executing the cells.

Running the multi-round benchmark#
Initiate the multi-round question-answering benchmark by running the following cell.
!python3 /app/production-stack/benchmarks/multi-round-qa/multi-round-qa.py \
    --num-users 10 \
    --num-rounds 5 \
    --qps 0.5 \
    --shared-system-prompt 1000 \
    --user-history-prompt 2000 \
    --answer-len 100 \
    --model /workspace/models/DeepSeek-R1 \
    --base-url http://localhost:8000/v1
The script above should produce output similar to the image below.
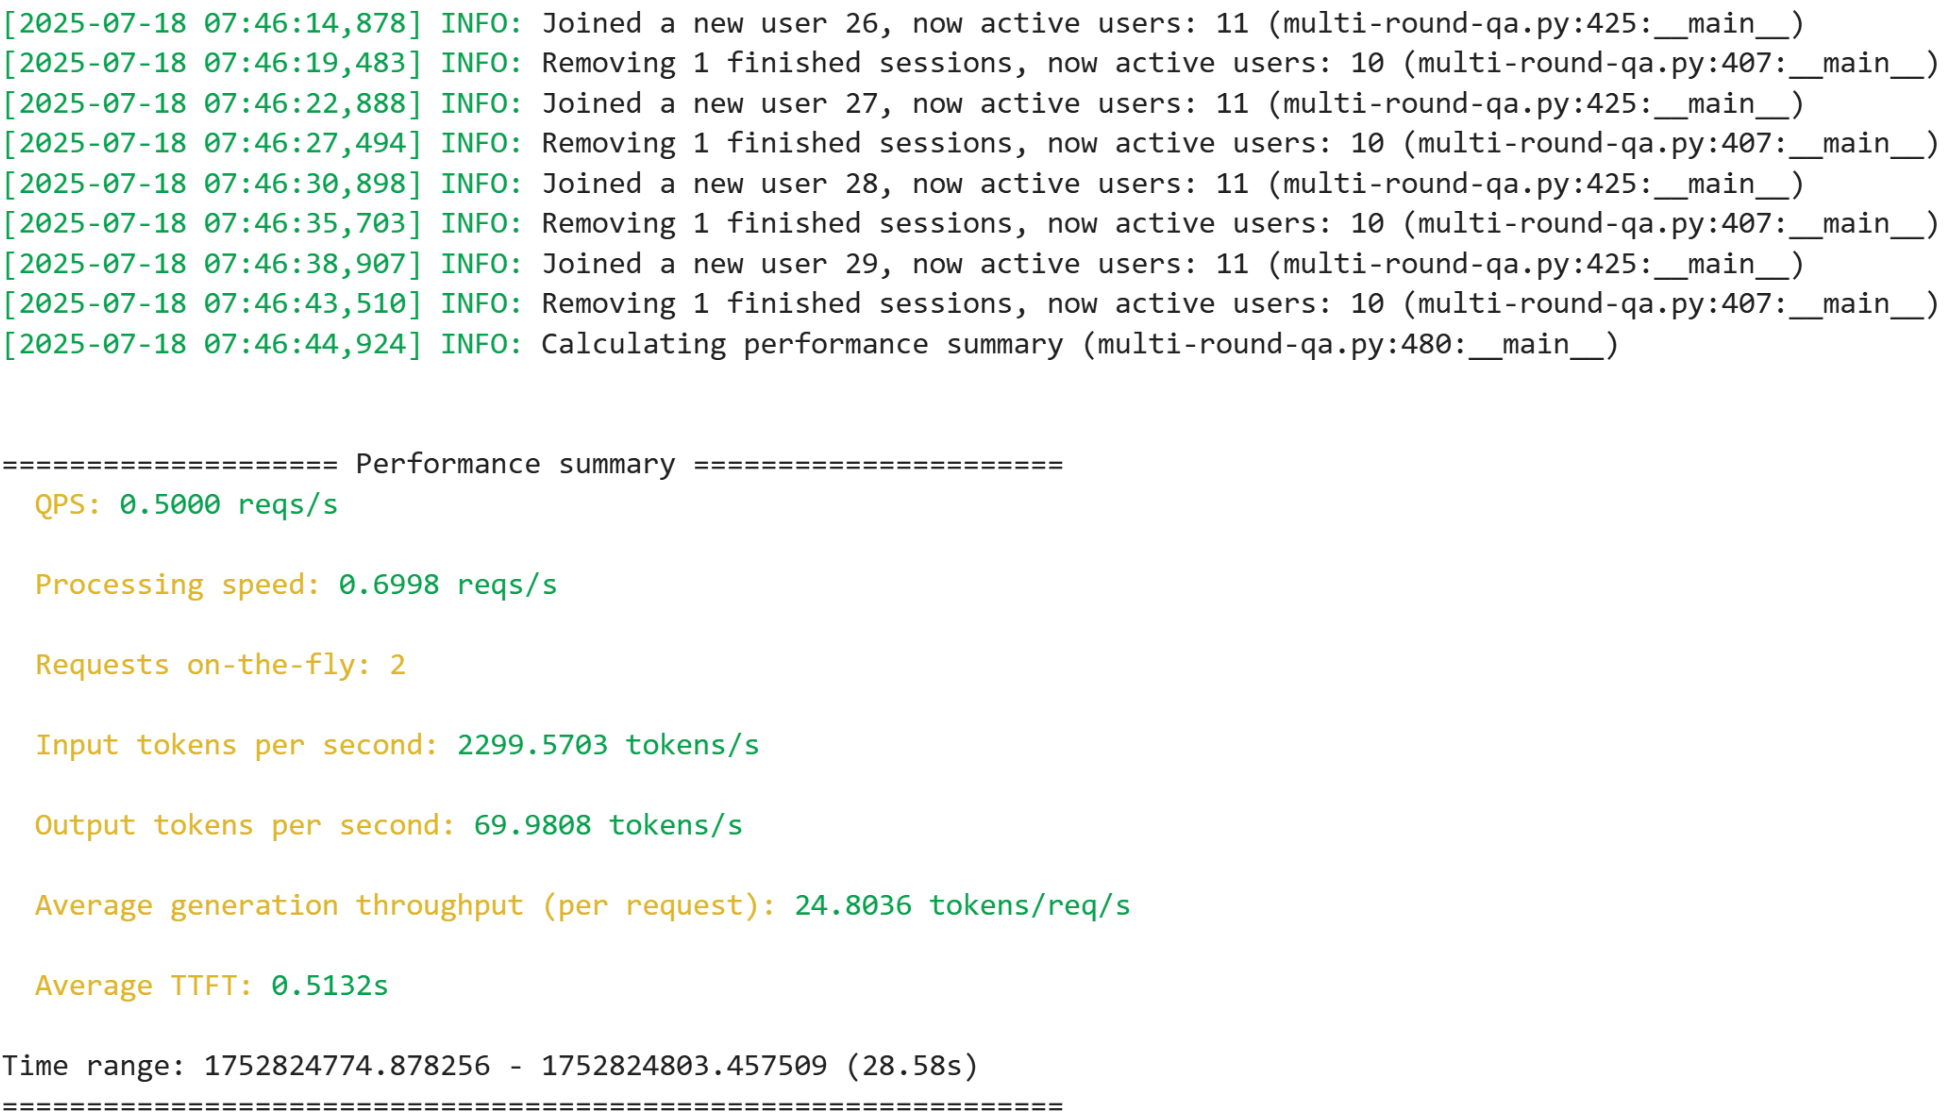
Note: The live demo will continue running until you manually stop it, so you can observe it for as long as you like.
To start testing the V0 engine, click Interrupt the kernel, as shown in the image below, to stop the current process, then continue running the remaining cells.
Important: ⚠️ The script must be manually stopped before moving to the next step.

Step 5: Run the DeepSeek-V0 engine:#
In the same terminal you used to run the vllm serve command in the previous section, press Ctrl-C twice to stop the V1 engine. Then run the V0 engine using the following command.
Copy and paste the following command to the terminal window:
SAFETENSORS_FAST_GPU=1 \
VLLM_ROCM_USE_AITER=1 \
VLLM_USE_V1=0 \
vllm serve /workspace/models/DeepSeek-R1 \
  -tp 8 \
  --max-model-len 32768 \
  --block-size 1 \
  --max-seq-len-to-capture 32768 \
  --no-enable-prefix-caching \
  --max-num-batched-tokens 32768 \
  --gpu-memory-utilization 0.95 \
  --trust-remote-code \
  --port 8000
After successfully running the command above in your terminal, the output should look like the example below. After you confirm the server is ready, return to the Jupyter notebook and continue executing the cells.
Running the multi-round benchmark#
Initiate the multi-round question-answering benchmark by running the following cell.
!python3 /app/production-stack/benchmarks/multi-round-qa/multi-round-qa.py \
    --num-users 10 \
    --num-rounds 5 \
    --qps 0.5 \
    --shared-system-prompt 1000 \
    --user-history-prompt 2000 \
    --answer-len 100 \
    --model /workspace/models/DeepSeek-R1 \
    --base-url http://localhost:8000/v1
The script above should produce output similar to the image below.

Note: The live demo will continue running until you manually stop it, so you can observe it for as long as you like.
To proceed to the second demo, click Interrupt the kernel, as shown in the image below, to stop the current process, then continue running the remaining cells.
Important: ⚠️ The script must be manually stopped before moving to the next step.
Demo 2: AI-powered office assistant#
In this demo, you’ll launch an AI-powered office assistant. Drag-and-drop .docx or .txt files, and the containerized tool instantly returns concise, high-quality summaries. No setup is required beyond docker run.
Important: ⚠️ You must terminate both vllm server commands in the terminal and click the Interrupt the kernel button in the previous cell before proceeding to the next step.
Follow these steps to run the AI office assistant.
Serve the DeepSeek-R1 model in online serving mode. Start a new terminal and copy and paste the following command to the terminal window:
SAFETENSORS_FAST_GPU=1 \
VLLM_ROCM_USE_AITER=1 \
VLLM_USE_V1=1 \
vllm serve /workspace/models/DeepSeek-R1 \
  -tp 8 \
  --max-model-len 32768 \
  --block-size 1 \
  --max-seq-len-to-capture 32768 \
  --no-enable-prefix-caching \
  --max-num-batched-tokens 32768 \
  --gpu-memory-utilization 0.95 \
  --trust-remote-code \
  --port 8000
After successfully running the command above, return to the Jupyter notebook and continue executing the cells.
Install the required libraries.
#Install the required libraries.
%pip install python-docx openai ipywidgets
Now import the libraries.
#import required libraries
import io
import os
from pathlib import Path
import textwrap

import docx
import ipywidgets as widgets
from openai import OpenAI

import ipywidgets as widgets
from IPython.display import display, clear_output
from io import BytesIO
import docx
Define your local vLLM model endpoint in the OpenAI-compatible API format.
#Define the vllm configurations for the openai endpoint

vllm_base = os.getenv("VLLM_ENDPOINT", "http://localhost:8000/v1")

client = OpenAI(
    base_url=vllm_base,
    api_key="dummy",   # or api_key=""  – any non-None string works
)
Define a helper function for reading docs in the .txt and .docx format.
from pathlib import Path
import docx
import textwrap

def read_document(path: Path) -> str:
    path = Path(path)
    if path.suffix.lower() == ".docx":
        doc = docx.Document(path)
        return "\n".join(para.text for para in doc.paragraphs)
    elif path.suffix.lower() == ".txt":
        return path.read_text(encoding="utf-8")
    else:
        raise ValueError("Only .docx and .txt are supported.")
Set an appropiate system prompt.
SYSTEM_PROMPT = (
    "You are a concise assistant. "
    "Read the following text and provide a short summary "
    "(3-5 sentences, 80-120 words)."
)
Define functions to summarize long texts by invoking the model in chunks.
def summarize_chunk(text: str) -> str:
    """Summarize one chunk with DeepSeek-R1 via vLLM."""
    prompt = f"{SYSTEM_PROMPT}\n\n{text}"
    response = client.completions.create(
        model="/workspace/models/DeepSeek-R1",  # must match vllm model arg
        prompt=prompt,
        max_tokens=120,
        temperature=0.3,
        top_p=0.9,
        stop=["\n\n"]
    )
    return response.choices[0].text.strip()

def summarize_long(text: str, max_chunk: int = 3000) -> str:
    """Chunk + summarize with vLLM."""
    words = text.split()
    chunks = [" ".join(words[i:i+max_chunk]) for i in range(0, len(words), max_chunk)]
    summaries = [summarize_chunk(c) for c in chunks]
    return " ".join(summaries)
Use some sample text to verify the function is working correctly.
test = "AMD CDNA architecture is the dedicated compute architecture underlying AMD Instinct GPUs and APUs. It features advanced packaging that unifies AMD chiplet technologies and High Bandwidth Memory (HBM), a high throughput Infinity Architecture fabric, and offers advanced Matrix Core Technology that supports a comprehensive set of AI and HPC data formats—designed to reduce data movement overhead and enhance power efficiency. AMD CDNA 4 offers enhanced Matrix Core Technologies that double the computational throughput for low precision Matrix data types compared to the previous Gen architecture. AMD CDNA 4 brings improved instruction-level parallelism, expands shared LDS resources with double the bandwidth, and includes support for a broad range of precisions that now include FP4 and FP6, along with sparse matrix data (i.e. sparsity) support. AMD demonstrated end-to-end, open-standards rack-scale AI infrastructure—already rolling out with AMD Instinct MI350 Series accelerators, 5th Gen AMD EPYC processors and AMD Pensando Pollara NICs in hyperscaler deployments such as Oracle Cloud Infrastructure (OCI) and set for broad availability in 2H 2025. AMD also previewed its next generation AI rack called Helios. It will be built on the next-generation AMD Instinct MI400 Series GPUs, which compared to the previous generation are expected to deliver up to 10x more performance running inference on Mixture of Experts models."
print("Test summary:", summarize_long(test))
Run the cells below, then click the Upload button to upload your own documents.
Note: The only accepted formats are .docx or .txt, and the recommended text length is less than 500 words for quick response time. Files outside these limits or formats might raise an error.
#Create file upload widget
uploader = widgets.FileUpload(
    accept='.txt,.docx',  # Accepted file types
    multiple=False  # Single file upload
)

output_area = widgets.Output()

def handle_upload(change):
    with output_area:
        clear_output()

        if not uploader.value:
            print("No file uploaded")
            return

        # Universal approach for all ipywidgets versions
        if hasattr(uploader.value, 'keys'):
            # Dictionary format (newer versions)
            filename = list(uploader.value.keys())[0]
            file_data = uploader.value[filename]
            content = file_data['content']
        elif isinstance(uploader.value, tuple) and len(uploader.value) > 0:
            # Tuple format (older versions)
            filename = uploader.value[0]['name']
            content = uploader.value[0]['content']
        else:
            print("Unsupported file format")
            return

        # Convert content to bytes if needed
        if isinstance(content, memoryview):
            content = content.tobytes()

        # Process based on file type
        if filename.endswith('.txt'):
            # Decode text file
            try:
                text = content.decode('utf-8')
            except UnicodeDecodeError:
                # Try alternative encodings if UTF-8 fails
                try:
                    text = content.decode('latin-1')
                except:
                    print("Failed to decode text file")
                    return

        elif filename.endswith('.docx'):
            # Process DOCX file
            try:
                doc = docx.Document(BytesIO(content))
                text = '\n'.join([para.text for para in doc.paragraphs])
            except:
                print("Failed to process DOCX file")
                return

        else:
            print("Unsupported file type")
            return

        # Clean and store text
        global test
        test = " ".join(text.split())  # Normalize whitespace

        # Show success message and preview
        print(f"✅ File '{filename}' processed successfully!")
        print("\nText preview (first 100 characters):")
        print(test[:100] + ("..." if len(test) > 100 else ""))
        print("\nFull text stored in variable 'test'")

# Setup interaction
uploader.observe(handle_upload, names='value')

# Display widgets
print("Upload a .txt or .docx file:")
display(uploader)
display(output_area)
Upon successful execution, you’ll see the following confirmation:
Continue running the following cells after the file is uploaded. Review the contents of the file you just uploaded to ensure they match your expectations.
print(test[:200])  # View first 200 characters
len(test)          # Check text length
Generate a summary of the provided text file.
print("Summary:", summarize_long(test))
Congratulations! You have successfully built a powerful AI assistant!