AMD RDNA2 system optimization#
2026-02-06
5 min read time
Workstation workloads#
Workstation workloads, much like those for HPC, have a unique set of requirements: a blend of both graphics and compute, certification, stability and others.
The document covers specific software requirements and processes needed to use these GPUs for Single Root I/O Virtualization (SR-IOV) and machine learning tasks.
The main purpose of this document is to help users utilize the RDNA™ 2 GPUs to their full potential.
System Guide |
Architecture reference |
White papers |
|---|---|---|
System settings#
This chapter reviews system settings that are required to configure the system for ROCm virtualization on RDNA2-based AMD Radeon™ PRO GPUs. Installing ROCm on Bare Metal follows the routine ROCm installation procedure.
To enable ROCm virtualization on V620, one has to setup Single Root I/O Virtualization (SR-IOV) in the BIOS via setting found in the following (System BIOS settings). A tested configuration can be followed in (Operating system settings).
Attention
SR-IOV is supported on V620 and unsupported on W6800.
System BIOS settings#
Advanced / North Bridge Configuration |
IOMMU |
Enabled |
Input-output Memory Management Unit |
|---|---|---|---|
Advanced / North Bridge Configuration |
ACS Enable |
Enabled |
Access Control Service |
Advanced / PCIe/PCI/PnP Configuration |
SR-IOV Support |
Enabled |
Single Root I/O Virtualization |
Advanced / ACPI settings |
PCI AER Support |
Enabled |
Advanced Error Reporting |
To set up the host, update SBIOS to version 1.2a.
Operating system settings#
Server |
SMC 4124 [AS -4124GS-TNR] |
|---|---|
Host OS |
Ubuntu 20.04.3 LTS |
Host Kernel |
5.4.0-97-generic |
CPU |
AMD EPYC 7552 48-Core Processor |
GPU |
RDNA2 V620 (D603GLXE) |
SBIOS |
Version SMC_r_1.2a |
VBIOS |
113-D603GLXE-077 |
Guest OS 1 |
Ubuntu 20.04.5 LTS |
Guest OS 2 |
RHEL 9.0 |
GIM Driver |
gim-dkms_1.0.0.1234577_all |
VM CPU Cores |
32 |
VM RAM |
64 GB |
Install the following Kernel-based Virtual Machine (KVM) Hypervisor packages:
sudo apt-get -y install qemu-kvm qemu-utils  bridge-utils virt-manager  gir1.2-spiceclientgtk*  gir1.2-spice-client-gtk* libvirt-daemon-system dnsmasq-base
sudo virsh net-start default /*to enable Virtual network by default
Enable input-output memory management unit (IOMMU) in GRUB settings by adding the following line to /etc/default/grub:
GRUB_CMDLINE_LINUX_DEFAULT="quiet splash" for AMD CPU
Update grub and reboot
sudo update=grub
sudo reboot
Install the GPU-IOV Module (GIM, where IOV is I/O Virtualization) driver and follow the steps below.z
sudo dpkg -i <gim_driver>
sudo reboot
# Load Host Driver to Create 1VF
sudo modprobe gim vf_num=1
# Note: If GIM driver loaded successfully, we could see "gim info:(gim_init:213) *****Running GIM*****" in dmesg
lspci -d 1002:
Which should output something like:
01:00.0 PCI bridge: Advanced Micro Devices, Inc. [AMD/ATI] Device 1478
02:00.0 PCI bridge: Advanced Micro Devices, Inc. [AMD/ATI] Device 1479
03:00.0 Display controller: Advanced Micro Devices, Inc. [AMD/ATI] Device 73a1
03:02.0 Display controller: Advanced Micro Devices, Inc. [AMD/ATI] Device 73ae → VF
Guest OS installation#
First, assign GPU virtual function (VF) to VM using the following steps.
Shut down the VM.
Run
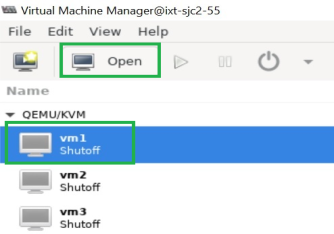
virt-managerIn the Virtual Machine Manager GUI, select the VM and click Open.
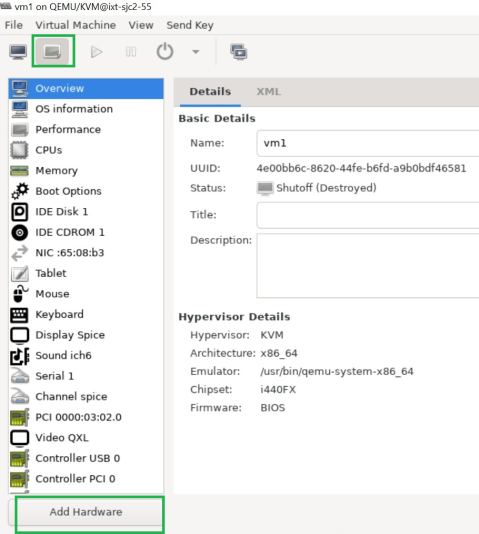
In the VM GUI, go to Show Virtual Hardware Details > Add Hardware to configure hardware.
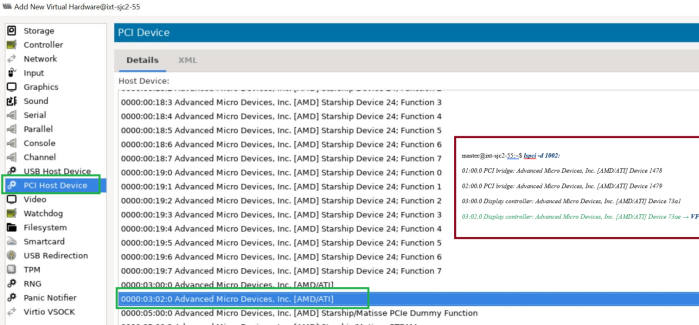
Go to Add Hardware > PCI Host Device > VF and click Finish.
Then start the VM.
Finally install ROCm on the virtual machine (VM). For detailed instructions, refer to the Linux install guide.