Inference optimization with MIGraphX#
2024-02-12
15 min read time
The following sections cover inferencing and introduces MIGraphX.
Inference#
The inference is where capabilities learned during deep-learning training are put to work. It refers to using a fully trained neural network to make conclusions (predictions) on unseen data that the model has never interacted with before. Deep-learning inferencing is achieved by feeding new data, such as new images, to the network, giving the Deep Neural Network a chance to classify the image.
Taking our previous example of MNIST, the DNN can be fed new images of handwritten digit images, allowing the neural network to classify digits. A fully trained DNN should make accurate predictions about what an image represents, and inference cannot happen without training.
MIGraphX introduction#
MIGraphX is a graph compiler focused on accelerating the machine-learning inference that can target AMD GPUs and CPUs. MIGraphX accelerates the machine-learning models by leveraging several graph-level transformations and optimizations. These optimizations include:
Operator fusion
Arithmetic simplifications
Dead-code elimination
Common subexpression elimination (CSE)
Constant propagation
After doing all these transformations, MIGraphX emits code for the AMD GPU by calling to MIOpen or rocBLAS or creating HIP kernels for a particular operator. MIGraphX can also target CPUs using DNNL or ZenDNN libraries.
MIGraphX provides easy-to-use APIs in C++ and Python to import machine models in ONNX or TensorFlow. Users can compile, save, load, and run these models using the MIGraphX C++ and Python APIs. Internally, MIGraphX parses ONNX or TensorFlow models into internal graph representation where each operator in the model gets mapped to an operator within MIGraphX. Each of these operators defines various attributes such as:
Number of arguments
Type of arguments
Shape of arguments
After optimization passes, all these operators get mapped to different kernels on GPUs or CPUs.
After importing a model into MIGraphX, the model is represented as migraphx::program. migraphx::program is made up of migraphx::module. The program can consist of several modules, but it always has one main_module. Modules are made up of migraphx::instruction_ref. Instructions contain the migraphx::op and arguments to the operator.
Installing MIGraphX#
There are three options to get started with MIGraphX installation. MIGraphX depends on ROCm libraries; assume that the machine has ROCm installed.
Option 1: installing binaries#
To install MIGraphX on Debian-based systems like Ubuntu, use the following command:
sudo apt update && sudo apt install -y migraphx
The header files and libraries are installed under /opt/rocm-\<version\>, where <version> is the ROCm version.
Option 2: building from source#
There are two ways to build the MIGraphX sources.
Use the ROCm build tool - This approach uses
[rbuild](https://github.com/ROCm/rbuild)to install the prerequisites and build the libraries with just one command.or
Use CMake - This approach uses a script to install the prerequisites, then uses CMake to build the source.
For detailed steps on building from source and installing dependencies, refer to the following README file:
Option 3: use docker#
To use Docker, follow these steps:
The easiest way to set up the development environment is to use Docker. To build Docker from scratch, first clone the MIGraphX repository by running:
git clone --recursive https://github.com/ROCm/AMDMIGraphX
The repository contains a Dockerfile from which you can build a Docker image as:
docker build -t migraphx .
Then to enter the development environment, use Docker run:
docker run --device='/dev/kfd' --device='/dev/dri' -v=`pwd`:/code/AMDMIGraphX -w /code/AMDMIGraphX --group-add video -it migraphx
The Docker image contains all the prerequisites required for the installation, so users can go to the folder /code/AMDMIGraphX and follow the steps mentioned in Option 2: Building from Source.
MIGraphX example#
MIGraphX provides both C++ and Python APIs. The following sections show examples of both using the Inception v3 model. To walk through the examples, fetch the Inception v3 ONNX model by running the following:
import torch
import torchvision.models as models
inception = models.inception_v3(pretrained=True)
torch.onnx.export(inception,torch.randn(1,3,299,299), "inceptioni1.onnx")
This will create inceptioni1.onnx, which can be imported in MIGraphX using C++ or Python API.
MIGraphX Python API#
Follow these steps:
To import the MIGraphX module in Python script, set
PYTHONPATHto the MIGraphX libraries installation. If binaries are installed using steps mentioned in Option 1: Installing Binaries, perform the following action:export PYTHONPATH=$PYTHONPATH:/opt/rocm/
The following script shows the usage of Python API to import the ONNX model, compile it, and run inference on it. Set
LD_LIBRARY_PATHto/opt/rocm/if required.# import migraphx and numpy import migraphx import numpy as np # import and parse inception model model = migraphx.parse_onnx("inceptioni1.onnx") # compile model for the GPU target model.compile(migraphx.get_target("gpu")) # optionally print compiled model model.print() # create random input image input_image = np.random.rand(1, 3, 299, 299).astype('float32') # feed image to model, 'x.1` is the input param name results = model.run({'x.1': input_image}) # get the results back result_np = np.array(results[0]) # print the inferred class of the input image print(np.argmax(result_np))
Find additional examples of Python API in the
/examplesdirectory of the MIGraphX repository.
MIGraphX C++ API#
Follow these steps:
The following is a minimalist example that shows the usage of MIGraphX C++ API to load ONNX file, compile it for the GPU, and run inference on it. To use MIGraphX C++ API, you only need to load the
migraphx.hppfile. This example runs inference on the Inception v3 model.#include <vector> #include <string> #include <algorithm> #include <ctime> #include <random> #include <migraphx/migraphx.hpp> int main(int argc, char** argv) { migraphx::program prog; migraphx::onnx_options onnx_opts; // import and parse onnx file into migraphx::program prog = parse_onnx("inceptioni1.onnx", onnx_opts); // print imported model prog.print(); migraphx::target targ = migraphx::target("gpu"); migraphx::compile_options comp_opts; comp_opts.set_offload_copy(); // compile for the GPU prog.compile(targ, comp_opts); // print the compiled program prog.print(); // randomly generate input image // of shape (1, 3, 299, 299) std::srand(unsigned(std::time(nullptr))); std::vector<float> input_image(1*299*299*3); std::generate(input_image.begin(), input_image.end(), std::rand); // users need to provide data for the input // parameters in order to run inference // you can query into migraph program for the parameters migraphx::program_parameters prog_params; auto param_shapes = prog.get_parameter_shapes(); auto input = param_shapes.names().front(); // create argument for the parameter prog_params.add(input, migraphx::argument(param_shapes[input], input_image.data())); // run inference auto outputs = prog.eval(prog_params); // read back the output float* results = reinterpret_cast<float*>(outputs[0].data()); float* max = std::max_element(results, results + 1000); int answer = max - results; std::cout << "answer: " << answer << std::endl; }
To compile this program, you can use CMake and you only need to link the
migraphx::clibrary to use MIGraphX’s C++ API. The following is theCMakeLists.txtfile that can build the earlier example:cmake_minimum_required(VERSION 3.5) project (CAI) set (CMAKE_CXX_STANDARD 14) set (EXAMPLE inception_inference) list (APPEND CMAKE_PREFIX_PATH /opt/rocm/hip /opt/rocm) find_package (migraphx) message("source file: " ${EXAMPLE}.cpp " ---> bin: " ${EXAMPLE}) add_executable(${EXAMPLE} ${EXAMPLE}.cpp) target_link_libraries(${EXAMPLE} migraphx::c)
To build the executable file, run the following from the directory containing the
inception_inference.cppfile:mkdir build cd build cmake .. make -j$(nproc) ./inception_inference
Note
Set `LD_LIBRARY_PATH` to `/opt/rocm/lib` if required during the build. Additional examples can be found in the MIGraphX repository under the `/examples/` directory.
Tuning MIGraphX#
MIGraphX uses MIOpen kernels to target AMD GPU. For the model compiled with MIGraphX, tune MIOpen to pick the best possible kernel implementation. The MIOpen tuning results in a significant performance boost. Tuning can be done by setting the environment variable MIOPEN_FIND_ENFORCE=3.
Note
The tuning process can take a long time to finish.
Example: The average inference time of the inception model example shown previously over 100 iterations using untuned kernels is 0.01383ms. After tuning, it reduces to 0.00459ms, which is a 3x improvement. This result is from ROCm v4.5 on a MI100 GPU.
Note
The results may vary depending on the system configurations.
For reference, the following code snippet shows inference runs for only the first 10 iterations for both tuned and untuned kernels:
### UNTUNED ###
iterator : 0
Inference complete
Inference time: 0.063ms
iterator : 1
Inference complete
Inference time: 0.008ms
iterator : 2
Inference complete
Inference time: 0.007ms
iterator : 3
Inference complete
Inference time: 0.007ms
iterator : 4
Inference complete
Inference time: 0.007ms
iterator : 5
Inference complete
Inference time: 0.008ms
iterator : 6
Inference complete
Inference time: 0.007ms
iterator : 7
Inference complete
Inference time: 0.028ms
iterator : 8
Inference complete
Inference time: 0.029ms
iterator : 9
Inference complete
Inference time: 0.029ms

### TUNED ###
iterator : 0
Inference complete
Inference time: 0.063ms
iterator : 1
Inference complete
Inference time: 0.004ms
iterator : 2
Inference complete
Inference time: 0.004ms
iterator : 3
Inference complete
Inference time: 0.004ms
iterator : 4
Inference complete
Inference time: 0.004ms
iterator : 5
Inference complete
Inference time: 0.004ms
iterator : 6
Inference complete
Inference time: 0.004ms
iterator : 7
Inference complete
Inference time: 0.004ms
iterator : 8
Inference complete
Inference time: 0.004ms
iterator : 9
Inference complete
Inference time: 0.004ms
YModel#
The best inference performance through MIGraphX is conditioned upon having tuned kernel configurations stored in a /home local User Database (DB). If a user were to move their model to a different server or allow a different user to use it, they would have to run through the MIOpen tuning process again to populate the next User DB with the best kernel configurations and corresponding solvers.
Tuning is time consuming, and if the users have not performed tuning, they would see discrepancies between expected or claimed inference performance and actual inference performance. This has led to repetitive and time-consuming tuning tasks for each user.
MIGraphX introduces a feature, known as YModel, that stores the kernel config parameters found during tuning into a .mxr file. This ensures the same level of expected performance, even when a model is copied to a different user/system.
The YModel feature is available starting from ROCm 5.4.1 and UIF 1.1.
YModel example#
Through the migraphx-driver functionality, you can generate .mxr files with tuning information stored inside it by passing additional --binary --output model.mxr to migraphx-driver along with the rest of the necessary flags.
For example, to generate .mxr file from the ONNX model, use the following:
./path/to/migraphx-driver compile --onnx resnet50.onnx --enable-offload-copy --binary --output resnet50.mxr
To run generated .mxr files through migraphx-driver, use the following:
./path/to/migraphx-driver run --migraphx resnet50.mxr --enable-offload-copy
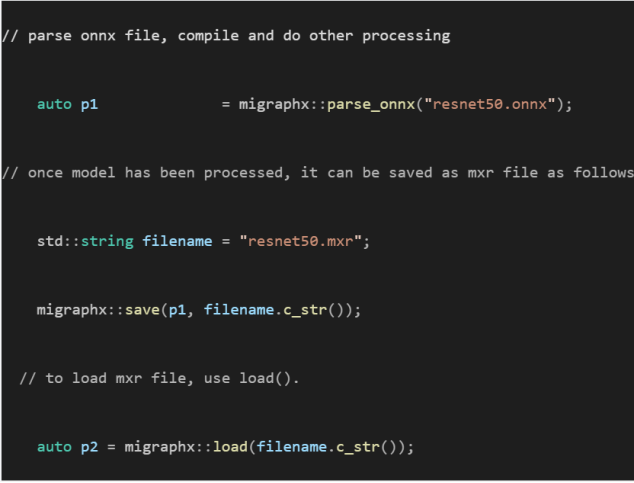
Alternatively, you can use the MIGraphX C++ or Python API to generate .mxr files.