PyTorch Installation for ROCm#
2023-06-28
15 min read time
PyTorch#
PyTorch is an open source Machine Learning Python library, primarily differentiated by Tensor computing with GPU acceleration and a type-based automatic differentiation. Other advanced features include:
Support for distributed training
Native ONNX support
C++ front-end
The ability to deploy at scale using TorchServe
A production-ready deployment mechanism through TorchScript
Installing PyTorch#
To install ROCm on bare metal, refer to the sections GPU and OS Support (Linux) and Compatibility for hardware, software and 3rd-party framework compatibility between ROCm and PyTorch. The recommended option to get a PyTorch environment is through Docker. However, installing the PyTorch wheels package on bare metal is also supported.
Option 1 (Recommended): Use Docker Image with PyTorch Pre-Installed#
Using Docker gives you portability and access to a prebuilt Docker container that has been rigorously tested within AMD. This might also save on the compilation time and should perform as it did when tested without facing potential installation issues.
Follow these steps:
Pull the latest public PyTorch Docker image.
docker pull rocm/pytorch:latest
Optionally, you may download a specific and supported configuration with different user-space ROCm versions, PyTorch versions, and supported operating systems. To download the PyTorch Docker image, refer to https://hub.docker.com/r/rocm/pytorch.
Start a Docker container using the downloaded image.
docker run -it --cap-add=SYS_PTRACE --security-opt seccomp=unconfined --device=/dev/kfd --device=/dev/dri --group-add video --ipc=host --shm-size 8G rocm/pytorch:latest
Note
This will automatically download the image if it does not exist on the host. You can also pass the -v argument to mount any data directories from the host onto the container.
Option 2: Install PyTorch Using Wheels Package#
PyTorch supports the ROCm platform by providing tested wheels packages. To access this feature, refer to https://pytorch.org/get-started/locally/ and choose the “ROCm” compute platform. Fig. 52 is a matrix from https://pytorch.org/ that illustrates the installation compatibility between ROCm and the PyTorch build.
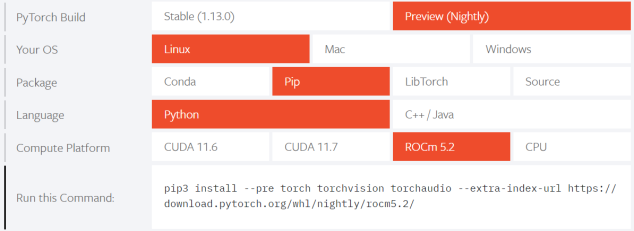
Fig. 52 Installation Matrix from Pytorch#
To install PyTorch using the wheels package, follow these installation steps:
Choose one of the following options: a. Obtain a base Docker image with the correct user-space ROCm version installed from https://hub.docker.com/repository/docker/rocm/dev-ubuntu-20.04.
or
b. Download a base OS Docker image and install ROCm following the installation directions in the section Installation. ROCm 5.2 is installed in this example, as supported by the installation matrix from https://pytorch.org/.
or
c. Install on bare metal. Skip to Step 3.
docker run -it --device=/dev/kfd --device=/dev/dri --group-add video rocm/dev-ubuntu-20.04:latest
Start the Docker container, if not installing on bare metal.
docker run -it --device=/dev/kfd --device=/dev/dri --group-add video rocm/dev-ubuntu-20.04:latest
Install any dependencies needed for installing the wheels package.
sudo apt update
sudo apt install libjpeg-dev python3-dev
pip3 install wheel setuptools
Install torch,
torchvision, andtorchaudioas specified by the installation matrix.Note
ROCm 5.2 PyTorch wheel in the command below is shown for reference.
pip3 install --pre torch torchvision torchaudio --extra-index-url https://download.pytorch.org/whl/nightly/rocm5.2/
Option 3: Install PyTorch Using PyTorch ROCm Base Docker Image#
A prebuilt base Docker image is used to build PyTorch in this option. The base Docker has all dependencies installed, including:
ROCm
Torchvision
Conda packages
Compiler toolchain
Additionally, a particular environment flag (BUILD_ENVIRONMENT) is set, and
the build scripts utilize that to determine the build environment configuration.
Follow these steps:
Obtain the Docker image.
docker pull rocm/pytorch:latest-base
The above will download the base container, which does not contain PyTorch.
Start a Docker container using the image.
docker run -it --cap-add=SYS_PTRACE --security-opt seccomp=unconfined --device=/dev/kfd --device=/dev/dri --group-add video --ipc=host --shm-size 8G rocm/pytorch:latest-base
You can also pass the -v argument to mount any data directories from the host onto the container.
Clone the PyTorch repository.
cd ~
git clone https://github.com/pytorch/pytorch.git
cd pytorch
git submodule update --init --recursive
Build PyTorch for ROCm.
Note
By default in the
rocm/pytorch:latest-base, PyTorch builds for these architectures simultaneously:gfx900
gfx906
gfx908
gfx90a
gfx1030
To determine your AMD uarch, run:
rocminfo | grep gfx
In the event you want to compile only for your uarch, use:
export PYTORCH_ROCM_ARCH=<uarch>
<uarch>is the architecture reported by therocminfocommand.Build PyTorch using the following command:
./.jenkins/pytorch/build.sh
This will first convert PyTorch sources for HIP compatibility and build the PyTorch framework.
Alternatively, build PyTorch by issuing the following commands:
python3 tools/amd_build/build_amd.py
USE_ROCM=1 MAX_JOBS=4 python3 setup.py install --user
Option 4: Install Using PyTorch Upstream Docker File#
Instead of using a prebuilt base Docker image, you can build a custom base Docker image using scripts from the PyTorch repository. This will utilize a standard Docker image from operating system maintainers and install all the dependencies required to build PyTorch, including
ROCm
Torchvision
Conda packages
Compiler toolchain
Follow these steps:
Clone the PyTorch repository on the host.
cd ~
git clone https://github.com/pytorch/pytorch.git
cd pytorch
git submodule update --init --recursive
Build the PyTorch Docker image.
cd.circleci/docker
./build.sh pytorch-linux-bionic-rocm<version>-py3.7
# eg. ./build.sh pytorch-linux-bionic-rocm3.10-py3.7
This should be complete with a message “Successfully build
<image_id>.”Start a Docker container using the image:
docker run -it --cap-add=SYS_PTRACE --security-opt
seccomp=unconfined --device=/dev/kfd --device=/dev/dri --group-add
video --ipc=host --shm-size 8G <image_id>
You can also pass -v argument to mount any data directories from the host onto the container.
Clone the PyTorch repository.
cd ~
git clone https://github.com/pytorch/pytorch.git
cd pytorch
git submodule update --init --recursive
Build PyTorch for ROCm.
Note
By default in the
rocm/pytorch:latest-base, PyTorch builds for these architectures simultaneously:gfx900
gfx906
gfx908
gfx90a
gfx1030
To determine your AMD uarch, run:
rocminfo | grep gfx
If you want to compile only for your uarch:
export PYTORCH_ROCM_ARCH=<uarch>
<uarch>is the architecture reported by therocminfocommand.Build PyTorch using:
./.jenkins/pytorch/build.sh
This will first convert PyTorch sources to be HIP compatible and then build the PyTorch framework.
Alternatively, build PyTorch by issuing the following commands:
python3 tools/amd_build/build_amd.py
USE_ROCM=1 MAX_JOBS=4 python3 setup.py install --user
Test the PyTorch Installation#
You can use PyTorch unit tests to validate a PyTorch installation. If using a prebuilt PyTorch Docker image from AMD ROCm DockerHub or installing an official wheels package, these tests are already run on those configurations. Alternatively, you can manually run the unit tests to validate the PyTorch installation fully.
Follow these steps:
Test if PyTorch is installed and accessible by importing the torch package in Python.
Note
Do not run in the PyTorch git folder.
python3 -c 'import torch' 2> /dev/null && echo 'Success' || echo 'Failure'
Test if the GPU is accessible from PyTorch. In the PyTorch framework,
torch.cudais a generic mechanism to access the GPU; it will access an AMD GPU only if available.python3 -c 'import torch; print(torch.cuda.is_available())'
Run the unit tests to validate the PyTorch installation fully. Run the following command from the PyTorch home directory:
BUILD_ENVIRONMENT=${BUILD_ENVIRONMENT:-rocm} ./.jenkins/pytorch/test.sh
This ensures that even for wheel installs in a non-controlled environment, the required environment variable will be set to skip certain unit tests for ROCm.
Note
Make sure the PyTorch source code is corresponding to the PyTorch wheel or installation in the Docker image. Incompatible PyTorch source code might give errors when running the unit tests.
This will first install some dependencies, such as a supported
torchvisionversion for PyTorch.torchvisionis used in some PyTorch tests for loading models. Next, this will run all the unit tests.Note
Some tests may be skipped, as appropriate, based on your system configuration. All features of PyTorch are not supported on ROCm, and the tests that evaluate these features are skipped. In addition, depending on the host memory, or the number of available GPUs, other tests may be skipped. No test should fail if the compilation and installation are correct.
Run individual unit tests with the following command:
PYTORCH_TEST_WITH_ROCM=1 python3 test/test_nn.py --verbose
test_nn.pycan be replaced with any other test set.
Run a Basic PyTorch Example#
The PyTorch examples repository provides basic examples that exercise the functionality of the framework. MNIST (Modified National Institute of Standards and Technology) database is a collection of handwritten digits that may be used to train a Convolutional Neural Network for handwriting recognition. Alternatively, ImageNet is a database of images used to train a network for visual object recognition.
Follow these steps:
Clone the PyTorch examples repository.
git clone https://github.com/pytorch/examples.git
Run the MNIST example.
cd examples/mnist
Follow the instructions in the
READMEfile in this folder. In this case:pip3 install -r requirements.txt python3 main.py
Run the ImageNet example.
cd examples/imagenet
Follow the instructions in the
READMEfile in this folder. In this case:pip3 install -r requirements.txt python3 main.py
Using MIOpen kdb files with ROCm PyTorch wheels#
PyTorch uses MIOpen for machine learning primitives. These primitives are compiled into kernels at runtime. Runtime compilation causes a small warm-up phase when starting PyTorch. MIOpen kdb files contain precompiled kernels that can speed up the warm-up phase of an application. More information is available in the MIOpeninstallation page.
MIOpen kdb files can be used with ROCm PyTorch wheels. However, the kdb files need to be placed in a specific location with respect to the PyTorch installation path. A helper script simplifies this task for the user. The script takes in the ROCm version and user’s GPU architecture as inputs, and works for Ubuntu and CentOS.
Helper script: install_kdb_files_for_pytorch_wheels.sh
Usage:
After installing ROCm PyTorch wheels:
[Optional]
export GFX_ARCH=gfx90a[Optional]
export ROCM_VERSION=5.5./install_kdb_files_for_pytorch_wheels.sh
References#
C. Szegedy, V. Vanhoucke, S. Ioffe, J. Shlens and Z. Wojna, “Rethinking the Inception Architecture for Computer Vision,” CoRR, p. abs/1512.00567, 2015
PyTorch, [Online]. Available: https://pytorch.org/vision/stable/index.html
PyTorch, [Online]. Available: https://pytorch.org/hub/pytorch_vision_inception_v3/
Stanford, [Online]. Available: http://cs231n.stanford.edu/
Wikipedia, [Online]. Available: https://en.wikipedia.org/wiki/Cross_entropy
AMD, “ROCm issues,” [Online]. Available: RadeonOpenCompute/ROCm#issues
PyTorch, [Online image]. https://pytorch.org/assets/brand-guidelines/PyTorch-Brand-Guidelines.pdf
TensorFlow, [Online image]. https://www.tensorflow.org/extras/tensorflow_brand_guidelines.pdf
MAGMA, [Online image]. https://bitbucket.org/icl/magma/src/master/docs/
Advanced Micro Devices, Inc., [Online]. Available: https://rocmsoftwareplatform.github.io/AMDMIGraphX/doc/html/
Advanced Micro Devices, Inc., [Online]. Available: ROCmSoftwarePlatform/AMDMIGraphX
Docker, [Online]. https://docs.docker.com/get-started/overview/
Torchvision, [Online]. Available https://pytorch.org/vision/master/index.html?highlight=torchvision#module-torchvision