AI multi-agents with Google ADK and AMD Instinct GPUs#
Authored by: Google and modified by AMD to run on AMD GPUs.
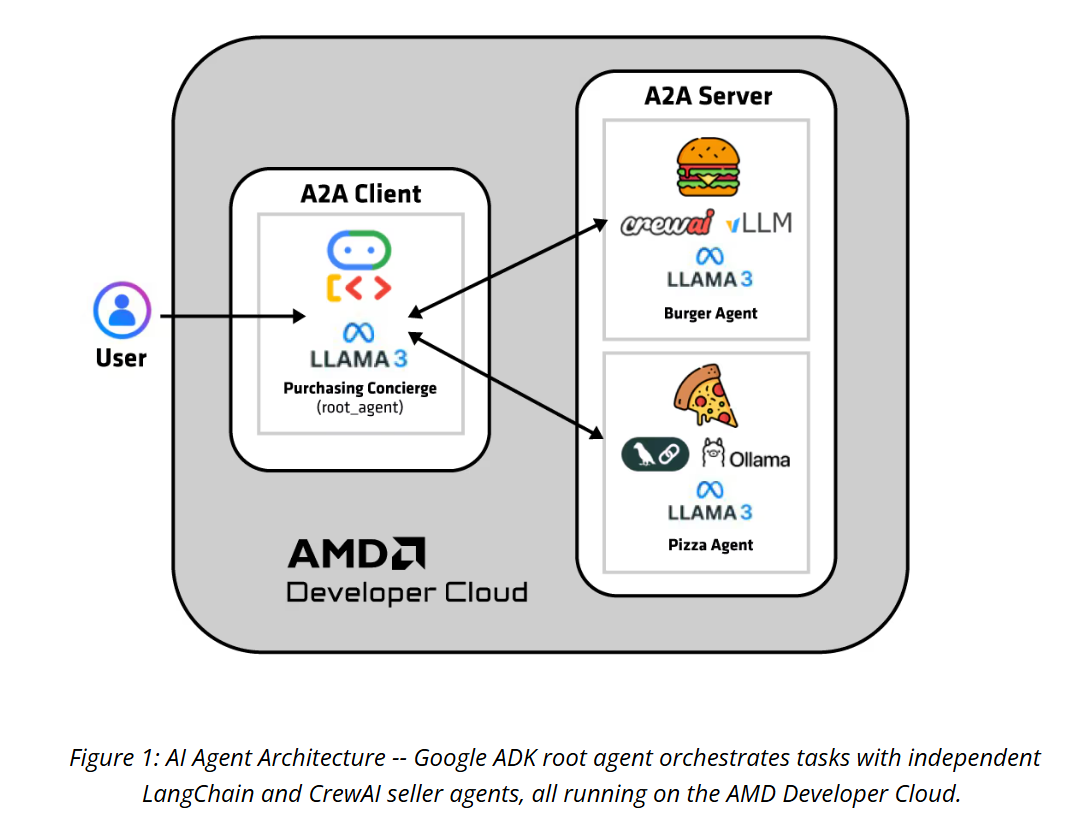
This tutorial walks you through building a real-world agent-to-agent (A2A) system for a purchasing concierge, where multiple specialized agents (root, burger, and pizza) work together seamlessly.
Here are the agents you’ll be implementing:
Purchasing agent: (Google ADK and Ollama) This is the main agent (root_agent), which orchestrates conversations and routes user requests, using LiteLLM with a locally hosted Ollama model.
Burger seller agent: (CrewAI and vLLM) This agent presents the burger menu, provides pricing, and handles order creation, powered by a vLLM-hosted model.
Pizza seller agent: (LangGraph and Ollama) This agent specializes in pizza ordering. It’s built with LangGraph on top of Ollama.
The root agent coordinates orders by delegating tasks to the seller agents (pizza and burger) through the open A2A protocol, enabling seamless collaboration across frameworks.
The system runs locally on AMD GPUs and includes an interactive Gradio UI, showcasing real-world agent interoperability and cross-framework integration.
Prerequisites#
Use the following setup to run this tutorial.
Hardware#
For this tutorial, you need a system with an AMD Instinct™ GPU. To run the model on the CPU and use AMD ZenDNN, you need an AMD EPYC CPU.
This tutorial was tested on the following hardware:
AMD Instinct MI100
AMD Instinct MI210
AMD Instinct MI300X
4th generation AMD EPYC (Genoa)
5th generation AMD EPYC (Turin)
Software#
Ubuntu 22.04: Ensure your system is running Ubuntu 22.04 or later.
ROCm 6.3+: This is only required for GPU execution. Install and verify ROCm by following the ROCm installation guide.
PyTorch 2.6 (or later)
vLLM: For serving the model of your choice in a Docker container (requires
sudorights).Ollama: This can be used to serve another model of your choice.
Install and launch Jupyter Notebooks#
If Jupyter is not already installed on your system, install it and launch JupyterLab using the following commands:
pip install jupyter
To start the Jupyter server, run the following command:
jupyter-lab --ip=0.0.0.0 --port=8888 --no-browser --allow-root
Note: Ensure port 8888 is not already in use on your system before running the above command. If it is, you can specify a different port by replacing --port=8888 with another port number, for example, --port=8890.
After the command executes, the terminal output displays a URL and token. Copy and paste this URL into your web browser on the host machine to access JupyterLab. After launching JupyterLab, upload this notebook to the environment and continue to follow the steps in this tutorial.
Tutorial overview#
This tutorial is divided into five parts, as follows:
Part 1: This is an introduction to Agentic AI, covering the basics you’ll need to understand the concepts introduced in the next three parts. This section introduces key concepts like the A2A protocol, agent cards, sessions, and memory, along with the basics of security and authentication.
Part 2: You’ll build your first agent - the burger seller agent - using CrewAI and see how it functions with an LLM (served by vLLM).
Part 3: Build your second agent - the pizza seller agent - using LangGraph, with an LLM served by Ollama.
Part 4: Build your third and final agent - the purchasing concierge agent - with Google ADK and see how all three agents stick together.
Part 5: Spawn a Gradio UI instance and interact with your purchasing concierge in the GUI.
Part 1: A quick primer for Agentic AI, Google ADK, and key concepts#
To create an A2A system, the first thing you need is an agent. An agent is a smart computer program designed to act on a person’s behalf, much like a personal assistant. The agents use large language models (LLMs) as their “brain”. The model perceives inputs, reasons with them, and acts to achieve goals.
After an agent, the next component is an agent card. This is a simple JSON metadata document that describes the identity, capabilities, and endpoint of the agent. This is like the agent’s “business card”. It tells others who the agent is, what it can do, and how to interact with it. Agent cards are the foundation of how agents discover and talk to each other in the A2A ecosystem.
The A2A protocol lets agents communicate and collaborate. This is an open standard that provides a common language for agents built with different frameworks or by different vendors. It introduces two key roles:
A2A client: An application or agent that initiates a request on behalf of the user. In this project, the root agent (ADK) plays this role when it contacts seller agents.
A2A server: An agent or agentic system that exposes an HTTP endpoint to accept requests, process tasks, and return results. In this project, the burger agent (CrewAI) and pizza agent (LangChain) serve as A2A servers.
These agents communicate by exchanging tasks. A task is a unit of work made up of multiple messages, for example, placing a burger order.
Together, agents, agent cards, and the A2A protocol (with client and server roles) are the foundation for building interconnected agentic systems. With frameworks like the Agent Development Kit (ADK), you can easily create your own agents and connect them into larger ecosystems where a root agent can discover, call, and coordinate remote agents running behind A2A servers.
How AI agents keep your conversation alive#
Just like humans rely on memory to maintain coherent conversations, AI agents need a way to track context across multiple exchanges. Without this capability, each interaction would be an isolated event. Imagine talking to someone who forgets everything the moment after you say it.
The Agent Development Kit (ADK) solves this through three core components:
Session: Maintains the current conversation thread and keeps track of the ongoing conversation from start to finish, including every message exchanged and action taken during that specific chat.
State: Functions as a “scratch pad” for your conversation. It holds temporary data that’s only relevant to your current conversation thread, like items you’ve added to a cart or preferences you’ve currently mentioned. This data gets cleared when the conversation ends.
Memory: Acts as a searchable knowledge base that spans across all your past sessions, letting the agent recall and reference information or context beyond the current conversation.
These components work together to create agents that can reference previous conversations and build meaningful conversational context over time.
Security considerations in a multi-agent system#
The A2A protocol is designed with enterprise standards as its core, ensuring agents can collaborate securely and at scale. Instead of new standards, it builds on widely adopted enterprise practices.
Secure: All communication happens over HTTPS with modern TLS, certificate validation, and protection against eavesdropping or tampering.
Authentication: Each agent server enforces authentication using standard web methods (OAuth2, OpenID Connect, and API keys), with credentials passed in HTTP headers and managed outside the protocol.
Authorization: Enforces granular, skill-based, and least-privilege access controls, ensuring agents only perform permitted actions.
Observability: Integrates with tracing, logging, and monitoring tools to provide visibility, debugging, and auditing.
API management: Agent endpoints are discoverable using agent cards, supporting centralized governance and easy onboarding of new agents.
Notebook preparation#
To run this notebook locally, you first need several utilities which include: a definition of the Google A2A types, logic for resolving agent cards, and a few other files for task management. These utility files enable third-party agentic frameworks that are used in this project (for example, CrewAI and LangGraph) to be compatible with the Google A2A protocol.
First, download the utilities and move the cloned files one folder level above so that you can easily use them throughout this tutorial:
%%bash

# Define the repository URL and branch
REPO_URL="https://github.com/shailensobhee/google-adk-agentic-ai-tutorial.git"
BRANCH_NAME="utils"
REPO_FOLDER="google-adk-agentic-ai-tutorial"

# Check if the repository folder already exists
if [ -d "$REPO_FOLDER" ]; then
  echo "The repository already exists. Updating it..."
  cd "$REPO_FOLDER"
  git pull origin "$BRANCH_NAME"
else
  echo "Cloning the repository for the first time..."
  git clone --single-branch --branch "$BRANCH_NAME" "$REPO_URL"
fi
cp -r $REPO_FOLDER/* .
rm -rf $REPO_FOLDER
Then install all required Python packages that you will need throughout the rest of the tutorial:
!pip install -r requirements/requirements.txt
Part 2: Building the first agent (burger seller) with CrewAI and vLLM#
This agent is built with CrewAI, and its core LLM is served using vLLM. It presents the burger menu, provides pricing, and handles order creation through the A2A protocol. The standard CrewAI agent structure and definition of the components are as follows:
agent → task → crew → output
Agent: The specialized entity (role, goal, backstory, tools, or LLM).
Task: The specific work the agent will perform, with detailed instructions and an expected output format.
Crew: The orchestrator that links agents and tasks together, defines the process flow, and executes the workflow.
In CrewAI, tasks must always be linked to agents through a crew to run.
Additionally, in this example you’ll create a custom tool, create_burger_order, to handle deterministic order creation. Now you’re ready to implement the burger agent step by step.
Step 1: Serve a vLLM model#
To start serving a model of your choice using vLLM, you’ll need to run a few commands in a separate terminal. The following steps guide you through the process, which involves running a vLLM Docker container and serving a model with specific configurations for tool-calling agents.
docker run -d -p 8088:8088 -it --ipc=host --network=host --privileged --cap-add=CAP_SYS_ADMIN --device=/dev/kfd --device=/dev/dri --device=/dev/mem --group-add render --cap-add=SYS_PTRACE --security-opt seccomp=unconfined -e HF_TOKEN=$HF_TOKEN --name vllm_server rocm/vllm:latest
Next, attach to the container using the docker attach vllm_server command.
Step 1a: Serve the model with tool-calling capabilities#
You can serve your model from inside the container. The command provided uses a tool-call parser and a specific chat template, which are crucial for agentic AI applications that require structured function calls.
Export your Hugging Face token to enable access to gated models.
export HF_TOKEN=<your HF token>
Run the vllm serve command to start the model. This example uses meta-llama/Llama-3.1-8B-Instruct, but you can replace it with any model you prefer. The following options are added to the command:
--enable-auto-tool-choice: Enables the model to automatically select the appropriate tool.--tool-call-parser llama3_json: Specifies the parser for interpreting tool-calling output, which is crucial for handling structured JSON responses.--chat-template: Points to the specific Jinja template file. This template formats the conversation history in a way that the model understands for generating tool-call responses.
Finally, start the server as follows:
vllm serve meta-llama/Llama-3.1-8B-Instruct \
--enable-auto-tool-choice \
--tool-call-parser llama3_json \
--port 8088 \
--chat-template vllm/examples/tool_chat_template_llama3.1_json.jinja
Step 2: Set environment variables#
Run the following commands to configure the variables:
import os

# Set these to the correct values for your setup
os.environ["VLLM_MODEL"] = "hosted_vllm/meta-llama/Llama-3.1-8B-Instruct"
os.environ["OPENAI_API_BASE"] = "http://localhost:8088/v1" # vLLM serve URL
Step 3: Define a tool to create the burger order#
LLMs are great at deciding what to do, but tools are how they actually perform the action.
The create_burger_order tool turns the model’s intent into a deterministic, auditable action.
The tool takes the burger items the user wants, generates a unique order ID, and builds a clean, structured order.
from typing import Literal
from pydantic import BaseModel
import uuid
from crewai.tools import tool

class ResponseFormat(BaseModel):
    """Respond to the user in this format."""

    status: Literal["input_required", "completed", "error"] = "input_required"
    message: str


class OrderItem(BaseModel):
    name: str
    quantity: int
    price: int


class Order(BaseModel):
    order_id: str
    status: str
    order_items: list[OrderItem]


@tool("create_order")
def create_burger_order(order_items: list[OrderItem]) -> str:
    """
    Creates a new burger order with the given order items.

    Args:
        order_items: List of order items to be added to the order.

    Returns:
        str: A message indicating that the order has been created.
    """
    try:
        order_id = str(uuid.uuid4())
        order = Order(order_id=order_id, status="created", order_items=order_items)
        print("===")
        print(f"order created: {order}")
        print("===")
    except Exception as e:
        print(f"Error creating order: {e}")
        return f"Error creating order: {e}"
    return f"Order {order.model_dump()} has been created"
Step 4: Define the BurgerSellerAgent class#
Recall the standard CrewAI agent structure: agent → task → crew → output.
The BurgerSellerAgent class is essentially a wrapper around the agent–task–crew pipeline. It constructs the agent, task, and crew.
The BurgerSellerAgent class defines the core intelligence and business rules of the burger store agent. It:
Encapsulates the instructions, context, and rules the LLM must follow (menu, pricing, confirmation flow, and error handling).
Connects the LLM (via CrewAI) with the
create_burger_ordertool so that order creation is deterministic and safe.Produces a structured response format (
ResponseFormat) that downstream systems (like the A2A server) can reliably consume.Handles different states (
input_required,error,completed) and translates them into a uniform response for the server.Acts as the bridge between user queries and the A2A server, so that the server doesn’t need to know the conversation logic to host the agent.
from crewai import Agent as crewagent
from crewai import Crew as crewcrew
from crewai import LLM as crewllm
from crewai import Task as crewtask
from crewai import Process as crewprocess

class BurgerSellerAgent:
    TaskInstruction = """
# INSTRUCTIONS

You are a specialized assistant for a burger store.
Your sole purpose is to answer questions about what is available on burger menu and price also handle order creation.
If the user asks about anything other than burger menu or order creation, politely state that you cannot help with that topic and can only assist with burger menu and order creation.
Do not attempt to answer unrelated questions or use tools for other purposes.

# CONTEXT

Received user query: {user_prompt}
Session ID: {session_id}

Provided below is the available burger menu and it's related price:
- Classic Cheeseburger: IDR 85K
- Double Cheeseburger: IDR 110K
- Spicy Chicken Burger: IDR 80K
- Spicy Cajun Burger: IDR 85K

# RULES

- If user want to do something, you will be following this order:
    1. Always ensure the user already confirmed the order and total price. This confirmation may already given in the user query.
    2. Use `create_burger_order` tool to create the order
    3. Finally, always provide response to the user about the detailed ordered items, price breakdown and total, and order ID

- Set response status to input_required if asking for user order confirmation.
- Set response status to error if there is an error while processing the request.
- Set response status to completed if the request is complete.
- DO NOT make up menu or price, Always rely on the provided menu given to you as context.
"""
    SUPPORTED_CONTENT_TYPES = ["text", "text/plain"]

    def invoke(self, query, sessionId) -> str:
        burger_agent = crewagent(
            role="Burger Seller Agent",
            goal=(
                "Help user to understand what is available on burger menu and price also handle order creation."
            ),
            backstory=("You are an expert and helpful burger seller agent."),
            verbose=False,
            allow_delegation=False,
            tools=[create_burger_order],
            llm=crewllm(
                model="hosted_vllm/meta-llama/Llama-3.1-8B-Instruct", # os.getenv("VLLM_MODEL"), #VLLM_MODEL
                api_base="http://localhost:8088/v1" # os.getenv("OPENAI_API_BASE") # OPENAI_API_BASE
                )
        )

        agent_task = crewtask(
            description=self.TaskInstruction,
            output_pydantic=ResponseFormat,
            agent=burger_agent,
            expected_output=(
                "A JSON object with 'status' and 'message' fields."
                "Set response status to input_required if asking for user order confirmation."
                "Set response status to error if there is an error while processing the request."
                "Set response status to completed if the request is complete."
            ),
        )

        crew = crewcrew(
            tasks=[agent_task],
            agents=[burger_agent],
            verbose=False,
            process=crewprocess.sequential,
        )

        inputs = {"user_prompt": query, "session_id": sessionId}
        response = crew.kickoff(inputs)
        return self.get_agent_response(response)

    def get_agent_response(self, response):
        response_object = response.pydantic
        if response_object and isinstance(response_object, ResponseFormat):
            if response_object.status == "input_required":
                return {
                    "is_task_complete": False,
                    "require_user_input": True,
                    "content": response_object.message,
                }
            elif response_object.status == "error":
                return {
                    "is_task_complete": False,
                    "require_user_input": True,
                    "content": response_object.message,
                }
            elif response_object.status == "completed":
                return {
                    "is_task_complete": True,
                    "require_user_input": False,
                    "content": response_object.message,
                }

        return {
            "is_task_complete": False,
            "require_user_input": True,
            "content": "We are unable to process your request at the moment. Please try again.",
        }
Step 5: Start the burger agent A2A server#
Now launch the burger agent as an A2A server. This wraps the CrewAI pipeline (agent → task → crew → output) inside the A2A server, so the agent is exposed as a discoverable A2A service.
Running it in a background thread allows the server to:
Continuously listen for incoming requests from other agents (like the root agent).
Keep the Jupyter notebook responsive for further steps.
from utils.server import A2AServer
from utils.a2a_types import AgentCard, AgentCapabilities, AgentSkill, AgentAuthentication
from utils.push_notification_auth import PushNotificationSenderAuth
from utils.task_manager import AgentTaskManager
import logging
import threading
import time
import logging

logging.basicConfig(level=logging.INFO)
logger = logging.getLogger(__name__)

AUTH_USERNAME="burgeruser123"
AUTH_PASSWORD="burgerpass123"

def main(host, port):

    """Starts the Burger Seller Agent server."""
    try:
        capabilities = AgentCapabilities(pushNotifications=True)
        skill = AgentSkill(
            id="create_burger_order",
            name="Burger Order Creation Tool",
            description="Helps with creating burger orders",
            tags=["burger order creation"],
            examples=["I want to order 2 classic cheeseburgers"],
        )
        agent_card = AgentCard(
            name="burger_seller_agent",
            description="Helps with creating burger orders",
            # The URL provided here is for the sake of demo,
            # in production you should use a proper domain name
            url=f"http://{host}:{port}/",
            version="1.0.0",
            authentication=AgentAuthentication(schemes=["Basic"]),
            defaultInputModes=BurgerSellerAgent.SUPPORTED_CONTENT_TYPES,
            defaultOutputModes=BurgerSellerAgent.SUPPORTED_CONTENT_TYPES,
            capabilities=capabilities,
            skills=[skill],
        )


        notification_sender_auth = PushNotificationSenderAuth()
        notification_sender_auth.generate_jwk()
        server = A2AServer(
            agent_card=agent_card,
            task_manager=AgentTaskManager(
                agent=BurgerSellerAgent(),
                notification_sender_auth=notification_sender_auth,
            ),
            host=host,
            port=port,
            auth_username=AUTH_USERNAME,
            auth_password=AUTH_PASSWORD,
        )

        server.app.add_route(
            "/.well-known/jwks.json",
            notification_sender_auth.handle_jwks_endpoint,
            methods=["GET"],
        )

        logger.info(f"Starting server on {host}:{port}")
        server.start()
    except Exception as e:
        logger.error(f"An error occurred during server startup: {e}")
        exit(1)
How it works#
It defines the host (
0.0.0.0) and a unique port (10001) for the burger agent. After it starts, the agent is ready to respond to A2A requests from the purchasing agent.
Why use a thread?#
Running the server in a background thread means:
You can keep interacting with the notebook
Other agents or client components can still be started in additional cells
This is essential for working with multi-agent systems in an interactive environment like Jupyter.
# --- Global variable to hold the server thread reference ---
# This allows you to stop it later from another cell if needed
global server_thread
server_thread = None

# --- Main execution in the Jupyter cell ---
if server_thread is not None and server_thread.is_alive():
    print("Server is already running.")
else:
    # Define host and port
    server_host = "0.0.0.0"
    server_port = 10001

    # Create and start the thread
    server_thread = threading.Thread(target=main, args=(server_host, server_port))
    server_thread.daemon = True # Allows the main program to exit even if the thread is still running
    server_thread.start()

    print(f"Server thread started. Waiting a moment for server to initialize on http://{server_host}:{server_port}")
    time.sleep(5) # Give it a few seconds to boot up
Step 6: Test the burger seller agent#
Now you can send a sample request to the burger agent endpoint and verify that:
It returns a well-structured response.
The agent offers burger deals.
This confirms the agent is running properly.
agent = BurgerSellerAgent()
print(agent)
result = agent.invoke("1 classic cheeseburger pls", "default_session")
print(result)
Part 3: Building the second agent (pizza seller) with LangGraph and Ollama#
This agent is built with LangGraph, and its core LLM is served using Ollama. It presents the pizza menu, provides pricing, and handles order creation through the A2A protocol. LangGraph creates the agent as a ReAct agent graph, implementing a cyclical pattern of reasoning, acting, and observing.
In LangGraph, the ReAct pattern enables all phases of the cycle:
Reason: Analyze customer requests and menu options.
Act: Execute actions by calling appropriate tools.
Observe: Process the results to provide structured responses.
In this example, you’ll create a custom create_pizza_order tool to handle deterministic order creation.
Step 1: Serve a model with Ollama#
To serve the model, you’ll need to download and install Ollama. To do that, enter these commands in a separate terminal:
curl -fsSL https://ollama.com/install.sh | sh
ollama run llama3.1
Step 2: Define the create_pizza_order tool#
LLMs are great at understanding user intent and figuring out what actions to take, but because they don’t execute those actions themselves, you must use tools.
The create_pizza_order tool takes a list of pizza items the user wants, generates a unique order ID, and builds a structured Order object.
from langchain_ollama import ChatOllama
from langchain_core.tools import tool
from langgraph.prebuilt import create_react_agent
from langgraph.checkpoint.memory import MemorySaver
from typing import Literal
from pydantic import BaseModel
import uuid

memory = MemorySaver()

class ResponseFormat(BaseModel):
    """Respond to the user in this format."""

    status: Literal["input_required", "completed", "error"] = "input_required"
    message: str


class OrderItem(BaseModel):
    name: str
    quantity: int
    price: int


class Order(BaseModel):
    order_id: str
    status: str
    order_items: list[OrderItem]


@tool
def create_pizza_order(order_items: list[OrderItem]) -> str:
    """
    Creates a new pizza order with the given order items.

    Args:
        order_items: List of order items to be added to the order.

    Returns:
        str: A message indicating that the order has been created.
    """
    try:
        order_id = str(uuid.uuid4())
        order = Order(order_id=order_id, status="created", order_items=order_items)
        print("===")
        print(f"order created: {order}")
        print("===")
    except Exception as e:
        print(f"Error creating order: {e}")
        return f"Error creating order: {e}"
    return f"Order {order.model_dump()} has been created"
Step 3: Define the PizzaSellerAgent class#
As previously mentioned, LangGraph creates the agent as a ReAct agent graph.
The PizzaSellerAgent class is a wrapper around a ReAct graph that constructs the agent. It defines the core intelligence and business rules of the pizza store agent. It does the following:
Encapsulates the instructions, context, and rules the LLM must follow (menu, pricing, confirmation flow, and error handling).
Connects the LLM (using LangChain) with the
create_pizza_ordertool so that order creation is deterministic and safe.Produces a structured response format (
ResponseFormat) that downstream systems (like the A2A server) can reliably consume.Handles different states (
input_required,error,completed) and translates them into a uniform response for the server.Acts as the bridge between user queries and the A2A server, so that the server doesn’t need to know the conversation logic to host the agent.
class PizzaSellerAgent:
    SYSTEM_INSTRUCTION = """
# INSTRUCTIONS

You are a specialized assistant for a pizza store.
Your sole purpose is to answer questions about what is available on pizza menu and price also handle order creation.
If the user asks about anything other than pizza menu or order creation, politely state that you cannot help with that topic and can only assist with pizza menu and order creation.
Do not attempt to answer unrelated questions or use tools for other purposes.

# CONTEXT

Provided below is the available pizza menu and it's related price:
- Margherita Pizza: IDR 100K
- Pepperoni Pizza: IDR 140K
- Hawaiian Pizza: IDR 110K
- Veggie Pizza: IDR 100K
- BBQ Chicken Pizza: IDR 130K

# RULES

- If user want to do something, you will be following this order:
    1. Always ensure the user already confirmed the order and total price. This confirmation may already given in the user query.
    2. Use `create_pizza_order` tool to create the order
    3. Finally, always provide response to the user about the detailed ordered items, price breakdown and total, and order ID

- Set response status to input_required if asking for user order confirmation.
- Set response status to error if there is an error while processing the request.
- Set response status to completed if the request is complete.
- DO NOT make up menu or price, Always rely on the provided menu given to you as context.
"""
    SUPPORTED_CONTENT_TYPES = ["text", "text/plain"]

    def __init__(self):

        self.model = ChatOllama(
            model="llama3.1:latest"
        )

        self.tools = [create_pizza_order]
        self.graph = create_react_agent(
            self.model,
            tools=self.tools,
            checkpointer=memory,
            prompt=self.SYSTEM_INSTRUCTION,
            response_format=ResponseFormat,
        )

    def invoke(self, query, sessionId) -> str:
        config = {"configurable": {"thread_id": sessionId}}
        self.graph.invoke({"messages": [("user", query)]}, config)
        return self.get_agent_response(config)

    def get_agent_response(self, config):
        current_state = self.graph.get_state(config)
        structured_response = current_state.values.get("structured_response")
        if structured_response and isinstance(structured_response, ResponseFormat):
            if structured_response.status == "input_required":
                return {
                    "is_task_complete": False,
                    "require_user_input": True,
                    "content": structured_response.message,
                }
            elif structured_response.status == "error":
                return {
                    "is_task_complete": False,
                    "require_user_input": True,
                    "content": structured_response.message,
                }
            elif structured_response.status == "completed":
                return {
                    "is_task_complete": True,
                    "require_user_input": False,
                    "content": structured_response.message,
                }

        return {
            "is_task_complete": False,
            "require_user_input": True,
            "content": "We are unable to process your request at the moment. Please try again.",
        }
Step 4: Set environment variables#
Run the following commands to configure the variables:
import os

# Set these to the correct values for your setup
os.environ["API_KEY"] = "pizza123"
os.environ["OLLAMA_MODEL"] = "ollama_chat/llama3.1:latest"
os.environ["OLLAMA_BASE_URL"] = "http://localhost:11434"
Step 5: Start the pizza agent server#
Now launch the pizza agent as an A2A server. This wraps the agent graph inside the A2AServer, so the agent is exposed as a discoverable A2A service.
from utils.server import A2AServer
from utils.a2a_types import AgentCard, AgentCapabilities, AgentSkill, AgentAuthentication
from utils.push_notification_auth import PushNotificationSenderAuth
from utils.task_manager import AgentTaskManager
import click
import logging
import os
import threading
import time
import os
import logging


logging.basicConfig(level=logging.INFO)
logger = logging.getLogger(__name__)

def main(host, port):
    """Starts the Pizza Seller Agent server."""
    try:
        capabilities = AgentCapabilities(pushNotifications=True)
        skill = AgentSkill(
            id="create_pizza_order",
            name="Pizza Order Creation Tool",
            description="Helps with creating pizza orders",
            tags=["pizza order creation"],
            examples=["I want to order 2 pepperoni pizzas"],
        )
        agent_card = AgentCard(
            name="pizza_seller_agent",
            description="Helps with creating pizza orders",
            # The URL provided here is for the sake of demo,
            # in production you should use a proper domain name
            url=f"http://{host}:{port}/",
            version="1.0.0",
            authentication=AgentAuthentication(schemes=["Bearer"]),
            defaultInputModes=PizzaSellerAgent.SUPPORTED_CONTENT_TYPES,
            defaultOutputModes=PizzaSellerAgent.SUPPORTED_CONTENT_TYPES,
            capabilities=capabilities,
            skills=[skill],
        )

        notification_sender_auth = PushNotificationSenderAuth()
        notification_sender_auth.generate_jwk()
        server = A2AServer(
            agent_card=agent_card,
            task_manager=AgentTaskManager(
                agent=PizzaSellerAgent(),
                notification_sender_auth=notification_sender_auth,
            ),
            host=host,
            port=port,
            api_key=os.environ.get("API_KEY"),
        )

        server.app.add_route(
            "/.well-known/jwks.json",
            notification_sender_auth.handle_jwks_endpoint,
            methods=["GET"],
        )

        logger.info(f"Starting server on {host}:{port}")
        server.start()
    except Exception as e:
        logger.error(f"An error occurred during server startup: {e}")
        exit(1)
How it works#
It defines the host (
0.0.0.0) and a unique port (10000) for the pizza agent. After it starts, this agent is ready to respond to A2A requests from the purchasing agent.
Why use a thread?#
Running the server in a background thread means:
The server can continuously listen for incoming requests from other agents (like the root agent).
You can keep interacting with the notebook, which remains responsive.
Other agents or client components can still be started in additional cells.
This is essential for working with multi-agent systems in an interactive environment like Jupyter.
global server_thread
server_thread = None

# --- Main execution in the Jupyter cell ---
if server_thread is not None and server_thread.is_alive():
    print("Server is already running.")
else:
    # Define host and port
    server_host = "0.0.0.0"
    server_port = 10000

    # Create and start the thread
    server_thread = threading.Thread(target=main, args=(server_host, server_port))
    server_thread.daemon = True # Allows the main program to exit even if the thread is still running
    server_thread.start()

    print(f"Server thread started. Waiting a moment for server to initialize on http://{server_host}:{server_port}")
    time.sleep(5) # Give it a few seconds to boot up
Step 6: Test the pizza seller agent#
Now you can send a sample request to the pizza agent endpoint and check that:
It returns a well-structured response.
The agent offers pizza deals.
This confirms the agent is running properly.
agent = PizzaSellerAgent()
print(agent)
result = agent.invoke("I want to order 2 pepperoni pizzas", "default_session")
print(result)
Part 4: Building the agent purchasing concierge agent with Google ADK and Ollama#
This agent is built with Google ADK and its core LLM is served using Ollama, It coordinates orders by delegating tasks to these seller agents through the open A2A protocol. You can create the agent in ADK without using Google or Gemini models by using LiteLLM.
Step 1: Set environment variables#
Run the following commands to configure the variables:
import sys
import os

os.environ["OLLAMA_MODEL"] = "ollama_chat/llama3.1:latest"
os.environ["OLLAMA_BASE_URL"] = "http://localhost:11434"


os.environ["PIZZA_SELLER_AGENT_AUTH"] = "pizza123"
os.environ["PIZZA_SELLER_AGENT_URL"] = "http://localhost:10000"
os.environ["BURGER_SELLER_AGENT_AUTH"] = "burgeruser123:burgerpass123"
os.environ["BURGER_SELLER_AGENT_URL"] = "http://localhost:10001"
Step 2: Remote agent connections#
The root agent delegates tasks to remote agents through the A2A protocol.
The RemoteAgentConnections class is a communication wrapper that manages interactions with remote agents in the A2A ecosystem. It:
Establishes A2A client connections with agent-specific authentication (API keys and basic auth).
Sends tasks to remote agents using the
send_task()method with callback support for real-time updates.Manages metadata propagation and message ID tracking to maintain conversation continuity.
Handles task lifecycle events (status updates and artifact changes) through callback functions.
Maintains session state with conversation context and pending task tracking.
from typing import Callable
import uuid
from utils.a2a_types import (
    AgentCard,
    Task,
    TaskSendParams,
    TaskStatusUpdateEvent,
    TaskArtifactUpdateEvent,
)
from utils.client import A2AClient
import os

TaskCallbackArg = Task | TaskStatusUpdateEvent | TaskArtifactUpdateEvent
TaskUpdateCallback = Callable[[TaskCallbackArg, AgentCard], Task]

KNOWN_AUTH = {
    "pizza_seller_agent": os.getenv("PIZZA_SELLER_AGENT_AUTH", "api_key"),
    "burger_seller_agent": os.getenv("BURGER_SELLER_AGENT_AUTH", "user:pass"),
}


class RemoteAgentConnections:
    """A class to hold the connections to the remote agents."""

    def __init__(self, agent_card: AgentCard, agent_url: str):
        auth = KNOWN_AUTH.get(agent_card.name, None)
        self.agent_client = A2AClient(agent_card, auth=auth, agent_url=agent_url)
        self.card = agent_card

        self.conversation_name = None
        self.conversation = None
        self.pending_tasks = set()

    def get_agent(self) -> AgentCard:
        return self.card

    async def send_task(
        self,
        request: TaskSendParams,
        task_callback: TaskUpdateCallback | None,
    ) -> Task | None:
        response = await self.agent_client.send_task(request.model_dump())
        merge_metadata(response.result, request)
        # For task status updates, we need to propagate metadata and provide
        # a unique message id.
        if (
            hasattr(response.result, "status")
            and hasattr(response.result.status, "message")
            and response.result.status.message
        ):
            merge_metadata(response.result.status.message, request.message)
            m = response.result.status.message
            if not m.metadata:
                m.metadata = {}
            if "message_id" in m.metadata:
                m.metadata["last_message_id"] = m.metadata["message_id"]
            m.metadata["message_id"] = str(uuid.uuid4())

        if task_callback:
            task_callback(response.result, self.card)
        return response.result


def merge_metadata(target, source):
    if not hasattr(target, "metadata") or not hasattr(source, "metadata"):
        return
    if target.metadata and source.metadata:
        target.metadata.update(source.metadata)
    elif source.metadata:
        target.metadata = dict(**source.metadata)
Step 3: Define the PurchasingAgent class#
As mentioned earlier, you’ll create the agent using LiteLLM, not with the Google or Gemini models.
The PurchasingAgent class is a wrapper around the agent card and agent components. This class defines the core orchestration and delegation logic. It:
Discovers remote agents by resolving agent cards, establishing authenticated connections, and maintaining a seller agent registry.
Orchestrates task delegation through intelligent routing, session management, and asynchronous task handling.
Manages responses by aggregating seller outputs, formatting user messages, and handling state transitions.
Controls conversation flow by tracking agent assignments, managing metadata propagation, and coordinating multi-agent interactions.
Provides reliability through error handling, clean session management, and structured response validation.
import json
import uuid
from typing import List
import httpx
import os

from google.adk.models.lite_llm import LiteLlm
from google.adk import Agent
from google.adk.agents.readonly_context import ReadonlyContext
from google.adk.agents.callback_context import CallbackContext
from google.adk.tools.tool_context import ToolContext
from utils.card_resolver import A2ACardResolver
from utils.a2a_types import (
    AgentCard,
    Message,
    TaskState,
    Task,
    TaskSendParams,
    TextPart,
    Part,
)


class PurchasingAgent:
    """The purchasing agent.

    This is the agent responsible for choosing which remote seller agents to send
    tasks to and coordinate their work.
    """

    def __init__(
        self,
        remote_agent_addresses: List[str],
        task_callback: TaskUpdateCallback | None = None,
    ):
        self.task_callback = task_callback
        self.remote_agent_connections: dict[str, RemoteAgentConnections] = {}
        self.cards: dict[str, AgentCard] = {}
        for address in remote_agent_addresses:
            card_resolver = A2ACardResolver(address)
            try:
                card = card_resolver.get_agent_card()
                # The URL accessed here should be the same as the one provided in the agent card
                # However, in this demo we are using the URL provided in the key arguments
                remote_connection = RemoteAgentConnections(
                    agent_card=card, agent_url=address
                )
                self.remote_agent_connections[card.name] = remote_connection
                self.cards[card.name] = card
            except httpx.ConnectError:
                print(f"ERROR: Failed to get agent card from : {address}")
        agent_info = []
        for ra in self.list_remote_agents():
            agent_info.append(json.dumps(ra))
        self.agents = "\n".join(agent_info)

    def create_agent(self) -> Agent:
        return Agent(
            model=LiteLlm(model=os.getenv("OLLAMA_MODEL")),
            name="purchasing_agent",
            instruction=self.root_instruction,
            before_model_callback=self.before_model_callback,
            description=(
                "This purchasing agent orchestrates the decomposition of the user purchase request into"
                " tasks that can be performed by the seller agents."
            ),
            tools=[
                self.send_task,
            ],
        )

    def root_instruction(self, context: ReadonlyContext) -> str:
        current_agent = self.check_active_agent(context)
        return f"""You are an expert purchasing delegator that can delegate the user product inquiry and purchase request to the
appropriate seller remote agents.

Execution:
- For actionable tasks, you can use `send_task` to assign tasks to remote agents to perform.
- When the remote agent is repeatedly asking for user confirmation, assume that the remote agent doesn't have access to user's conversation context.
    So improve the task description to include all the necessary information related to that agent
- Never ask user permission when you want to connect with remote agents. If you need to make connection with multiple remote agents, directly
    connect with them without asking user permission or asking user preference
- Always show the detailed response information from the seller agent and propagate it properly to the user.
- If the remote seller is asking for confirmation, rely the confirmation question to the user if the user haven't do so.
- If the user already confirmed the related order in the past conversation history, you can confirm on behalf of the user
- Do not give irrelevant context to remote seller agent. For example, ordered pizza item is not relevant for the burger seller agent
- Never ask order confirmation to the remote seller agent

Please rely on tools to address the request, and don't make up the response. If you are not sure, please ask the user for more details.
Focus on the most recent parts of the conversation primarily.

If there is an active agent, send the request to that agent with the update task tool.

Agents:
{self.agents}

Current active seller agent: {current_agent["active_agent"]}
"""

    def check_active_agent(self, context: ReadonlyContext):
        state = context.state
        if (
            "session_id" in state
            and "session_active" in state
            and state["session_active"]
            and "active_agent" in state
        ):
            return {"active_agent": f"{state['active_agent']}"}
        return {"active_agent": "None"}

    def before_model_callback(self, callback_context: CallbackContext, llm_request):
        state = callback_context.state
        if "session_active" not in state or not state["session_active"]:
            if "session_id" not in state:
                state["session_id"] = str(uuid.uuid4())
            state["session_active"] = True

    def list_remote_agents(self):
        """List the available remote agents you can use to delegate the task."""
        if not self.remote_agent_connections:
            return []

        remote_agent_info = []
        for card in self.cards.values():
            print(f"Found agent card: {card.model_dump()}")
            print("=" * 100)
            remote_agent_info.append(
                {"name": card.name, "description": card.description}
            )
        return remote_agent_info

    async def send_task(self, agent_name: str, task: str, tool_context: ToolContext):
        """Sends a task to remote seller agent

        This will send a message to the remote agent named agent_name.

        Args:
            agent_name: The name of the agent to send the task to.
            task: The comprehensive conversation context summary
                and goal to be achieved regarding user inquiry and purchase request.
            tool_context: The tool context this method runs in.

        Yields:
            A dictionary of JSON data.
        """
        if agent_name not in self.remote_agent_connections:
            raise ValueError(f"Agent {agent_name} not found")
        state = tool_context.state
        state["active_agent"] = agent_name
        client = self.remote_agent_connections[agent_name]
        if not client:
            raise ValueError(f"Client not available for {agent_name}")
        if "task_id" in state:
            taskId = state["task_id"]
        else:
            taskId = str(uuid.uuid4())
        sessionId = state["session_id"]
        task: Task
        messageId = ""
        metadata = {}
        if "input_message_metadata" in state:
            metadata.update(**state["input_message_metadata"])
            if "message_id" in state["input_message_metadata"]:
                messageId = state["input_message_metadata"]["message_id"]
        if not messageId:
            messageId = str(uuid.uuid4())
        metadata.update(**{"conversation_id": sessionId, "message_id": messageId})
        request: TaskSendParams = TaskSendParams(
            id=taskId,
            sessionId=sessionId,
            message=Message(
                role="user",
                parts=[TextPart(text=task)],
                metadata=metadata,
            ),
            acceptedOutputModes=["text", "text/plain"],
            # pushNotification=None,
            metadata={"conversation_id": sessionId},
        )
        task = await client.send_task(request, self.task_callback)
        # Assume completion unless a state returns that isn't complete
        state["session_active"] = task.status.state not in [
            TaskState.COMPLETED,
            TaskState.CANCELED,
            TaskState.FAILED,
            TaskState.UNKNOWN,
        ]
        if task.status.state == TaskState.INPUT_REQUIRED:
            # Force user input back
            tool_context.actions.escalate = True
        elif task.status.state == TaskState.COMPLETED:
            # Reset active agent is task is completed
            state["active_agent"] = "None"

        response = []
        if task.status.message:
            # Assume the information is in the task message.
            response.extend(convert_parts(task.status.message.parts, tool_context))
        if task.artifacts:
            for artifact in task.artifacts:
                response.extend(convert_parts(artifact.parts, tool_context))
        return response


def convert_parts(parts: list[Part], tool_context: ToolContext):
    rval = []
    for p in parts:
        rval.append(convert_part(p, tool_context))
    return rval


def convert_part(part: Part, tool_context: ToolContext):
    # Currently only support text parts
    if part.type == "text":
        return part.text

    return f"Unknown type: {part.type}"
import os

root_agent = PurchasingAgent(
    remote_agent_addresses=[
        os.getenv("PIZZA_SELLER_AGENT_URL", "http://localhost:10000"),
        os.getenv("BURGER_SELLER_AGENT_URL", "http://localhost:10001"),
    ]
).create_agent()
Part 5: Running the purchasing concierge agent from a UI#
To make it easier to test the agent, you can build a simple Gradio interface. It runs locally in your browser at http://localhost:8095.
Now try it out by asking for a menu! After all the agents are running, you can test their responses by asking:
“What is your pizza menu today?”
or
“Please give me a list of burgers and pizzas you have, including prices in bullet points”
Each seller agent (burger and pizza) will reply with their available items and prices.
This is a great way to test if the agents are reachable and responding properly and is helpful for testing how the full multi-agent system works.
!pip list | grep google
import gradio as gr
from typing import List, Dict, Any
from google.adk.sessions import InMemorySessionService
from google.adk.runners import Runner
from google.adk.events import Event
from typing import AsyncIterator
from google.genai import types
from pprint import pformat
import logging
logging.getLogger("opentelemetry.context").setLevel(logging.CRITICAL)

purchasing_agent = root_agent

APP_NAME = "purchasing_concierge_app"
USER_ID = "default_user"
SESSION_ID = "default_session"
SESSION_SERVICE = InMemorySessionService()

PURCHASING_AGENT_RUNNER = Runner(
    agent=purchasing_agent,  # The agent we want to run
    app_name=APP_NAME,  # Associates runs with our app
    session_service=SESSION_SERVICE,  # Uses our session manager
)

async def get_response_from_agent(
    message: str,
    history: List[Dict[str, Any]],
) -> str:
    """Send the message to the backend and get a response.

    Args:
        message: Text content of the message.
        history: List of previous message dictionaries in the conversation.

    Returns:
        Text response from the backend service.
    """
    # try:
    events_iterator: AsyncIterator[Event] = PURCHASING_AGENT_RUNNER.run_async(
        user_id=USER_ID,
        session_id=SESSION_ID,
        new_message=types.Content(role="user", parts=[types.Part(text=message)]),
    )

    responses = []
    async for event in events_iterator:  # event has type Event
        if event.content.parts:
            for part in event.content.parts:
                if part.function_call:
                    formatted_call = f"```python\n{pformat(part.function_call.model_dump(), indent=2, width=80)}\n```"
                    responses.append(
                        gr.ChatMessage(
                            role="assistant",
                            content=f"{part.function_call.name}:\n{formatted_call}",
                            metadata={"title": "🛠️ Tool Call"},
                        )
                    )
                elif part.function_response:
                    formatted_response = f"```python\n{pformat(part.function_response.model_dump(), indent=2, width=80)}\n```"

                    responses.append(
                        gr.ChatMessage(
                            role="assistant",
                            content=formatted_response,
                            metadata={"title": "⚡ Tool Response"},
                        )
                    )

        # Key Concept: is_final_response() marks the concluding message for the turn
        if event.is_final_response():
            if event.content and event.content.parts:
                # Extract text from the first part
                final_response_text = event.content.parts[0].text
            elif event.actions and event.actions.escalate:
                # Handle potential errors/escalations
                final_response_text = (
                    f"Agent escalated: {event.error_message or 'No specific message.'}"
                )
            responses.append(
                gr.ChatMessage(role="assistant", content=final_response_text)
            )
            yield responses
            break  # Stop processing events once the final response is found

        yield responses

if __name__ == "__main__":

    session = await SESSION_SERVICE.create_session(
    app_name=APP_NAME,
    user_id=USER_ID,
    session_id=SESSION_ID)

    print(session)
    demo = gr.ChatInterface(
        get_response_from_agent,
        title="Purchasing Concierge",
        description="This assistant can help you to purchase food from remote sellers.",
        type="messages",
    )
    print(SESSION_ID)

    demo.launch(
        server_name="0.0.0.0",
        server_port=8095,
        share=True
    )