Accelerating DeepSeek-V3 inference using multi-token prediction in SGLang#
DeepSeek-V3 and DeepSeek-R1 have been two of the most popular LLMs. However, serving such large models is time consuming, due to the large number of parameters involved. Speculative decoding employs a smaller draft model to predict a few draft future tokens, which reduces the time and cost to directly leverage a large base model for each token prediction. This is one of the most feasible and effective techniques to accelerate the efficiency of LLM serving.
You might be wondering whether you can adopt a speculative decoding module for DeepSeek-V3/R1 inference, and the answer is yes. The multi-token prediction (MTP) module is one of the most suitable options. It was initially introduced to enhance the training performance of DeepSeek-V3 and DeepSeek-R1, and its weights have been optimized along with the pre-training of the corresponding DeepSeek model. This saves extra training resources such as GPU usage and the time required for dataset preparation.
In this step-by-step tutorial, you’ll learn how to launch an LLM service with MTP enabled. By comparing the inference performance of the service with and without MTP enabled, you can observe how MTP is more efficient.
Prerequisites and setting up the environment#
This tutorial was created and tested using the following setup, which is recommended for reproducing the same performance gain with AMD Instinct™ GPUs.
Operating system#
Ubuntu 22.04: Ensure your system is running Ubuntu 22.04 or later.
Hardware#
AMD Instinct™ GPU(s): This tutorial has been tested on eight AMD Instinct MI300X GPUs. Ensure you are using AMD Instinct GPUs or compatible hardware with ROCm support, and that your system meets the official requirements.
Software#
ROCm 6.3+: Install and verify ROCm 6.3 or later by following the ROCm installation guide. After installation, confirm your setup using:
rocm-smi
This command lists your AMD GPUs with relevant details, similar to the image below.

Docker: Ensure Docker is installed and configured correctly. Follow the Docker installation guide for your operating system.
Note: Ensure the Docker permissions are correctly configured. To configure permissions to allow non-root access, run the following commands:
sudo usermod -aG docker $USER
newgrp docker
Verify Docker is working correctly:
docker run hello-world
Preparing the serving environment#
Follow these steps to download and run the Docker container and Jupyter notebook.
Pull the Docker image#
Ensure your system meets the system requirements.
Pull the Docker image required for this tutorial:
docker pull lmsysorg/sglang:v0.5.0rc0-rocm630-mi30x
Note: You might need to visit the official SGLang Docker Hub to find the most appropriate Docker image for your system.
Launch the Docker container#
Launch the Docker container and map the necessary directories.
docker run -it --rm \
  --network=host \
  --ipc=host \
  --privileged \
  --cap-add=CAP_SYS_ADMIN \
  --device=/dev/kfd \
  --device=/dev/dri \
  --device=/dev/mem \
  --group-add render \
  --cap-add=SYS_PTRACE \
  --security-opt seccomp=unconfined \
  --name sglang_base \
  -v $(pwd):/work \
  lmsysorg/sglang:v0.5.0rc0-rocm630-mi30x \
  bash
Note: This command mounts the current directory to the /work directory in the container. Ensure the notebook file is either copied to this directory before running the Docker command or uploaded into the Jupyter Notebook environment after it starts. Save the token or URL provided in the terminal output to access the notebook from your web browser. You can download this notebook from the AI Developer Hub GitHub repository.
Install and launch Jupyter#
Inside the Docker container, install Jupyter using the following command:
pip install jupyter
Start the Jupyter server:
jupyter-lab --ip=0.0.0.0 --port=8888 --no-browser --allow-root
Note: Ensure port 8888 is not already in use on your system before running the above command. If it is, you can specify a different port by replacing --port=8888 with another port number, for example, --port=8890.
Step 1: Starting the baseline server#
You can use the online serving mode of SGLang to compare the performance difference between having MTP disabled and enabled.
Use the command below to launch the server without MTP enabled.
import os
from sglang.utils import launch_server_cmd

cmd = "python3 -m sglang.launch_server \
    --model-path deepseek-ai/DeepSeek-V3 \
    --attention-backend aiter \
    --host 0.0.0.0 \
    --trust-remote-code \
    --tp-size 8 \
    --enable-metrics \
    --mem-fraction-static 0.85 \
    --chunked-prefill-size 131072"

server_process, port = launch_server_cmd(cmd)

os.environ["SERVER_PORT"] = str(port)
This command also downloads the model, which might take some time. Wait for the server to print the message "The server is fired up and ready to roll!", which indicates it has started, before continuing. You can test whether the server is ready with the following curl command:
!curl http://localhost:$SERVER_PORT/v1/models
Step 2: Sending requests to the baseline server#
After starting the server, launch a client to send out requests. Use the client to benchmark the performance of the server container without MTP using the command below:
!python3 -m sglang.bench_serving \
  --backend sglang \
  --dataset-name random \
  --num-prompt 300 \
  --request-rate 1.0 \
  --random-input 3200 \
  --random-output 800 \
  --port $SERVER_PORT \
  > /work/sglang_base_log
After the client command runs, it generates a log file named sglang_base_log.
Release the GPU resources by terminating the server.
Caution: Only continue after the log generation has finished:
from sglang.utils import terminate_process
terminate_process(server_process)
Step 3: Enabling MTP in serving#
Now use the command below to launch the server with MTP enabled.
cmd = "python3 -m sglang.launch_server \
    --model-path deepseek-ai/DeepSeek-V3 \
    --attention-backend aiter \
    --host 0.0.0.0 \
    --trust-remote-code \
    --tp-size 8 \
    --enable-metrics \
    --mem-fraction-static 0.85 \
    --chunked-prefill-size 131072 \
    --speculative-algorithm NEXTN \
    --speculative-draft-model-path lmsys/DeepSeek-V3-NextN \
    --speculative-num-steps 2 \
    --speculative-eagle-topk 1 \
    --speculative-num-draft-tokens 3 \
    --speculative-accept-threshold-single=0.001"

server_process, port = launch_server_cmd(cmd)

os.environ["SERVER_PORT"] = str(port)
This command also downloads the model, which might take some time. Wait for the server to print the message "The server is fired up and ready to roll!", which indicates it has started, before continuing. You can test whether the server is ready with the following curl command:
!curl http://localhost:$SERVER_PORT/v1/models
Step 4: Sending requests to the MTP server#
After starting the server, launch a client to send out requests. Use the client to benchmark the performance of the server container with MTP using the command below:
!python3 -m sglang.bench_serving \
  --backend sglang \
  --dataset-name random \
  --num-prompt 300 \
  --request-rate 1.0 \
  --random-input 3200 \
  --random-output 800 \
  --port $SERVER_PORT \
  > /work/sglang_mtp_log
To explore MTP more thoroughly, you can modify the value of each parameter (for example, request-rate) in the command above to observe the performance changes.
After benchmarking the performance, release the resources using the command below.
Caution: Only continue after you have finished generating the logs:
from sglang.utils import terminate_process
terminate_process(server_process)
Log interpretation#
The log generated after running the benchmark is formatted as follows:
============ Serving Benchmark Result ============
Backend:                                 sglang
Traffic request rate:                    inf
Max request concurrency:                 x
Successful requests:                     x
Benchmark duration (s):                  xxx.xx
Total input tokens:                      xxxxx
Total generated tokens:                  xxxx
Total generated tokens (retokenized):    xxxx
Request throughput (req/s):              x.xx
Input token throughput (tok/s):          xxx.xx
Output token throughput (tok/s):         xx.xx
Total token throughput (tok/s):          xxx.xx
Concurrency:                             x.xx
----------------End-to-End Latency----------------
Mean E2E Latency (ms):                   xxxxx.xx
Median E2E Latency (ms):                 xxxxx.xx
---------------Time to First Token----------------
Mean TTFT (ms):                          xxx.xx
Median TTFT (ms):                        xxx.xx
P99 TTFT (ms):                           xxx.xx
---------------Inter-Token Latency----------------
Mean ITL (ms):                           xx.xx
Median ITL (ms):                         xx.xx
P95 ITL (ms):                            xx.xx
P99 ITL (ms):                            xx.xx
Max ITL (ms):                            xx.xx
==================================================
This tutorial focuses on two key metrics: Mean E2E Latency and Total token throughput. Mean E2E Latency measures the average time taken to process an entire request from start to finish, reflecting end-to-end responsiveness. Total token throughput measures the overall number of tokens (input plus output) processed per second, reflecting system efficiency and serving capacity.
You can view the log contents as follows:
!cat /work/sglang_base_log
!cat /work/sglang_mtp_log
Understanding the MTP module#
In DeepSeek-V3, the objective of Multi-Token Prediction (MTP) is to extend the model’s prediction scope to multiple future tokens at each position. This approach not only enriches the training signals but also strengthens the model’s internal representations, leading to more accurate predictions of future tokens.
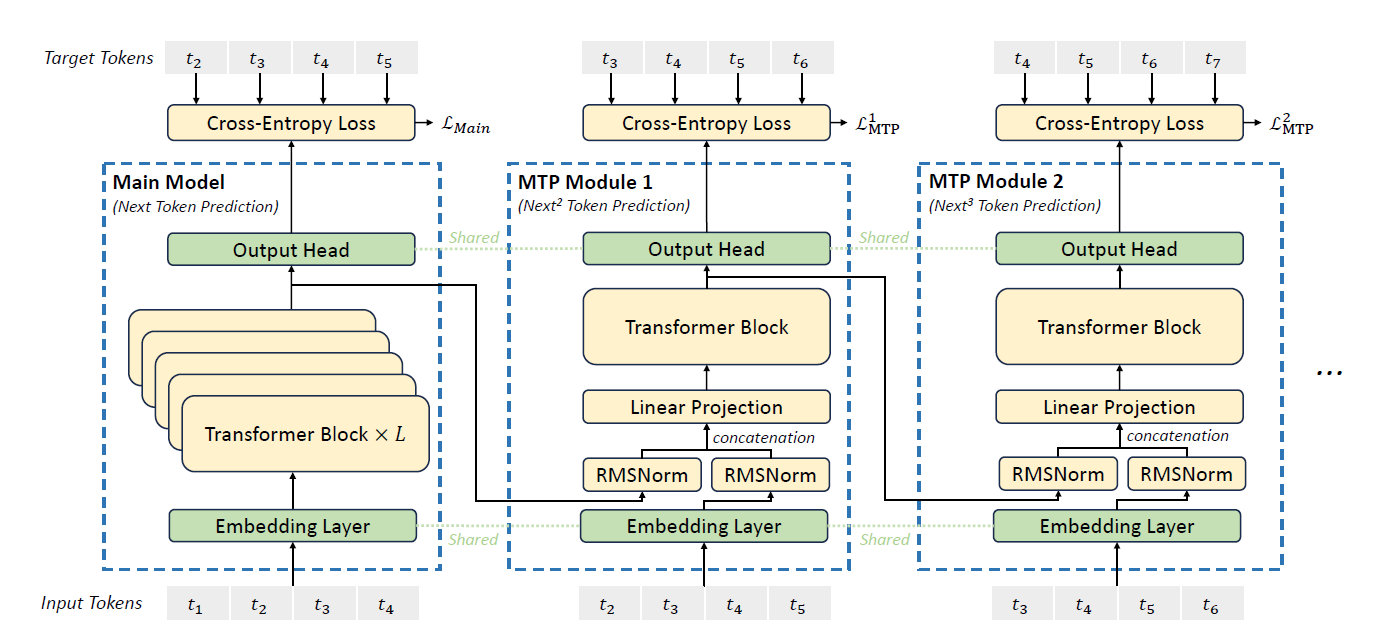
Figure 1: MTP module architecture.
As shown in Figure 1, MTP employs \(D\) sequential modules to predict the next \(D\) tokens. Each MTP module consists of four components: a shared embedding layer \(E(\cdot)\), a shared output head \(Out(\cdot)\), a transformer block \(T_k(\cdot)\), and a projection matrix \(M_k\).
For the \(i\)-th input token \(t_i\) at prediction depth \(k\), the model combines the hidden representation from the previous depth \(h_i^{k-1}\) with the embedding of the ground-truth future token \(E(t_{i+k})\), projected through \(M_k\). This yields an intermediate representation \(\hat{h}_i^k\), which is then processed by the transformer block \(T_k(\cdot)\) to produce the updated hidden state \(h_i^k\).
Finally, the output head \(Out(\cdot)\) maps \(h_i^k\) to a probability distribution over the vocabulary, from which the \(k\)-th token prediction is obtained using a Softmax layer.
Performance gain#
Figure 2 compares the performance of serving DeepSeek-R1 using SGLang with MTP disabled and enabled. Use this illustration as a reference when reproducing the experiment in this tutorial. As mentioned previously, the tutorial sets the maximum concurrency as 1, 2, 4, …, and 64 and the input sequence and output sequence lengths to 3200 and 800. The illustration shows that serving DeepSeek-V3 with MTP enabled boosts both the latency and throughput by 1.2 to 2.1 times.
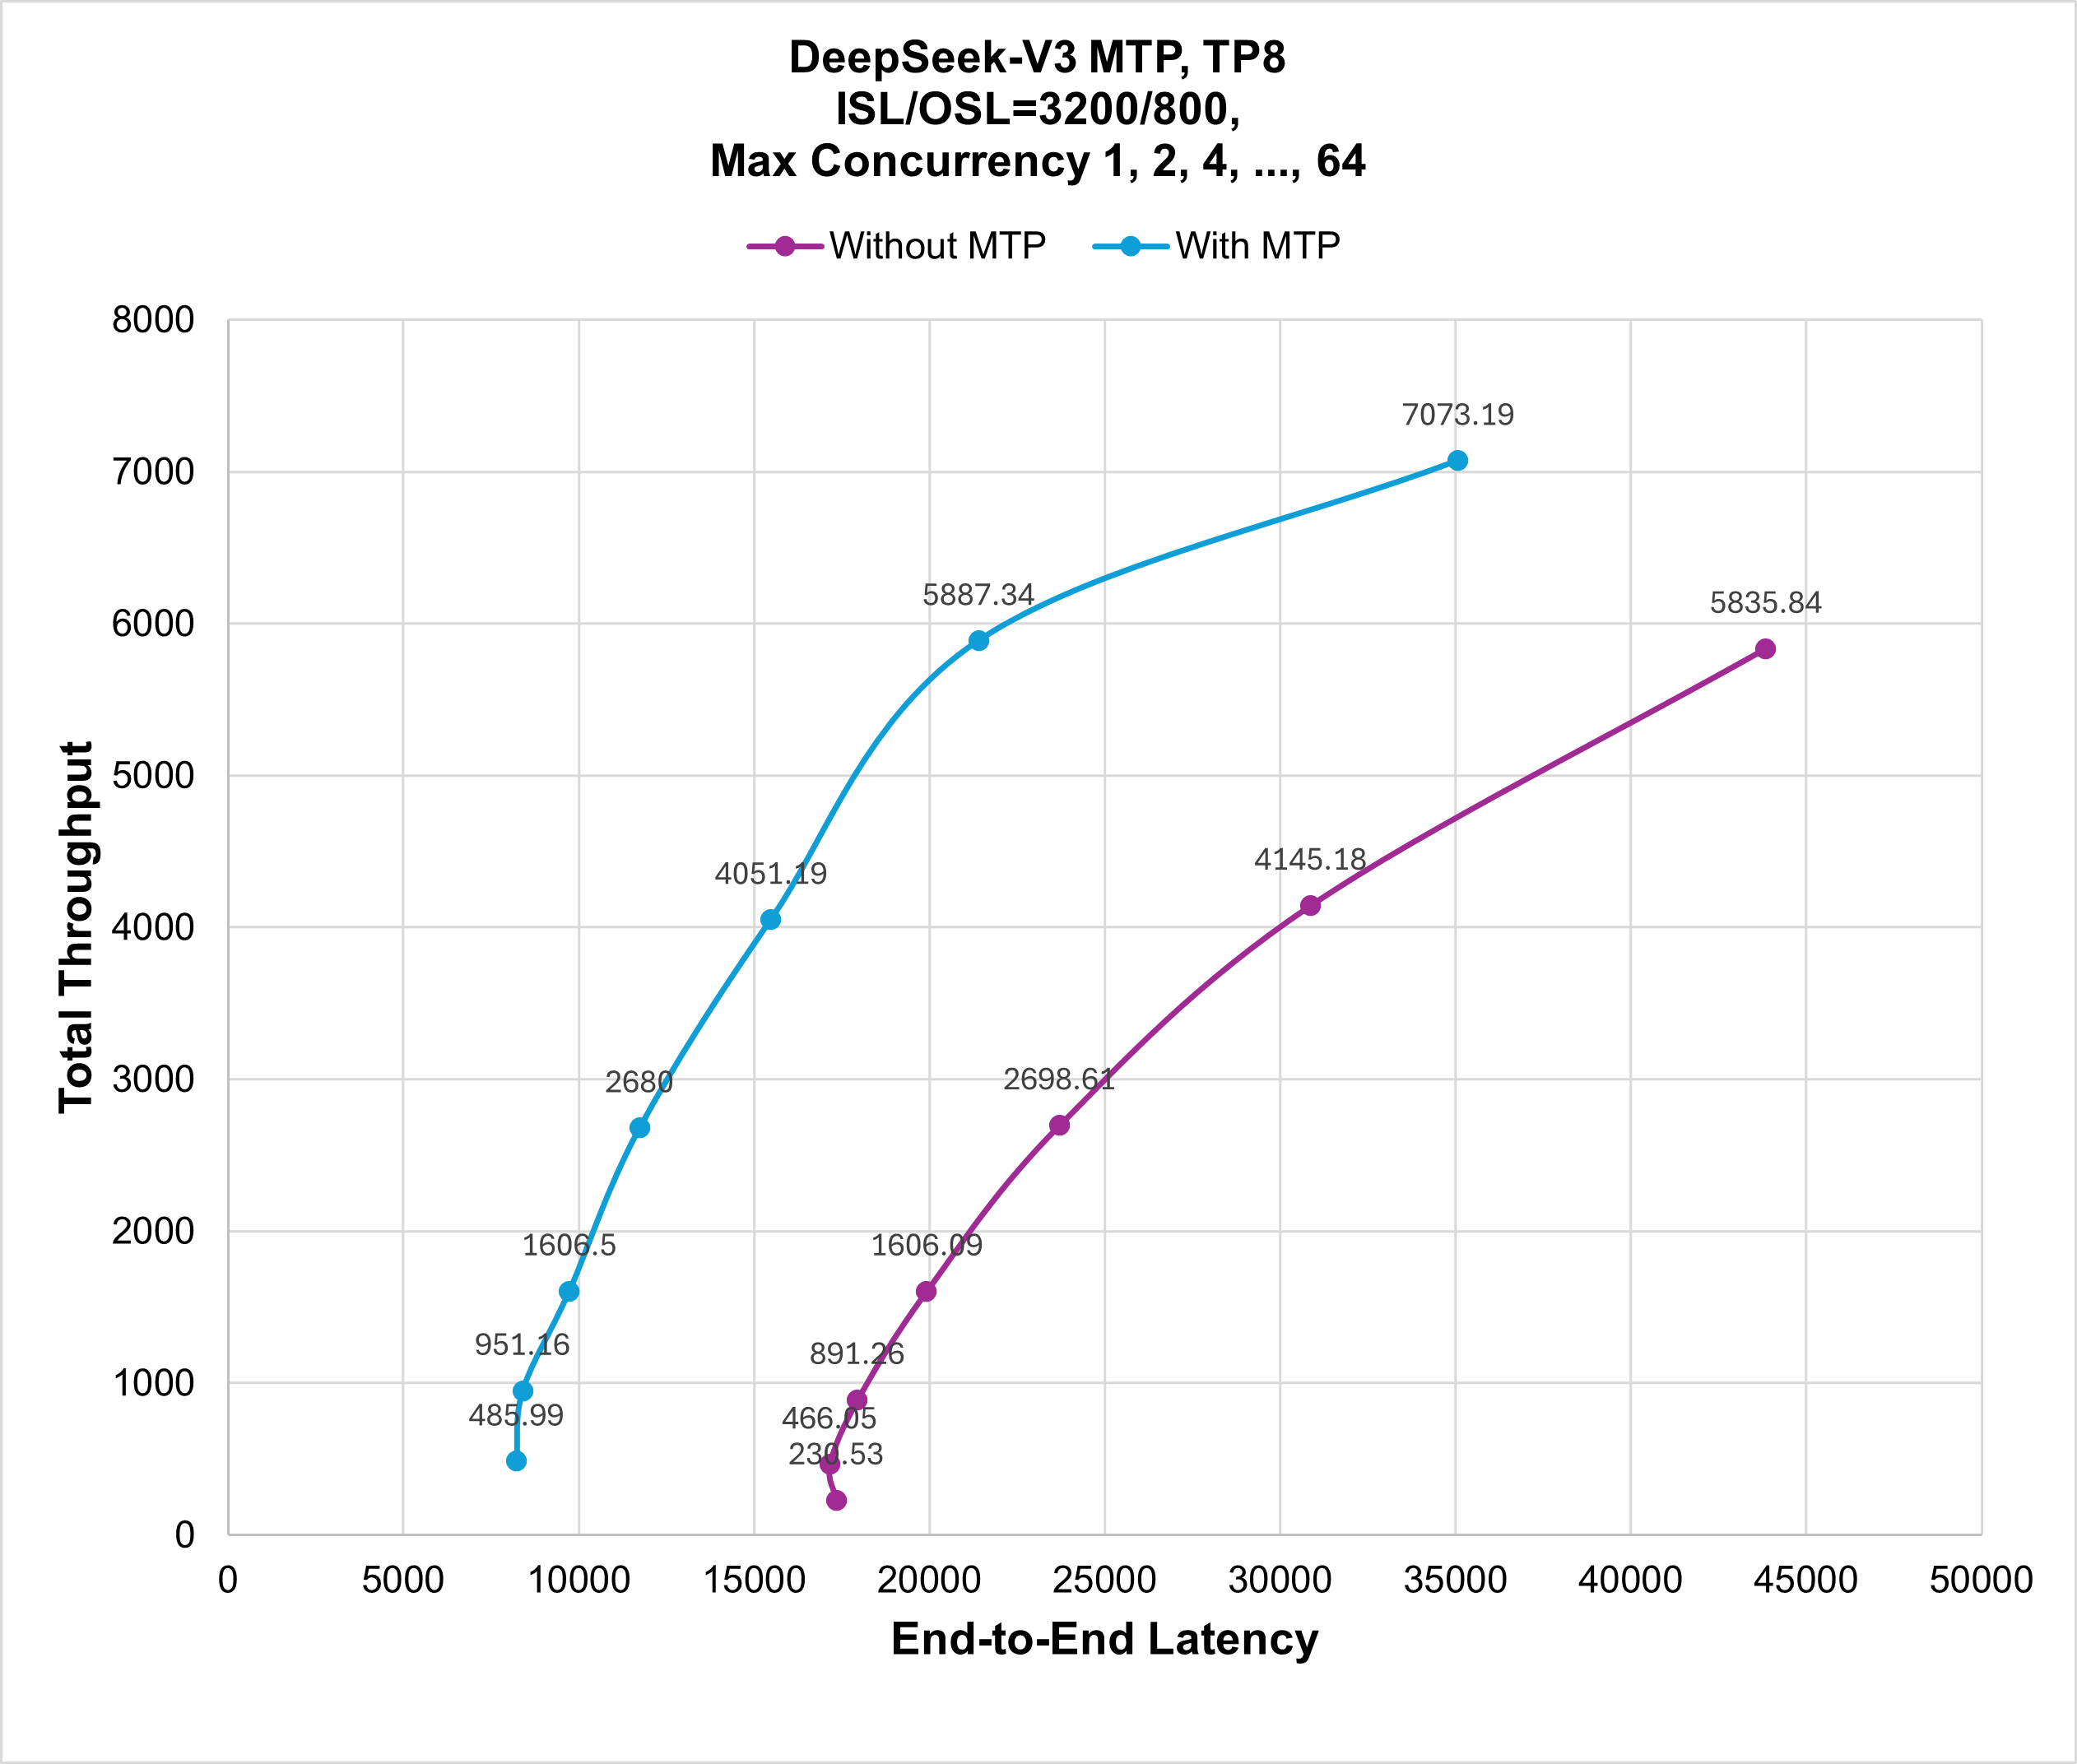
Figure 2: Performance comparison of disabling and enabling MTP for DeepSeek-V3 serving with total throughput/end-to-end latency.
Summary#
With multi-token prediction (MTP) enabled, this variant of speculative decoding empowers the serving of DeepSeek-R1. Rather than leveraging the DeepSeek-R1 base model for each future token prediction, the MTP module (the draft model in speculative decoding) is first employed for drafting multiple future tokens. The lightweight nature of MTP results in a lower consumption of computing resources. After receiving the draft tokens, the base model, such as DeepSeek-R1 in this case, is then leveraged to verify the correctness of these draft candidates by a single pass. This workflow saves the time required by the heavy base model to predict each token by employing a lighter draft model to predict multiple draft tokens through multiple passes and leveraging the base model for one-time verification. After following this tutorial and enabling this feature, you should be able to observe similar performance gains to those shown in Figure 2. You’re welcome to provide feedback and comments on this tutorial.