Install ROCm Optiq#
This section describes how to install ROCm Optiq on your system.
Prerequisites#
The following are the prerequisites for using ROCm Optiq:
ROCm: ROCm Optiq only visualizes profiler database files. The machine that runs ROCm Optiq doesn’t need ROCm, ROCm Systems Profiler, or ROCm Compute Profiler installed. However, see Supported data sources for the ROCm versions required for the profiling host that generates the
.dbfile.Memory: At least 16 GB of RAM is recommended for working with large traces.
Operating system: See the supported operating systems and versions below.
Supported operating systems#
From the following selector, choose your operating system, distribution, version, and installation method to see the instructions for installing and uninstalling ROCm Optiq.
Supported versions#
Ubuntu 26.04, Ubuntu 24.04, and Ubuntu 22.04 are supported.
Supported versions#
Ubuntu 26.04, Ubuntu 24.04, and Ubuntu 22.04 are supported.
Supported versions#
Ubuntu 26.04, Ubuntu 24.04, and Ubuntu 22.04 are supported.
Supported versions#
RHEL 10, RHEL 9, and RHEL 8 are supported.
Supported versions#
RHEL 10, RHEL 9, and RHEL 8 are supported.
Supported versions#
RHEL 10, RHEL 9, and RHEL 8 are supported.
Supported versions#
Oracle Linux 10, Oracle Linux 9, and Oracle Linux 8 are supported.
Supported versions#
Oracle Linux 10, Oracle Linux 9, and Oracle Linux 8 are supported.
Supported versions#
Oracle Linux 10, Oracle Linux 9, and Oracle Linux 8 are supported.
Supported Windows versions#
Windows 11 is supported.
Visual C++ runtime#
Download and install the Visual C++ v14 Redistributable (x64), which is required to run ROCm Optiq.
Note
If roc-optiq.exe doesn’t start after installation and Windows reports that MSVCP140.dll or MSVCP140_ATOMIC_WAIT.dll is missing, verify that the x64 redistributable is installed.
Supported versions#
macOS Tahoe (Version 26), macOS Sequoia (Version 15), and macOS Sonoma (Version 14) are supported.
If you’re not sure which Linux distribution or version you’re running, the /etc/os-release file contains this information:
$ cat /etc/os-release
NAME="Ubuntu"
VERSION_ID="24.04"
VERSION="24.04.3 LTS (Noble Numbat)"
VERSION_CODENAME=noble
ID=ubuntu
The relevant fields are ID and VERSION_ID.
If you’re not sure which Linux distribution or version you’re running, the /etc/os-release file contains this information:
$ cat /etc/os-release
NAME="Ubuntu"
VERSION_ID="24.04"
VERSION="24.04.3 LTS (Noble Numbat)"
VERSION_CODENAME=noble
ID=ubuntu
The relevant fields are ID and VERSION_ID.
If you’re not sure which Linux distribution or version you’re running, the /etc/os-release file contains this information:
$ cat /etc/os-release
NAME="Ubuntu"
VERSION_ID="24.04"
VERSION="24.04.3 LTS (Noble Numbat)"
VERSION_CODENAME=noble
ID=ubuntu
The relevant fields are ID and VERSION_ID.
If you’re not sure which Linux distribution or version you’re running, the /etc/os-release file contains this information:
$ cat /etc/os-release
NAME="Red Hat Enterprise Linux"
VERSION_ID="10.0"
VERSION="10.0 (Coughlan)"
ID="rhel"
ID_LIKE="fedora"
The relevant fields are ID and VERSION_ID.
If you’re not sure which Linux distribution or version you’re running, the /etc/os-release file contains this information:
$ cat /etc/os-release
NAME="Red Hat Enterprise Linux"
VERSION_ID="10.0"
VERSION="10.0 (Coughlan)"
ID="rhel"
ID_LIKE="fedora"
The relevant fields are ID and VERSION_ID.
If you’re not sure which Linux distribution or version you’re running, the /etc/os-release file contains this information:
$ cat /etc/os-release
NAME="Red Hat Enterprise Linux"
VERSION_ID="10.0"
VERSION="10.0 (Coughlan)"
ID="rhel"
ID_LIKE="fedora"
The relevant fields are ID and VERSION_ID.
If you’re not sure which Linux distribution or version you’re running, the /etc/os-release file contains this information:
$ cat /etc/os-release
NAME="Oracle Linux Server"
VERSION_ID="9.4"
VERSION="9.4"
ID="ol"
ID_LIKE="fedora"
The relevant fields are ID and VERSION_ID.
If you’re not sure which Linux distribution or version you’re running, the /etc/os-release file contains this information:
$ cat /etc/os-release
NAME="Oracle Linux Server"
VERSION_ID="9.4"
VERSION="9.4"
ID="ol"
ID_LIKE="fedora"
The relevant fields are ID and VERSION_ID.
If you’re not sure which Linux distribution or version you’re running, the /etc/os-release file contains this information:
$ cat /etc/os-release
NAME="Oracle Linux Server"
VERSION_ID="9.4"
VERSION="9.4"
ID="ol"
ID_LIKE="fedora"
The relevant fields are ID and VERSION_ID.
Install#
Download the
.msiinstaller from the ROCm Optiq releases page, run it, and follow the instructions in the install wizard.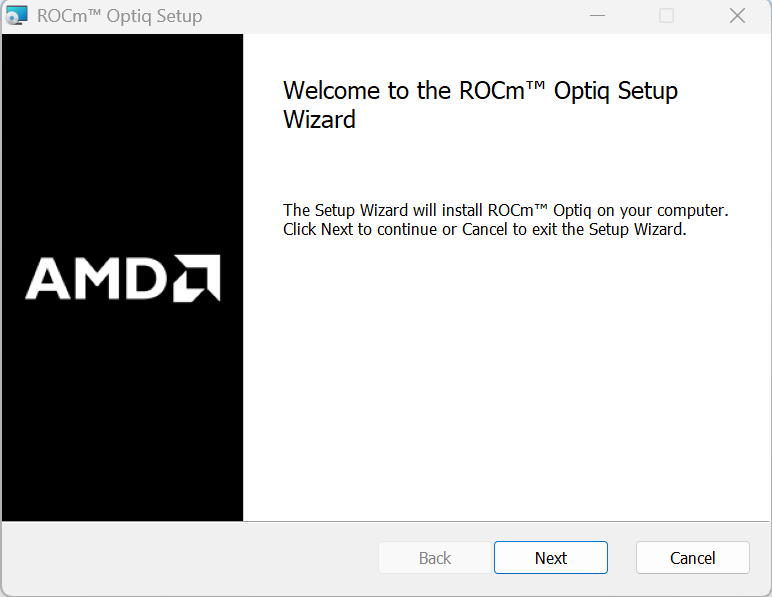
Accept the agreement to install, then follow the installation instructions.
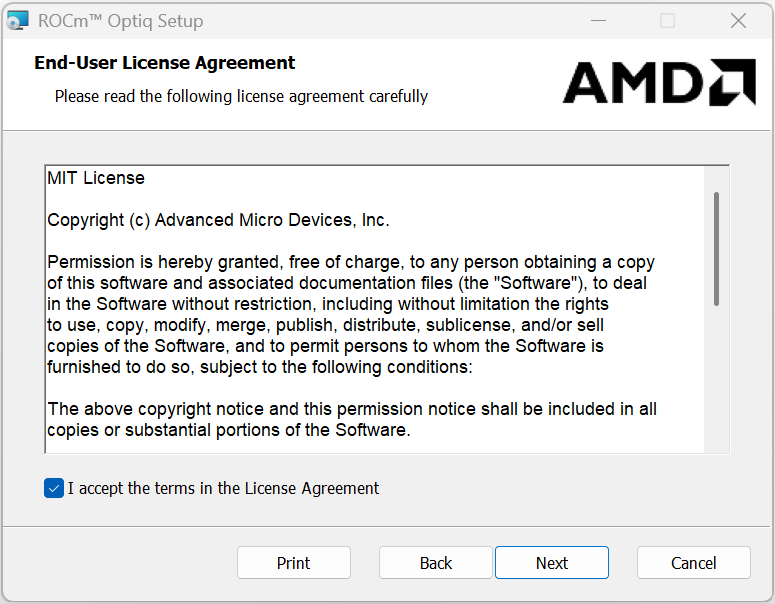
Launch
roc-optiq.exefrom the installation directory or the Start menu.
Install using apt#
Install system dependencies:
sudo apt install libgl1 libopengl0 libdbus-1-3
Register the ROCm Optiq repository:
sudo mkdir --parents --mode=0755 /etc/apt/keyrings
wget https://stable.repo.amd.com/rocm/gpg/packages.gpg -O - | gpg --dearmor | sudo tee /etc/apt/keyrings/amdrocm.gpg > /dev/null
sudo tee /etc/apt/sources.list.d/amdrocm-optiq.sources << 'EOF'
X-Repo-Id: amdrocm-optiq
Types: deb
URIs: https://stable.repo.amd.com/rocm/extras/rocoptiq/packages/ubuntu2604/
Suites: stable
Components: main
Architectures: amd64
Signed-By: /etc/apt/keyrings/amdrocm.gpg
Enabled: yes
EOF

sudo apt update
Install the ROCm Optiq package:
sudo apt install amdrocm10-roc-optiq
Complete the following post-installation steps:
Configure environment variables so that ROCm Optiq is added to the
PATHvariable. There are two choices:User-specific setup:
# Optiq Environment Setup
tee --append ~/.bashrc << EOF
# BEGIN Optiq environment configuration
export OPTIQ_PATH=/opt/rocm/extras-10/rocm-optiq
export PATH=\$OPTIQ_PATH/bin:\$PATH
# END Optiq environment configuration
EOF

source ~/.bashrc
System-wide setup:
# Optiq Environment Setup
sudo tee /etc/profile.d/set-optiq-env.sh << EOF
export OPTIQ_PATH=/opt/rocm/extras-10/rocm-optiq
export PATH=\$OPTIQ_PATH/bin:\$PATH
EOF

sudo chmod +x /etc/profile.d/set-optiq-env.sh
source /etc/profile.d/set-optiq-env.sh
Verify Your Installation:
roc-optiq -v
Install using apt#
Install system dependencies:
sudo apt install libgl1 libopengl0 libdbus-1-3
Register the ROCm Optiq repository:
sudo mkdir --parents --mode=0755 /etc/apt/keyrings
wget https://stable.repo.amd.com/rocm/gpg/packages.gpg -O - | gpg --dearmor | sudo tee /etc/apt/keyrings/amdrocm.gpg > /dev/null
sudo tee /etc/apt/sources.list.d/amdrocm-optiq.sources << 'EOF'
X-Repo-Id: amdrocm-optiq
Types: deb
URIs: https://stable.repo.amd.com/rocm/extras/rocoptiq/packages/ubuntu2404/
Suites: stable
Components: main
Architectures: amd64
Signed-By: /etc/apt/keyrings/amdrocm.gpg
Enabled: yes
EOF

sudo apt update
Install the ROCm Optiq package:
sudo apt install amdrocm10-roc-optiq
Complete the following post-installation steps:
Configure environment variables so that ROCm Optiq is added to the
PATHvariable. There are two choices:User-specific setup:
# Optiq Environment Setup
tee --append ~/.bashrc << EOF
# BEGIN Optiq environment configuration
export OPTIQ_PATH=/opt/rocm/extras-10/rocm-optiq
export PATH=\$OPTIQ_PATH/bin:\$PATH
# END Optiq environment configuration
EOF

source ~/.bashrc
System-wide setup:
# Optiq Environment Setup
sudo tee /etc/profile.d/set-optiq-env.sh << EOF
export OPTIQ_PATH=/opt/rocm/extras-10/rocm-optiq
export PATH=\$OPTIQ_PATH/bin:\$PATH
EOF

sudo chmod +x /etc/profile.d/set-optiq-env.sh
source /etc/profile.d/set-optiq-env.sh
Verify Your Installation:
roc-optiq -v
Install using apt#
Install system dependencies:
sudo apt install libgl1 libopengl0 libdbus-1-3
Register the ROCm Optiq repository:
sudo mkdir --parents --mode=0755 /etc/apt/keyrings
wget https://stable.repo.amd.com/rocm/gpg/packages.gpg -O - | gpg --dearmor | sudo tee /etc/apt/keyrings/amdrocm.gpg > /dev/null
sudo tee /etc/apt/sources.list.d/amdrocm-optiq.sources << 'EOF'
X-Repo-Id: amdrocm-optiq
Types: deb
URIs: https://stable.repo.amd.com/rocm/extras/rocoptiq/packages/ubuntu2204/
Suites: stable
Components: main
Architectures: amd64
Signed-By: /etc/apt/keyrings/amdrocm.gpg
Enabled: yes
EOF

sudo apt update
Install the ROCm Optiq package:
sudo apt install amdrocm10-roc-optiq
Complete the following post-installation steps:
Configure environment variables so that ROCm Optiq is added to the
PATHvariable. There are two choices:User-specific setup:
# Optiq Environment Setup
tee --append ~/.bashrc << EOF
# BEGIN Optiq environment configuration
export OPTIQ_PATH=/opt/rocm/extras-10/rocm-optiq
export PATH=\$OPTIQ_PATH/bin:\$PATH
# END Optiq environment configuration
EOF

source ~/.bashrc
System-wide setup:
# Optiq Environment Setup
sudo tee /etc/profile.d/set-optiq-env.sh << EOF
export OPTIQ_PATH=/opt/rocm/extras-10/rocm-optiq
export PATH=\$OPTIQ_PATH/bin:\$PATH
EOF

sudo chmod +x /etc/profile.d/set-optiq-env.sh
source /etc/profile.d/set-optiq-env.sh
Verify Your Installation:
roc-optiq -v
Install using dnf#
Register the ROCm Optiq repository:
sudo tee /etc/yum.repos.d/amdrocm-optiq.repo <<EOF
[amdrocm-optiq]
name=AMD ROCm Optiq Repository
baseurl=https://stable.repo.amd.com/rocm/extras/rocoptiq/packages/rhel10/x86_64
enabled=1
gpgcheck=1
gpgkey=https://stable.repo.amd.com/rocm/gpg/packages.gpg
priority=50
EOF
sudo dnf clean all
Install the ROCm Optiq package.
sudo dnf install amdrocm10-roc-optiq
Complete the following post-installation steps:
Configure environment variables so that ROCm Optiq is added to the
PATHvariable. There are two choices.User-specific setup:
# Optiq Environment Setup
tee --append ~/.bashrc << EOF
# BEGIN Optiq environment configuration
export OPTIQ_PATH=/opt/rocm/extras-10/rocm-optiq
export PATH=\$OPTIQ_PATH/bin:\$PATH
# END Optiq environment configuration
EOF

source ~/.bashrc
System-wide setup:
# Optiq Environment Setup
sudo tee /etc/profile.d/set-optiq-env.sh << EOF
export OPTIQ_PATH=/opt/rocm/extras-10/rocm-optiq
export PATH=\$OPTIQ_PATH/bin:\$PATH
EOF

sudo chmod +x /etc/profile.d/set-optiq-env.sh
source /etc/profile.d/set-optiq-env.sh
Verify Your Installation:
roc-optiq -v
Install using dnf#
Register the ROCm Optiq repository:
sudo tee /etc/yum.repos.d/amdrocm-optiq.repo <<EOF
[amdrocm-optiq]
name=AMD ROCm Optiq Repository
baseurl=https://stable.repo.amd.com/rocm/extras/rocoptiq/packages/rhel9/x86_64
enabled=1
gpgcheck=1
gpgkey=https://stable.repo.amd.com/rocm/gpg/packages.gpg
priority=50
EOF
sudo dnf clean all
Install the ROCm Optiq package.
sudo dnf install amdrocm10-roc-optiq
Complete the following post-installation steps:
Configure environment variables so that ROCm Optiq is added to the
PATHvariable. There are two choices.User-specific setup:
# Optiq Environment Setup
tee --append ~/.bashrc << EOF
# BEGIN Optiq environment configuration
export OPTIQ_PATH=/opt/rocm/extras-10/rocm-optiq
export PATH=\$OPTIQ_PATH/bin:\$PATH
# END Optiq environment configuration
EOF

source ~/.bashrc
System-wide setup:
# Optiq Environment Setup
sudo tee /etc/profile.d/set-optiq-env.sh << EOF
export OPTIQ_PATH=/opt/rocm/extras-10/rocm-optiq
export PATH=\$OPTIQ_PATH/bin:\$PATH
EOF

sudo chmod +x /etc/profile.d/set-optiq-env.sh
source /etc/profile.d/set-optiq-env.sh
Verify Your Installation:
roc-optiq -v
Install using dnf#
Register the ROCm Optiq repository:
sudo tee /etc/yum.repos.d/amdrocm-optiq.repo <<EOF
[amdrocm-optiq]
name=AMD ROCm Optiq Repository
baseurl=https://stable.repo.amd.com/rocm/extras/rocoptiq/packages/rhel8/x86_64
enabled=1
gpgcheck=1
gpgkey=https://stable.repo.amd.com/rocm/gpg/packages.gpg
priority=50
EOF
sudo dnf clean all
Install the ROCm Optiq package.
sudo dnf install amdrocm10-roc-optiq
Complete the following post-installation steps:
Configure environment variables so that ROCm Optiq is added to the
PATHvariable. There are two choices.User-specific setup:
# Optiq Environment Setup
tee --append ~/.bashrc << EOF
# BEGIN Optiq environment configuration
export OPTIQ_PATH=/opt/rocm/extras-10/rocm-optiq
export PATH=\$OPTIQ_PATH/bin:\$PATH
# END Optiq environment configuration
EOF

source ~/.bashrc
System-wide setup:
# Optiq Environment Setup
sudo tee /etc/profile.d/set-optiq-env.sh << EOF
export OPTIQ_PATH=/opt/rocm/extras-10/rocm-optiq
export PATH=\$OPTIQ_PATH/bin:\$PATH
EOF

sudo chmod +x /etc/profile.d/set-optiq-env.sh
source /etc/profile.d/set-optiq-env.sh
Verify Your Installation:
roc-optiq -v
Install using dnf#
Register the ROCm Optiq repository:
sudo tee /etc/yum.repos.d/amdrocm-optiq.repo <<EOF
[amdrocm-optiq]
name=AMD ROCm Optiq Repository
baseurl=https://stable.repo.amd.com/rocm/extras/rocoptiq/packages/rhel10/x86_64
enabled=1
gpgcheck=1
gpgkey=https://stable.repo.amd.com/rocm/gpg/packages.gpg
priority=50
EOF
sudo dnf clean all
Install the ROCm Optiq package.
sudo dnf install amdrocm10-roc-optiq
Complete the following post-installation steps:
Configure environment variables so that ROCm Optiq is added to the
PATHvariable. There are two choices.User-specific setup:
# Optiq Environment Setup
tee --append ~/.bashrc << EOF
# BEGIN Optiq environment configuration
export OPTIQ_PATH=/opt/rocm/extras-10/rocm-optiq
export PATH=\$OPTIQ_PATH/bin:\$PATH
# END Optiq environment configuration
EOF

source ~/.bashrc
System-wide setup:
# Optiq Environment Setup
sudo tee /etc/profile.d/set-optiq-env.sh << EOF
export OPTIQ_PATH=/opt/rocm/extras-10/rocm-optiq
export PATH=\$OPTIQ_PATH/bin:\$PATH
EOF

sudo chmod +x /etc/profile.d/set-optiq-env.sh
source /etc/profile.d/set-optiq-env.sh
Verify Your Installation:
roc-optiq -v
Install using dnf#
Register the ROCm Optiq repository:
sudo tee /etc/yum.repos.d/amdrocm-optiq.repo <<EOF
[amdrocm-optiq]
name=AMD ROCm Optiq Repository
baseurl=https://stable.repo.amd.com/rocm/extras/rocoptiq/packages/rhel9/x86_64
enabled=1
gpgcheck=1
gpgkey=https://stable.repo.amd.com/rocm/gpg/packages.gpg
priority=50
EOF
sudo dnf clean all
Install the ROCm Optiq package.
sudo dnf install amdrocm10-roc-optiq
Complete the following post-installation steps:
Configure environment variables so that ROCm Optiq is added to the
PATHvariable. There are two choices.User-specific setup:
# Optiq Environment Setup
tee --append ~/.bashrc << EOF
# BEGIN Optiq environment configuration
export OPTIQ_PATH=/opt/rocm/extras-10/rocm-optiq
export PATH=\$OPTIQ_PATH/bin:\$PATH
# END Optiq environment configuration
EOF

source ~/.bashrc
System-wide setup:
# Optiq Environment Setup
sudo tee /etc/profile.d/set-optiq-env.sh << EOF
export OPTIQ_PATH=/opt/rocm/extras-10/rocm-optiq
export PATH=\$OPTIQ_PATH/bin:\$PATH
EOF

sudo chmod +x /etc/profile.d/set-optiq-env.sh
source /etc/profile.d/set-optiq-env.sh
Verify Your Installation:
roc-optiq -v
Install using dnf#
Register the ROCm Optiq repository:
sudo tee /etc/yum.repos.d/amdrocm-optiq.repo <<EOF
[amdrocm-optiq]
name=AMD ROCm Optiq Repository
baseurl=https://stable.repo.amd.com/rocm/extras/rocoptiq/packages/rhel8/x86_64
enabled=1
gpgcheck=1
gpgkey=https://stable.repo.amd.com/rocm/gpg/packages.gpg
priority=50
EOF
sudo dnf clean all
Install the ROCm Optiq package.
sudo dnf install amdrocm10-roc-optiq
Complete the following post-installation steps:
Configure environment variables so that ROCm Optiq is added to the
PATHvariable. There are two choices.User-specific setup:
# Optiq Environment Setup
tee --append ~/.bashrc << EOF
# BEGIN Optiq environment configuration
export OPTIQ_PATH=/opt/rocm/extras-10/rocm-optiq
export PATH=\$OPTIQ_PATH/bin:\$PATH
# END Optiq environment configuration
EOF

source ~/.bashrc
System-wide setup:
# Optiq Environment Setup
sudo tee /etc/profile.d/set-optiq-env.sh << EOF
export OPTIQ_PATH=/opt/rocm/extras-10/rocm-optiq
export PATH=\$OPTIQ_PATH/bin:\$PATH
EOF

sudo chmod +x /etc/profile.d/set-optiq-env.sh
source /etc/profile.d/set-optiq-env.sh
Verify Your Installation:
roc-optiq -v
Install using tarball#
Install system dependencies:
sudo apt install libvulkan1 libgl1 libopengl0 libdbus-1-3 libc6 libstdc++6
Download the ROCm Optiq tarball:
wget https://stable.repo.amd.com/rocm/extras/rocoptiq/tarball/amdrocm10-roc-optiq-1.1.0.2-Linux.tar.gzExtract the tarball:
# Set Optiq installation path
OPTIQ_INSTALL_PATH="$HOME/roc-optiq"

# Extract to the extras directory
mkdir -p $OPTIQ_INSTALL_PATH
tar -xzf amdrocm10-roc-optiq-1.1.0.2-Linux.tar.gz -C $OPTIQ_INSTALL_PATH --strip-components=5
Note
OPTIQ_INSTALL_PATHcan be changed to your preferred location. For example,$HOME/roc-optiq.Complete the following post-installation steps:
Configure environment variables so that ROCm Optiq is added to the
PATHvariable. There are two choices:User-specific setup:
# Optiq Environment Setup
tee --append ~/.bashrc << EOF
# BEGIN Optiq environment configuration
export OPTIQ_PATH="$HOME/roc-optiq"
export PATH=\$OPTIQ_PATH/bin:\$PATH
# END Optiq environment configuration
EOF

source ~/.bashrc
System-wide setup:
# Optiq Environment Setup
sudo tee /etc/profile.d/set-optiq-env.sh << EOF
export OPTIQ_PATH="$HOME/roc-optiq"
export PATH=\$OPTIQ_PATH/bin:\$PATH
EOF

sudo chmod +x /etc/profile.d/set-optiq-env.sh
source /etc/profile.d/set-optiq-env.sh
Verify your installation:
roc-optiq -v
Install using tarball#
Install system dependencies:
sudo dnf install vulkan-loader mesa-libGL libglvnd-opengl dbus-libs glibc libstdc++
Download the ROCm Optiq tarball:
wget https://stable.repo.amd.com/rocm/extras/rocoptiq/tarball/amdrocm10-roc-optiq-1.1.0.2-Linux.tar.gzExtract the tarball:
# Set Optiq installation path
OPTIQ_INSTALL_PATH="$HOME/roc-optiq"

# Extract to the extras directory
mkdir -p $OPTIQ_INSTALL_PATH
tar -xzf amdrocm10-roc-optiq-1.1.0.2-Linux.tar.gz -C $OPTIQ_INSTALL_PATH --strip-components=5
Note
OPTIQ_INSTALL_PATHcan be changed to your preferred location. For example,$HOME/roc-optiq.Complete the following post-installation steps:
Configure environment variables so that ROCm Optiq is added to the
PATHvariable. There are two choices:User-specific setup:
# Optiq Environment Setup
tee --append ~/.bashrc << EOF
# BEGIN Optiq environment configuration
export OPTIQ_PATH="$HOME/roc-optiq"
export PATH=\$OPTIQ_PATH/bin:\$PATH
# END Optiq environment configuration
EOF

source ~/.bashrc
System-wide setup:
# Optiq Environment Setup
sudo tee /etc/profile.d/set-optiq-env.sh << EOF
export OPTIQ_PATH="$HOME/roc-optiq"
export PATH=\$OPTIQ_PATH/bin:\$PATH
EOF

sudo chmod +x /etc/profile.d/set-optiq-env.sh
source /etc/profile.d/set-optiq-env.sh
Verify your installation:
roc-optiq -v
Install using tarball#
Install system dependencies:
sudo dnf install vulkan-loader mesa-libGL libglvnd-opengl dbus-libs glibc libstdc++
Download the ROCm Optiq tarball:
wget https://stable.repo.amd.com/rocm/extras/rocoptiq/tarball/amdrocm10-roc-optiq-1.1.0.2-Linux.tar.gzExtract the tarball:
# Set Optiq installation path
OPTIQ_INSTALL_PATH="$HOME/roc-optiq"

# Extract to the extras directory
mkdir -p $OPTIQ_INSTALL_PATH
tar -xzf amdrocm10-roc-optiq-1.1.0.2-Linux.tar.gz -C $OPTIQ_INSTALL_PATH --strip-components=5
Note
OPTIQ_INSTALL_PATHcan be changed to your preferred location. For example,$HOME/roc-optiq.Complete the following post-installation steps:
Configure environment variables so that ROCm Optiq is added to the
PATHvariable. There are two choices:User-specific setup:
# Optiq Environment Setup
tee --append ~/.bashrc << EOF
# BEGIN Optiq environment configuration
export OPTIQ_PATH="$HOME/roc-optiq"
export PATH=\$OPTIQ_PATH/bin:\$PATH
# END Optiq environment configuration
EOF

source ~/.bashrc
System-wide setup:
# Optiq Environment Setup
sudo tee /etc/profile.d/set-optiq-env.sh << EOF
export OPTIQ_PATH="$HOME/roc-optiq"
export PATH=\$OPTIQ_PATH/bin:\$PATH
EOF

sudo chmod +x /etc/profile.d/set-optiq-env.sh
source /etc/profile.d/set-optiq-env.sh
Verify your installation:
roc-optiq -v
Download the
*-macos.zipof the latest ROCm Optiq release from the ROCm Optiq GitHub Releases page.Unzip it, then drag and drop
roc-optiq.appfrom the extracted folder to theApplicationsfolder.Launch ROCm Optiq from Applications.
Settings, logs, and presets are stored at ~/Library/Application Support/ROCm-Optiq/.
Uninstall#
Go to Settings > Apps > Installed apps, select ROCm Optiq, and click Uninstall.
Uninstall using apt#
Remove the installed package:
sudo apt autoremove amdrocm10-roc-optiq
Remove ROCm Optiq repositories:
# Remove ROCm Optiq repositories
sudo rm /etc/apt/sources.list.d/amdrocm-optiq.sources

# Clear the cache and clean the system
sudo rm -rf /var/cache/apt/*
sudo apt clean
sudo apt update
Remove ROCm Optiq environment configuration:
User-specific setup:
If you opted for a user-specific setup during the installation process, remove the ROCm Optiq environment configuration block you added to your shell configuration file (
~/.bashrc).System-wide setup:
If you opted for a system-wide setup during the installation process, remove the ROCm Optiq environment variables.
sudo rm -f /etc/profile.d/set-optiq-env.sh
Uninstall using dnf#
Remove the installed package:
sudo dnf remove amdrocm10-roc-optiq
Remove ROCm Optiq repositories:
# Remove ROCm Optiq repositories
sudo rm /etc/yum.repos.d/amdrocm-optiq.repo

# Clear the cache and clean the system
sudo rm -rf /var/cache/dnf
sudo dnf clean all
Remove ROCm Optiq environment configuration:
User-specific setup:
If you opted for a user-specific setup during the installation process, remove the ROCm Optiq environment configuration block you added to your shell configuration file (
~/.bashrc).System-wide setup:
If you opted for a system-wide setup during the installation process, remove the ROCm Optiq environment variables.
sudo rm -f /etc/profile.d/set-optiq-env.sh
Uninstall using dnf#
Remove the installed package:
sudo dnf remove amdrocm10-roc-optiq
Remove ROCm Optiq repositories:
# Remove ROCm Optiq repositories
sudo rm /etc/yum.repos.d/amdrocm-optiq.repo

# Clear the cache and clean the system
sudo rm -rf /var/cache/dnf
sudo dnf clean all
Remove ROCm Optiq environment configuration:
User-specific setup:
If you opted for a user-specific setup during the installation process, remove the ROCm Optiq environment configuration block you added to your shell configuration file (
~/.bashrc).System-wide setup:
If you opted for a system-wide setup during the installation process, remove the ROCm Optiq environment variables.
sudo rm -f /etc/profile.d/set-optiq-env.sh
Uninstall tarball installation#
Remove the installation directory:
Important
The following command assumes you had set
OPTIQ_INSTALL_PATHto$HOME/roc-optiqduring installation. If you have chosen a different installation directory, remove it instead.rm -rf "$HOME/roc-optiq"
Then remove
$HOME/roc-optiq/binfrom yourPATHvariable.Remove ROCm Optiq environment configuration:
User-specific setup:
If you opted for a user-specific setup during the installation process, remove the ROCm Optiq environment configuration block you added to your shell configuration file (
~/.bashrc).System-wide setup:
If you opted for a system-wide setup during the installation process, remove the ROCm Optiq environment variables:
sudo rm -f /etc/profile.d/set-optiq-env.sh
Drag roc-optiq.app from /Applications to the Trash. Optionally remove the settings directory:
rm -rf "$HOME/Library/Application Support/ROCm-Optiq"