Installing and deploying Omniperf#
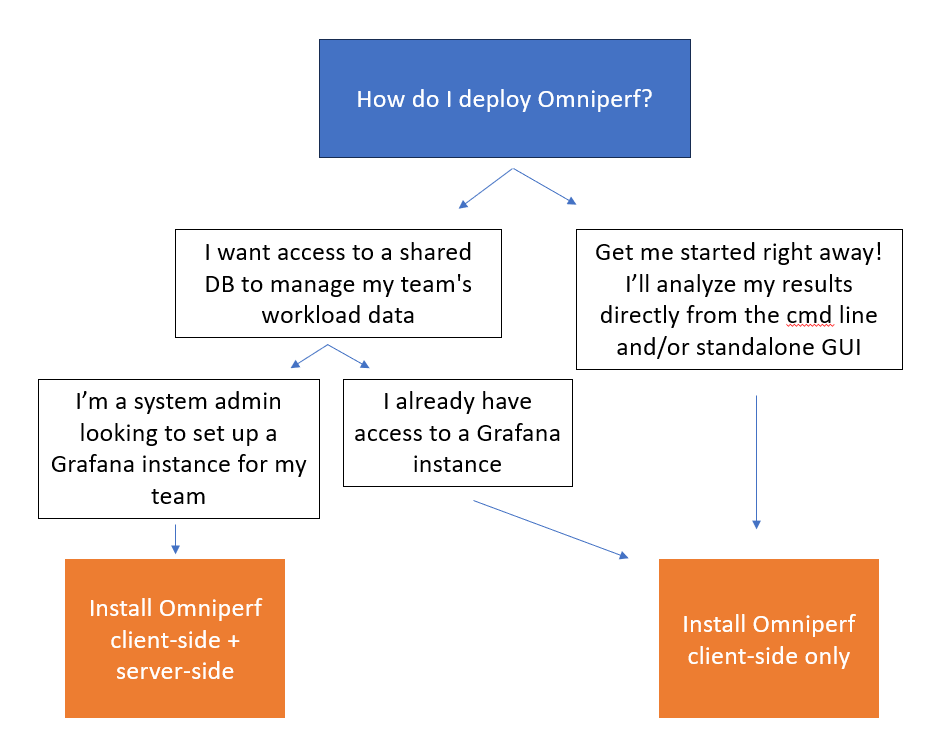
Omniperf consists of two installation components.
Omniperf core installation (client-side)
Provides the core application profiling capability.
Allows the collection of performance counters, filtering by hardware block, dispatch, kernel, and more.
Provides a CLI-based analysis mode.
Provides a standalone web interface for importing analysis metrics.
Grafana server for Omniperf (server-side) (optional)
Hosts the MongoDB backend and Grafana instance.
Is packaged in a Docker container for easy setup.
Determine what you need to install based on how you would like to interact with Omniperf. See the following decision tree to help determine what installation is right for you.

Core installation#
The core Omniperf application requires the following basic software dependencies. As of ROCm 6.2, the core Omniperf is included with your ROCm installation.
Python
>= 3.8CMake
>= 3.19ROCm
>= 5.7.1
Note
Omniperf will use the first version of Python3 found in your system’s
PATH. If the default version of Python3 is older than 3.8, you may need to
update your system’s PATH to point to a newer version of Python3.
Omniperf depends on a number of Python packages documented in the top-level
requirements.txt file. Install these before configuring Omniperf.
Tip
If looking to build Omniperf as a developer, consider these additional requirements.
|
Python packages required to build this documentation from source. |
|
Python packages required to run Omniperf’s CI suite using PyTest. |
The recommended procedure for Omniperf usage is to install into a shared file
system so that multiple users can access the final installation. The
following steps illustrate how to install the necessary Python dependencies
using pip and Omniperf into a
shared location controlled by the INSTALL_DIR environment variable.
Tip
To always run Omniperf with a particular version of python, you can create a bash alias. For example, to run Omniperf with Python 3.10, you can run the following command:
alias omniperf-mypython="/usr/bin/python3.10 /opt/rocm/bin/omniperf"
Configuration variables#
The following installation example leverages several CMake project variables defined as follows.
CMake variable |
Description |
|---|---|
|
Controls the install path for Omniperf files. |
|
Specifies an optional path to resolve Python package dependencies. |
|
Specifies an optional path for separate Omniperf modulefile installation. |
Install from source#
A typical install begins by downloading the latest release tarball available from ROCm/omniperf. From there, untar and navigate into the top-level directory.
tar xfz omniperf-v2.0.1.tar.gz
cd omniperf-v2.0.1
Next, install Python dependencies and complete the Omniperf configuration and install process.
# define top-level install path
export INSTALL_DIR=<your-top-level-desired-install-path>

# install python deps
python3 -m pip install -t ${INSTALL_DIR}/python-libs -r requirements.txt

# configure Omniperf for shared install
mkdir build
cd build
cmake -DCMAKE_INSTALL_PREFIX=${INSTALL_DIR}/2.0.1 \
        -DPYTHON_DEPS=${INSTALL_DIR}/python-libs \
        -DMOD_INSTALL_PATH=${INSTALL_DIR}/modulefiles/omniperf ..

# install
make install
Tip
You might need to
sudothe final installation step if you don’t have write access for the chosen installation path.Upon successful installation, your top-level installation directory should look like this.
$ ls $INSTALL_DIR
modulefiles  2.0.1  python-libs
Execution using modulefiles#
The installation process includes the creation of an environment modulefile for use with Lmod. On systems that support Lmod, you can register the Omniperf modulefile directory and setup your environment for execution of Omniperf as follows.
$ module use $INSTALL_DIR/modulefiles
$ module load omniperf
$ which omniperf
/opt/apps/omniperf/2.0.1/bin/omniperf

$ omniperf --version
ROC Profiler:   /opt/rocm-5.1.0/bin/rocprof

omniperf (v2.0.1)
Tip
If you’re relying on an Lmod Python module locally, you may wish to customize the resulting Omniperf modulefile post-installation to include extra module dependencies.
Execution without modulefiles#
To use Omniperf without the companion modulefile, update your PATH
settings to enable access to the command line binary. If you installed Python
dependencies in a shared location, also update your PYTHONPATH
configuration.
export PATH=$INSTALL_DIR/2.0.1/bin:$PATH
export PYTHONPATH=$INSTALL_DIR/python-libs
Install via package manager#
Once ROCm (minimum version 6.2.0) is installed, you can install Omniperf using your operating system’s native package manager using the following commands. See ROCm installation for Linux for guidance on installing the ROCm software stack.
$ sudo apt install omniperf
# Include omniperf in your system PATH
$ sudo update-alternatives --install /usr/bin/omniperf omniperf /opt/rocm/bin/omniperf 0
# Install Python dependencies
$ python3 -m pip install -r /opt/rocm/libexec/omniperf/requirements.txt
$ sudo dnf install omniperf
# Include omniperf in your system PATH
$ sudo update-alternatives --install /usr/bin/omniperf omniperf /opt/rocm/bin/omniperf 0
# Install Python dependencies
$ python3 -m pip install -r /opt/rocm/libexec/omniperf/requirements.txt
$ sudo zypper install omniperf
# Include omniperf in your system PATH
$ sudo update-alternatives --install /usr/bin/omniperf omniperf /opt/rocm/bin/omniperf 0
# Install Python dependencies
$ python3 -m pip install -r /opt/rocm/libexec/omniperf/requirements.txt
ROCProfiler#
Omniperf relies on ROCProfiler’s rocprof binary
during the profiling process. Normally, the path to this binary is detected
automatically, but you can override the path by the setting the optional
ROCPROF environment variable.