ROCm Runfile Installer#
2025-01-15
26 min read time
The ROCm Runfile Installer is a method of installing ROCm on a system with or without network or internet access. Unlike all other methods for installing ROCm, the ROCm Runfile Installer can install ROCm without using a native Linux package management system.
The key advantage of using the ROCm Runfile Installer is its offline installation support. Many system environments have network or internet access restrictions, making installation via normal package management difficult. Furthermore, some installation environments might also have general restrictions on package management usage. Therefore, the ROCm Runfile Installer lets you perform a completely self-contained ROCm software installation.
The ROCm Runfile Installer includes these features:
An optional easy-to-use user interface for configuring the installation
An optional command-line interface for the installation
Offline ROCm installation (requires the prior installation of dependencies)
Packageless ROCm install without native package management
A single self-contained installer for all ROCm software
Configurable installation location for the ROCm install
Prerequisites#
The ROCm Runfile Installer requires the following configuration:
Installation of dependency requirements for the ROCm runtime
Sufficient storage space for the installation (100 GB of free space)
A supported Linux distribution
Dependency requirements#
The ROCm components contained within the ROCm Runfile installer have a specific set of libraries, frameworks, and other elements that must be pre-installed on the system before you can use ROCm after the installation. ROCm Runfile installer users must pre-install the list of required first-level dependencies, such as Debian packages.
To install the pre-install dependencies, use one of two methods:
Manual installation
The ROCm Runfile Installer
Manual installation#
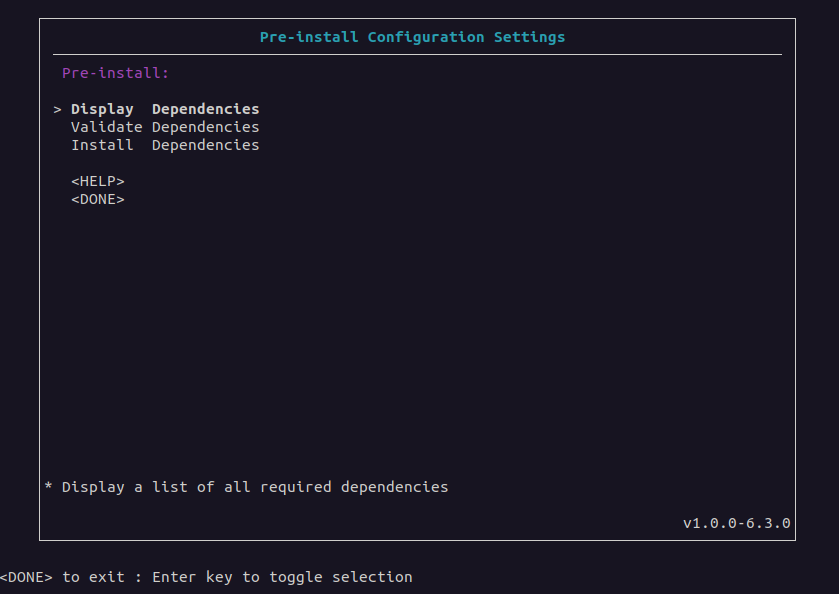
You can determine the dependent packages from the Display Dependencies option of the ROCm
Runfile Installer Pre-Install Configuration Settings menu
in the GUI or from the command line by using the deps=list rocm argument. This list indicates all packages
required for the ROCm runtime. The required libraries, frameworks, and other components
within the required packages must be present on the system when running ROCm.
Users can manually install the required packages in the list using any method.
System administrators might prefer a manual installation process when deploying ROCm across a multi-node cluster environment, where a base operating system image is prepared and applied. This base OS image might have the dependency requirements pre-installed.
ROCm Runfile Installer#
For single-system environments, users can choose to have the ROCm Runfile Installer automatically install the
dependency requirements as part of the pre-installation stage for ROCm. Any missing dependency requirements can
be installed using the Install Dependencies option of the Pre-Install Configuration Settings menu
in the GUI or from the command line using the deps=install rocm argument.
Note
A network or internet connection is required to use the ROCm Runfile Installer to install the dependency requirements.
Supported Linux distributions#
The ROCm Runfile Installer tool currently supports the following Linux distributions and versions:
Ubuntu: 22.04
Getting started#
The ROCm Runfile Installer is distributed as a self-extracting .run file.
To install ROCm, launch the installer from any directory on the system.
Downloading the ROCm Runfile Installer#
Download the ROCm Runfile Installer from repo.radeon.com using the following command:
wget https://repo.radeon.com/rocm/installer/rocm-runfile-installer/rocm-rel-<rocm-version>/<distro>/<distro-version>/<installer-file>
Substitute values specific to your installation for the following placeholders:
<rocm-version>    = ROCm version number for the installer
<distro>          = Linux distribution for the installer
<distro-version>  = Linux distribution version for the installer
<install-file>    = The installer .run file
For example, use this command to download ROCm version 6.3.1 of the ROCm Runfile Installer for Ubuntu release 22.04:
wget https://repo.radeon.com/rocm/installer/rocm-runfile-installer/rocm-rel-6.3.1/ubuntu/22.04/rocm-installer_1.0.0.60301-1~22.04.run
Running the ROCm Runfile Installer#
After downloading the ROCm Runfile Installer, run it from a terminal using GUI install or Command line install. See the sections below for more details.
You can obtain help or version information using the following installer .run file argument options:
bash rocm-installer.run help
bash rocm-installer.run version
Note
These commands use rocm-installer.run as a placeholder for the actual run file.
Throughout the guide, substitute the name of the actual .run file for rocm-installer.run.
Both the help and version commands run without extracting the installer contents.
Depending on the install method, they provide quick feedback on how to use the installer.
For all other argument options, or if no arguments are specified, the installer .run file self-extracts
to the current working directory where the .run file is executing.
The self-extraction process creates a new directory named rocm-install containing the content
and tools required for the installation. The rocm-install directory also includes a logs
directory for recording the installation process.
For more information, see Log files below.
Note
The installer self-extraction process might take a significant amount of time due to the size of the installer content and the decompression process.
Install methods#
The ROCm Runfile Installer provides two methods for running the ROCm installation:
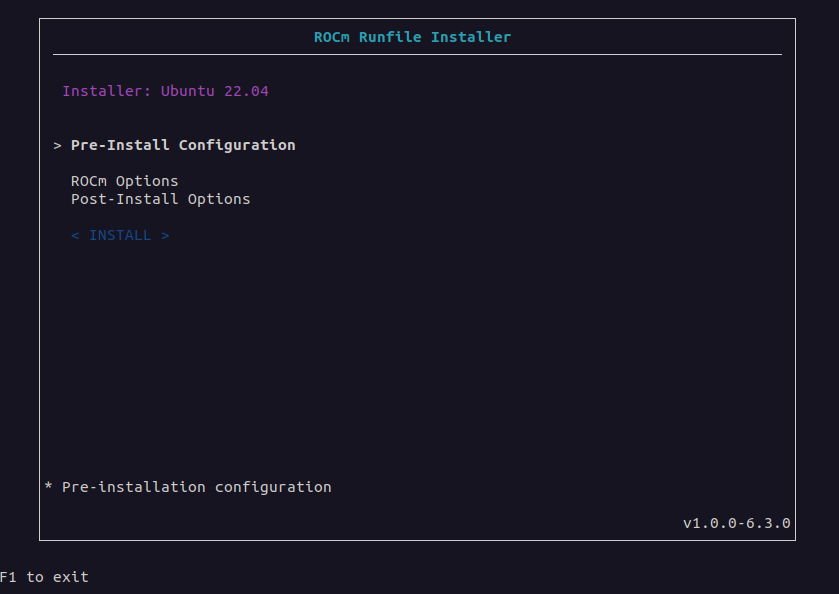
GUI install: The GUI installation includes a visual interface for configuring the ROCm installation, letting you specify the pre- and post-installation requirements. In addition, the GUI provides feedback and guidance for setting up the installation. This method is recommended for new and intermediate installer users.
Command line install: The command line interface installation method provides a direct terminal-based approach for configuring and running the ROCm installation. This method is recommended for more advanced installer users.
GUI install#
Launch the GUI-based installation of the ROCm Runfile Installer from the terminal command line without arguments as follows:
bash rocm-installer.run
GUI#
Use the Runfile Installer GUI to configure the ROCm installation, from the pre- to post-install options.
Starting from the Main menu, the user interface contains multiple menus and sub-menus for each stage of the ROCm installation process.
Using the GUI#
Start the ROCm Runfile Installer user interface from the terminal and launch the Main menu. While navigating through the user interface menus, use the Done option to return to the previous menu. Some menus have a Help option to display more information about the elements within the current menu.
Follow these steps to install ROCm:
(Optional) Install dependencies:
Enter the Pre-Install Configuration menu.
If using the installer to install missing required dependencies, select Install Dependencies.
To manually install the required dependencies, select Display Dependencies to list all the dependencies or Validate Dependencies to only list the missing dependencies on the current system. Quit the installer using DONE->F1 and separately install the required dependencies. After completing this task, restart the ROCm Runfile Installer and proceed to step 2.
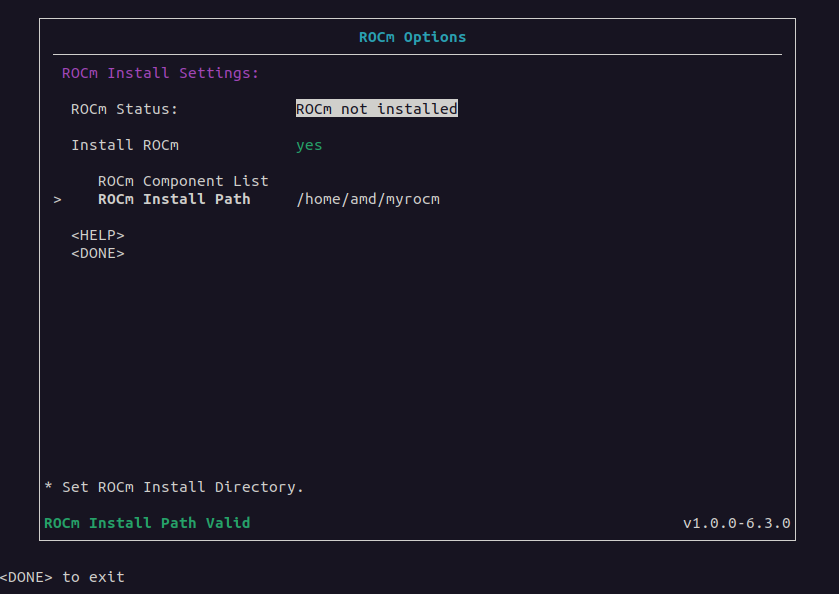
Set the ROCm options:
Enter the ROCm Options menu.
(Optional) Verify whether a previous ROCm installation exists on the system.
Set Install ROCm to yes to include ROCm components in the installation.
Leave the ROCm Install Path field set to the default location to install ROCm to
/opt/rocmor set the install location to a valid existing directory.
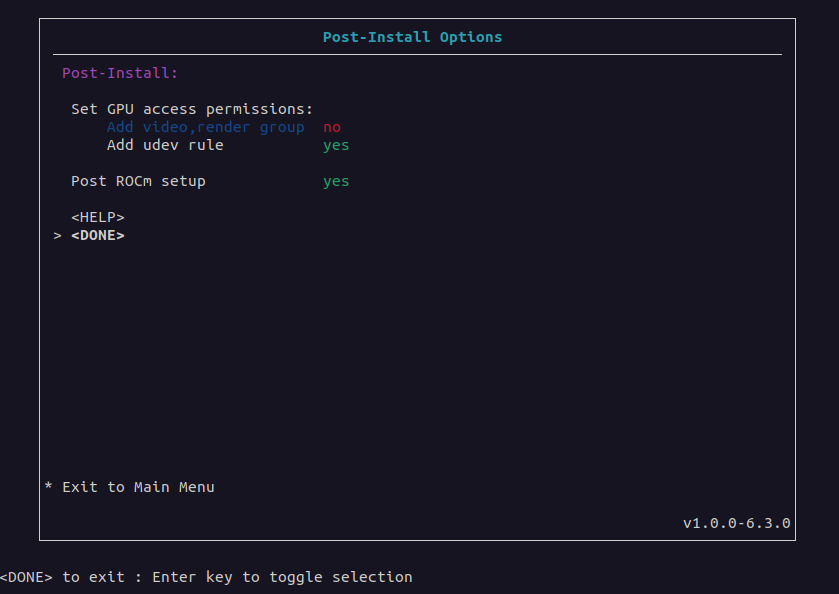
Set the post-install options:
Set the method of enabling permission for GPU access to Add video,render group or Add udev rule.
Set Post ROCm setup to yes to include post-install ROCm setup configuration.
Command line install#
The command line install interface can be used as an alternative to the menu-based ROCm Runfile Installer GUI to reduce user interaction during the installation.
Run the ROCm Runfile Installer from the terminal command line as follows:
bash rocm-installer.run <options>
The <options> parameter can be set to these options:
User help/information
help: displays information on how to use the ROCm Runfile Installer.version: displays the current version of the ROCm Runfile Installer.
Dependencies
deps=<arg>list rocm: Lists the required dependencies for the install.validate rocm: Validates which required dependencies are installed or not installed.install-only: Installs the required dependencies only.install: Installs with the required dependencies.file <file-path>: Installs with the dependencies from a dependency configuration file with path<file_path>.file-only <file-path>: Install the dependencies from a dependency configuration file with path<file_path>only.
Install
rocm: Enable ROCm components install.target=<directory>: The target directory path for the ROCm components install.
Post-install
postrocm: Run the post-installation ROCm configuration (for instance, script execution and symbolic link creation).gpu-access=<access_type><access_type>:user: Adds the current user to therender,videogroup for GPU access.all: Grants GPU access to all users on the system usingudevrules.
Uninstall
uninstall (target=<directory>): Uninstall ROCm.(
target=<directory>): Optional target directory for the ROCm uninstall.
Information/Debug
complist: List the version of ROCm components included in the installer.prompt: Run the installer with user prompts.verbose: Run the installer with verbose logging.
Note
The installer can be used with multiple <options> combinations to enable specific stages of the
ROCm install process (pre-installation and post-installation). The exception is any option that uses the
keyword -only will apply that option only and no others. Some
informational options are also single-option commands. These options are described in more detail below.
This example demonstrates how to perform a typical ROCm installation on a single target system with
the required dependencies installed, the ROCm install directory set to /myrocm, GPU access set
to udev, and with the post-install setup:
bash rocm-installer.run deps=install target="/myrocm" rocm gpu-access=all postrocm
Command line interface#
The command line interface for the ROCm Runfile Installer is based on the
<options> list provided to the installer .run file.
Dependence options#
Like the GUI Pre-Install Configuration menu, the command line interface can list,
validate, and install the required dependencies. At the command line, add the deps=<arg> option to the
list of <options> for the .run file.
deps=list rocmThis dependency option lists all the dependencies required for the
.runfile-based ROCm installation. It lists all required (Debian) packages that require pre-installation on the system for the ROCm runtime. The additionalrocmparameter is a requirement for thedeps=listoption that instructs the installer to list only the dependencies required by ROCm.Running
deps=list rocmcauses the installer to quit after listing the dependencies.Use
deps=list rocmas a single<options>parameter:bash rocm-installer.run deps=list rocm
Note
The list of required packages can be installed separately from the Runfile Installer.
deps=validate rocmThis dependency option verifies whether any of the required packages in the dependency list are already installed on the system running the command. The output is a list of any missing dependency packages for the ROCm runtime that require installation. The additional
rocmparameter is a requirement for thedeps=validateoption to list only the missing ROCm required dependencies.Running
deps=validate rocmcauses the installer to quit after listing the missing dependencies.Use
deps=validate rocmas a single<options>parameter:bash rocm-installer.run deps=validate rocm
Note
The list of missing packages can be installed separately from the Runfile Installer.
deps=installThis dependency option validates and installs any required packages in the dependency list for ROCm that are missing on the system running the command. This dependency option is not a single
<options>parameter and can be added to a list of other options for the installer. Thedeps=installoption expects therocm <options>parameter to also be present in the options list to enable the pre-installation of required dependencies before the Runfile Installer installs ROCm.For example, to install the dependencies and ROCm, the command line is as follows:
bash rocm-installer.run deps=install rocm
Note
The installer can be set to only install the ROCm dependencies and then quit. In this case, add
-onlyto thedeps=installoption:bash rocm-installer.run deps=install-only rocm
deps=file <file-path>This dependency option specifies the name of a input file for the installer. This file contains a custom list of dependency packages to install. The list must have as the same format as the output of the
deps=listoption. Specify each (Debian) package by name, one package per line.<file-path>is the second parameter, which indicates the absolute path to the dependency file.For example, to install the dependencies listed in a file named
mydeps.txtas part of a ROCm install, the command line is as follows:bash rocm-installer.run deps=file /home/amd/mydeps.txt
Note
The installer can be set only to install the dependencies file and then quit. In this case, add
-onlytodeps=file.bash rocm-installer.run deps=file-only /home/amd/mydeps.txt
Install options#
Like the GUI ROCm Options menu, the ROCm Runfile Installer can be configured to install ROCm, which can be installed in a specific location.
rocmAt the command line, add the
rocmoption to enable ROCm installation.Note
This option must be in the list of
.run <options>for ROCm component installation.For example, to install ROCm with no other options, the command line is as follows:
bash rocm-installer.run rocm
target=<directory>This install option is used to set the target directory where ROCm will be installed.
When
target=<directory>is not specified in the<options>list, the installer uses a default installation path for ROCm. For the command line interface method, the default install directory is$PWD. This is the current working directory where you launched the installer. In this configuration, the installer creates a new directory inside$PWDnamedrocmand installs all ROCm components to this location.The user can change the default location and set the ROCm component installation directory using the
target=<directory>option. The<directory>argument must be a valid and absolute path to a directory on the system executing the ROCm Runfile Installer.For example, to install ROCm to the usual
/opt/rocmlocation, the command line is as follows:bash rocm-installer.run target="/" rocm
To install ROCm to a directory called
amd/myrocmin the$USERdirectory, the command line is as follows:bash rocm-installer.run target="/home/amd/myrocm rocm"
Post-install options#
Similar to the GUI Post-Install Options menu, the post-install options can configure the ROCm Runfile Installer
to apply additional post-installation options after completing the installation.
At the command line, add one or more of the post-installation options to the <options> list for the .run file.
postrocmThis post-install option applies any post-installation configuration settings for ROCm following installation on the target system. The post-installation configuration includes any symbolic link creation, library configuration, and script execution required to use the ROCm runtime.
To enable the ROCm post-install configuration, add
postrocmto the<options>list at the command line.For example, to enable ROCm post-installation configuration for a ROCm installation to the
/directory, the command line is as follows:bash rocm-installer.run target="/" rocm postrocm
Note
Adding the
postrocmoption to the<options>list is highly recommended to guarantee proper functioning of the ROCm components and applications.gpu-access=<access_type>This post-install option sets the GPU resource access permissions. ROCm runtime libraries and applications might need access to the GPU. This requires setting the access permission to the
videoandrendergroups using the<access_type>.If the ROCm installation is for a single user, then set the
<access_type>for thegpu-accessoption touser.For example, to add the current user (
$USER) to thevideo,rendergroup for GPU access for a ROCm installation, the command line is as follows:bash rocm-installer.run rocm gpu-access=user
In cases where a system administrator is installing ROCm for multiple users, they might want to enable GPU access permission for all users. For this case, set the
<access_type>for thegpu-accessoption toall:bash rocm-installer.run rocm gpu-access=all
Note
Adding the
gpu-accessoption to the<options>list is recommended for using ROCm. A typical ROCm installation includes both thepostrocmoption and one of thegpu-accesstypes.
Uninstall options#
This option configures the ROCm Runfile Installer to uninstall a previous ROCm installation.
uninstall (target=<directory>)The parameter
target=<directory>is optional for theuninstalloption. If it’s set, the uninstall looks for a pre-existing ROCm installation at the specified directory path and attempts to remove it.To uninstall ROCm from the default location (
$PWD/rocm), use the following command line:bash rocm-installer.run uninstall
Note
This command matches the case where ROCm was installed without the
target=<directory>option. To uninstall ROCm from a specific location, appendtarget=<directory>. For example, if ROCm was previously installed to/home/amd/myrocm, use the following command line:bash rocm-installer.run uninstall target="/home/amd/myrocm"
Note
The uninstall option can only remove ROCm if it was installed using the ROCm Runfile Installer. Traditional package-based ROCm installs will not be removed.
Information and debug options#
The ROCm Runfile Installer command line interface includes options for information output or debugging.
complistThis information option lists the version of each ROCm component included in the installer. The
complistoption causes the Runfile Installer to quit after listing the ROCm components.Use
complistas a standalone<options>parameter:bash rocm-installer.run complist
promptThis debug option enables user prompts in the installer. At specific, critical points of the installation process, the installer halts execution and prompts the user to either continue with the install or exit.
verboseThis debug option enables verbose logging during ROCm Runfile Installer execution.
For example, to install ROCm with user prompts and verbose logging, the command line is as follows:
bash rocm-installer.run target="/" rocm prompt verbose
Log files#
By default, the ROCm Runfile Installer GUI and command line interfaces record the output execution in log files.
These log files are created in the rocm-installer/logs directory.
The rocm-installer directory is created when the ROCm Runfile Installer self-extracts
to the current working directory where it is being executed.


